TechTarget.com/searchitchannel
https://www.techtarget.com/searchitchannel/feature/Troubleshooting-Windows-7-hardware-and-performance-issues
Troubleshooting Windows 7 hardware and performance issues
By null
Solutions provider takeaway: This chapter excerpt provides information on troubleshooting Windows 7 hardware and performance issues. You will get an inside look into the top ways to deal with hardware problems and error messages as well as how to use the troubleshooting tools listed under Windows 7 System Recovery Options.
About the book:
This chapter excerpt on Troubleshooting Hardware and Performance (download PDF) is taken from the Windows 7 Bible. This book provides information a solutions provider needs to know on Windows 7, including new desktop features and tips on performance tuning. Learn how take your customers step-by-step through a Windows 7 installation or upgrade.
This chapter discusses some common problems and their solutions for hardware on your system including the normal components of a computer. Additionally, information for troubleshooting Bluetooth connectivity is included. Finally, some information for troubleshooting general performance issues is addressed.
First Aid for Troubleshooting Hardware
Whenever you have a hardware problem that's causing a device to misbehave or just not work at all, finding an updated driver will usually be your best bet. But even before you do that, you might want to try Windows built-in Troubleshooting tools to see if they can resolve the problem.
New Feature:
Windows 7 integrates troubleshooting components into a single applet in the Control Panel,
replacing the Help and Support troubleshooting tools in previous versions.
To get help on programs, hardware, and drivers, open the Troubleshooting applet from the Control Panel (Figure 50-1). Each of the items in this Control Panel applet provides a troubleshooting wizard that can automatically search for, detect, and potentially fix problems. The applet offers the following groups:
- Programs: Launch the Program Compatibility Wizard, which enables you to apply settings to programs to make them run as if they were running in an earlier version of Windows. For example, you can potentially run a Windows 98 program under Windows 7 by configuring its compatibility settings for Windows 98. This group also includes items for troubleshooting printers, Media Player, and Internet Explorer.
-
Figure 50-1
The Troubleshooting applet provides options for troubleshooting hardware and driver issues.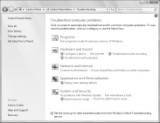
- Hardware and Sound: Use the Hardware and Sound item to scan for hardware changes and troubleshoot problems with general devices, printers, network adapters, and audio devices.
- Network and Internet: Troubleshoot problems connecting to the Internet or accessing shared files and folders on a local area network. Also troubleshoot Homegroup, incoming network connections, and DirectAccess.
- Appearance and Personalization: Troubleshoot problems with the Windows Aero desktop visual effects (such as transparent windows).
- System and Security: Troubleshoot problems with Windows Update, modify power settings, check for computer performance issues, and run maintenance tasks including cleaning up unused files and shortcuts. Also check search and indexing problems, and adjust performance settings.

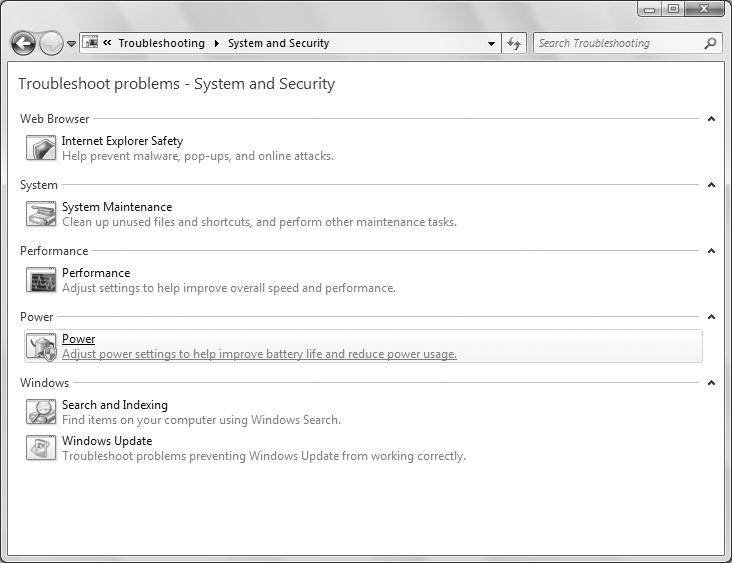
The Troubleshooting applet lists only some of the items for each category. Click the group name (such as Hardware and Sound or Network and Internet) to see all of the troubleshooting tools for that category. Figure 50-2, for example, shows the System and Security category.
Tip:
Make sure to leave enabled the option at the bottom of the Troubleshooting window, Get the Most
Up-to-Date Troubleshooters from the Windows Online Troubleshooting Service, to allow Windows to
update the troubleshooters as new or modified ones become available.
Figure 50-2
The System and Security category.
A second alternative is to troubleshoot from the hardware device's Properties dialog box in Device Manager. To open Device Manager, tap, type dev, and click Device Manager. Or click the Start button, right-click Computer, and choose Properties. Then click the Device Manager link on the left side of the screen. In Device Manager:
- Right-click the name of the device that's causing problems and choose Properties.
- If the device shows an error in the Device Manager (Figure 50-3), use that information to begin troubleshooting. For example, if Device Manager indicates that there is no driver installed, try installing or reinstalling the device's driver.
- If needed, use the options on the Driver tab to reinstall the drivers for the device. You can also disable the device from this tab and eliminate potential conflicts with other devices.
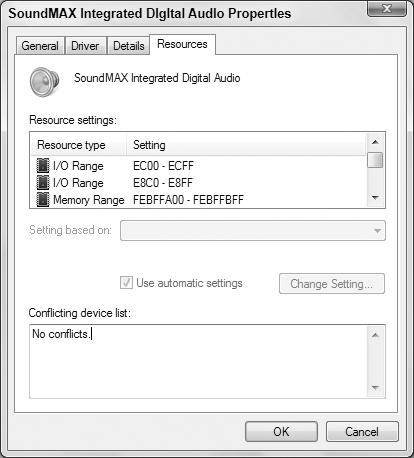
- On the Resources tab (Figure 50-4), check for a conflict message under Conflicting Device List and resolve problems by reassigning resources to the conflicting devices, or by disabling one of them. Note that not all hardware devices will have a Resources tab.
Tip:
If you've made a hardware change but Windows hasn't noticed the change, open Device Manager and
choose Action ➪ Scan for Hardware Changes to have Windows rescan the system. For example, if you
have an external modem that was turned off when you turned on the computer, rescanning should cause
Windows to redetect the modem after you have turned it on.
Figure 50-3
Use Device Manager to help troubleshoot hardware problems.
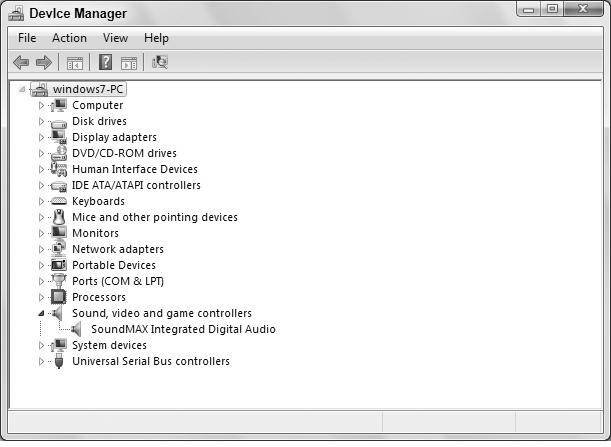
Figure 50-4
The Resources tab.
Dealing with Error Messages
Error messages come in all forms, from simple warnings to the stop errors and ''the blue screen of death,'' which causes the computer to stop dead in its tracks. The more serious errors are often accompanied by one or more of the following pieces of information:
- An error number: An error number will often be a hexadecimal number in the format 0x00000xxx where the italicized numbers could be any numbers in the message.
- Symbolic error name: Symbolic error names are usually shown in all uppercase with underlines between words, such as PAGE_FAULT_IN_NONPAGED_AREA.
- Driver details: If a device driver caused the problem, you might see a filename with a .sys extension in the error message.
- Troubleshooting info: Some errors will have their own built-in troubleshooting advice, or a Help button. Use that information to learn more about what went wrong.
Whenever you get an error message that you can't solve just by reading the advice presented on the screen, go to http://support.microsoft.com and search for the error number, or the symbolic error name, the driver name, or some combination of words in the text or troubleshooting of the error message.
If searching Microsoft's support site doesn't do the trick, consider searching the entire Internet using Google or Bing. You never know, someone out there may have had the same problem and posted the solution somewhere on the Internet. When using a search engine, provide as much detail as possible to get the best results for your problem.
Tip:
Odd as it might seem, a Google search will often turn up pages on Microsoft's own support site that
can be difficult to find when searching at the Microsoft site. You can include
''site:support.microsoft.com'' in the search criteria in Google to help narrow down your search
results to the Microsoft site.
Performing a Clean Boot
The biggest problem with hardware errors is that even a tiny error can have seemingly catastrophic results, like suddenly shutting down the system and making it difficult to get the system started again. Clean booting can also help with software problems that prevent the computer from starting normally or cause frequent errors.
Not for the technologically challenged, this procedure is best left to more experienced users who can use it to diagnose the source of a problem that's preventing the computer from starting normally. The procedure for performing a clean boot is as follows:
Note:
A clean boot is not the same as a clean install. During a clean boot, you may temporarily lose some
normal functionality. But once you perform a normal startup, you should regain access to all your
programs and documents, and full functionality.
1. Close all open programs and save any work in progress.
2. At the Windows desktop, click Start and enter msconfig.
3. The System Configuration Utility opens.
4. On the General tab, choose Selective Startup and make sure the Load Startup Items check box is cleared.
5. Click the Services tab.
6. Select Hide All Microsoft Services and click the Disable All button.
7. Click OK and click Restart to reboot.
To return to normal startup after diagnosis, open the System Configuration Utility. On the Services tab, click Enable All. On the General tab, choose Normal Startup and click the OK button.
Using the System Recovery Options
For more severe problems that require repairing an existing Windows 7 installation, troubleshooting startup issues, system and complete PC restoration, using Windows Memory Diagnostic Tool, or getting to a command prompt, you'll need to use the System Recovery Options. This method should only be used by experienced users who can perform such tasks from a command prompt.
To boot from the Windows disc, first make sure that the drive is enabled as a boot device in the BIOS with a higher priority than any hard drives. Insert the Windows disc into the drive. Restart the computer and follow these steps:
1. During the POST, watch for the Press Any Key to Boot from CD or DVD prompt, and tap a key.
2. After all files load from the disc, click the Next button on the page that is prompting for language, currency, and keyboard type.
3. On the next page, click the Repair Your Computer link near the bottom of the page.
4. Windows will bring up the System Recovery Options dialog box, which looks for an existing installation of Windows 7. If your system requires special hard drive controller drivers, you can click the Load Drivers button so your installation of Windows 7 can be located. If you see your version of Windows 7 in the list box, select it and click the Next button.
5. The next window shows all of your options for recovery.
The System Recovery Options window provides different troubleshooting tools based on your set of circumstances:
- Startup Repair: Use this option if your system won't start up. This could be for any number of reasons including a bad or misconfigured driver, an application that attempts to start at startup but causes the system to hang, or a faulty piece of hardware.
- System Restore: System Restore restores back to a designated restore point. By default, Windows is making restore points of your computer that store the state of your system. You'll be able to choose a restore point for your system from a previous day when you knew your system was performing correctly. The System Restore option will not alter any of your personal data or documents.
- System Image Recovery: For this feature to work, you would need to have done a backup in the past. Windows will search hard drives and DVDs for valid backups to restore from. See Chapter 33 for information on backing up your system.
- Windows Memory Diagnostic: Some of the issues you may be experiencing may be the result of memory problems. Windows Memory Diagnostic Tool will perform tests against the RAM in your system to see if there are any problems. For this tool to run, click the link, which will prompt you to restart your computer now and check for problems or to check for problems the next time you restart.
- Command Prompt: The Command Prompt option is for experienced users who need to access the file system and run commands specific to Windows 7. Only choose this option if you're sure you need it, and be careful when using the Command Prompt.
When you're finished using the System Recovery Options, you can click either Shut Down or Restart to exit. For additional information on System Recovery Options, use Help and Support and search on System Recovery Options.
Troubleshooting Performance Problems
About the author:
Jim Boyce is a former contributing editor for Windows Magazine and has written or contributed to more than 50 books. He has also authored Microsoft Office Outlook 2007 Inside Out.
This section covers basic troubleshooting in terms of using Task Manager and Control Panel tools to monitor and troubleshoot performance. Keep in mind that hardware and software go hand in hand, so performance problems can be caused by either one. For example, if a device is malfunctioning or improperly configured, it can lead to performance problems. Likewise, having too many programs running at one time can eat up valuable memory and processor time, also foiling performance. So, don't assume that performance problems are always caused by hardware or software -- the problem could well be one, the other, or both.
Figure 50-5
Task Manager sorting the processes based on CPU percentage.

If your CPU Usage chart consistently runs at a high percentage in Task Manager, you may be running two or more firewalls. Most likely, you'll need to disable and remove any third-party firewalls, or disable the built-in Windows Firewall.
Also, scan your system for viruses, adware, and other malware, and remove all that you can find to eliminate their resource consumption.
If neither of the previous suggestions fixes your problem, you may need to see if an individual process is keeping your system overly busy. To do this, use one of these methods to start the Task Manager:
- With Windows running and while logged on to the computer, press Ctrl+Alt+Del and click Start Task Manager.
- Click Start and type taskmgr to locate and start Task Manager.
- Right-click the taskbar and click Start Task Manager.
Once you're in Task Manager, click the Processes tab and then click Show Processes from All Users. This will list all of the processes running on the system. Next, sort the information in the grid based on CPU, as shown in Figure 50-5. Just click the CPU column to sort by CPU utilization.
Tip:
If a task is spiking CPU utilization but not staying at a consistently high rate, first identify
the processes by sorting by CPU, then when you've determined which processes are using the most CPU
time, sort by process name to watch how those processes are using the CPU.
You should be able to identify the process that is using the majority of your CPU. You have a couple of options at this point:
- Use the name of the process under the Image Name column to search the Internet to see if the process is a valid file or a potential virus. If it is a virus of some form, you'll need to update your virus definitions and rerun your virus scan. If it does not appear to be a virus, you'll need to contact the vendor who provided the software to see if they can help troubleshoot the problem.
- Short term, you can right-click the process and choose End Process. Sometimes applications run into problems or situations the developer never imagined and the process gets stuck in a loop, which taxes the CPU. Restarting the application will reset the process, hopefully avoiding the circumstances that put the application in a loop. In addition to using Task Manager,Windows 7 includes several other utilities located in the Performance Information and Tools Control Panel applet (see Chapter 51).
Wrap-Up
Many thousands of hardware devices are available that you can use with Windows, and no one rule that applies to troubleshooting all of them. So you'll likely have to consider all of your resources. Be sure to check the manual that came with the hardware device first. If that doesn't work, the device manufacturer's Web site will likely be your next best bet.
When you need to ask a question, post a question in the appropriate newsgroup in Microsoft Communities.
Printed with permission from Wiley Publishing Inc. Copyright 2009. The Windows 7 Bible by Jim Boyce. For more information about this title and other similar books, please visit Wiley Publishing Inc.
10 Mar 2010