
Murrstock - stock.adobe.com
How to create snapshots for Azure VMs and managed disks
VM snapshots are critical in the event of a system failure, as seen in the CrowdStrike outage in 2024. Follow these step-by-step examples to create Azure snapshots, as well as best practices.

Snapshots are a trusted way to save a point-in-time copy of a virtual machine that users can easily revert to when needed. In the recent CrowdStrike global incident, the best recovery process involved snapshotting the impacted boot disk, attaching it to a working VM, deleting the impacted CrowdStrike file and then re-attaching the updated snapshot.
In Microsoft Azure, snapshots are not the same as what a seasoned on-site administrator might expect. Admins can't revert a VM to a snapshot with just a few clicks using standard Azure tools as they would on-premises for tools such as VMware, Hyper-V or ProxMox. To use Azure snapshots, administrators will need to build a new Azure machine and use the snapshot disk. That might sound scary but it's quite simple. Unlike traditional snapshots, Azure snapshots can be used to create new VMs. This is useful for testing and one-off backups.
In this tutorial, you will learn:
- How to create a snapshot with Azure Portal.
- How to create a snapshot with PowerShell.
- How to create a snapshot with Azure CLI.
- How to create an Azure managed disks snapshot.
Learn how to create and use Azure VM snapshots for custom point-in-time copies.
What are Azure VM snapshots?
Azure snapshots exist as point-in-time copies to ensure the administrator has a good copy of the VM disks. Azure snapshots can also be cloned into additional VMs. This is how scale sets work; one snapshotted disk is cloned into all the VMs in the set.
Best practices for Azure VM snapshots
Keep these best practices in mind when creating and using Azure snapshots:
- Power off the machine. Where possible, create the Azure snapshot when the machine is powered off. This makes the snapshot more consistent as there is no I/O activity on a powered-off VM. This is considered best practice.
- Perform regular deletions. Don't keep snapshots for longer than needed. They cost money.
- Don't use snapshots as a long-term backup strategy. Instead, use Azure Backup. It doesn't require human interaction, which reduces human error and other risks. There are much better alternatives for backup now within the Azure cloud infrastructure than when this article was originally written.
- Enable immutability. More importantly, it is possible to enable immutability so that your backups cannot easily be tampered with. More information can be found at this Microsoft site
- Use snapshots for testing. They can create an exact copy of the production server, though there are better ways to do this using tools such as Ansible or Puppet, where the servers are built to a standard rather than using a snapshot.
If numerous upgrades are planned against multiple different servers, it might be more prudent to consider using Azure Pipelines to run all the setup requirements, such as snapshot and disk addition, before the upgrade.
This reduces the risk of administrators entering the snapshot details incorrectly before running the script. Performing a snapshot is a non-disruptive task that shouldn't cause issues under normal circumstances, other than potentially powering off for the snapshot. It also keeps the process uniform and consistent, so administrators can more granularly control who can run the pipeline.
Azure VM snapshot use cases
IT teams can use an Azure snapshot to complete the following tasks:
- Create a custom backup.
- Restore and rebuild a VM.
- Begin disaster recovery.
- Overwrite OS disks without recreating a VM.
- Copy a VM.
- Troubleshoot VM issues.
Azure incremental snapshots
Another option is incremental snapshots, which are used in addition to full snapshots. They can apply to Linux VMs, Windows VMs, flexible scale sets and uniform scale sets. They are point-in-time backups for managed disks that capture only changes -- referred to as delta changes -- since the last snapshot was taken rather than copying the entire disk each time. Since there are only delta changes, storage needs are reduced, which translates into cost savings. Additionally, since less data is saved, the backup and recovery process is faster.
The benefits of incremental snapshots include:
- Storage optimization. Users only need to store the changes between snapshots, rather than complete disk copies, which reduce the storage requirements.
- Enhanced performance. With delta changes, there is less data to process during both backup and recovery operations, so these operations are completed faster.
- Cost efficiency. The reduced storage requirement directly translates to lower costs.
Retention Flexibility: The storage efficiency enables organizations to maintain more recovery points without proportional increases in storage costs, enhancing disaster recovery capabilities.
How do I create a snapshot with Azure Portal?
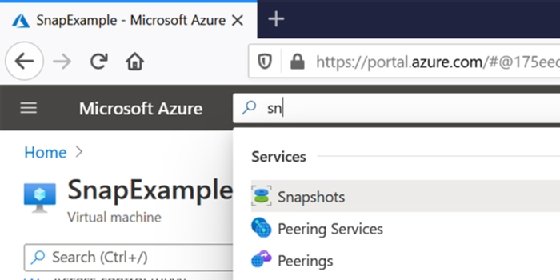
To create an Azure VM snapshot, navigate to the Azure Portal and select Create a resource. Use the search function and type in "snap" to take a basic snapshot. This will highlight the snapshot blade. Click on the link to open the required blade, as shown in Figure 1.
Click the Add button to create the new Azure snapshot. Once the snapshot wizard is open, select the following properties for the snapshot:
- Select the resource group to which the server belongs.
- Give the snapshot a name.
- Select which disks are needed. Select all the disks to create the snapshot as an impromptu backup.
Finish by clicking Review and create.
How do I create a snapshot with PowerShell?
Admins can also create snapshots with PowerShell. They'll need to set several variables, call the New-AzSnapshot and pass those variables as parameters. This approach requires admins to install the Azure PowerShell plugin.
Microsoft offers a sample script for handling this task in PowerShell. To run it for VMs, just replace the first three variables in the first step. Users will have to address additional configuration variables to create the new snapshot on the last command.
The following code, provided by Microsoft, shows how to copy the VHD disk and create the snapshot configuration. Follow these four steps.
Step 1. Set parameters
$resourceGroup = 'MyTTExample'
$location= 'southcentralus'
$vmName = "SnapExample"
$snapshotName = 'ExampleSnap'
Step 2. Retrieve the VM
$vm = Get-AzVM `
-ResourceGroupName $resourceGroup
-Name $vmName
Step 3. Create the snapshot configurations
$snapshot = New-AzSnapshotConfig `
-SourceUri $vm.StorageProfile.OsDisk.ManagedDisk.Id `
-Location $location `
-CreateOption copy
Step 4. Take the snapshot
New-AzSnapshot `
-Snapshot $snapshot `
-SnapshotName $snapshotName `
-ResourceGroupName $resourceGroup
See an example of running this script in Figure 2.
How do I create a snapshot with Azure CLI?
The last way to create a snapshot is with Azure's command line interface. This can be done using the az set of commands. To create a snapshot, the user will need to install the Azure CLI and log in or use Cloud Shell.
In this example, the az snapshot create command is used with --source-disk parameter. This OS disk backup snapshot example is created in two steps.
Step 1. Use az vm show to retrieve the disk ID
osDiskId=$(az vm show \
-g myResourceGroup \
-n myVM \
--query "storageProfile.osDisk.managedDisk.id" \
-o tsv)
Step 2. Use az snapshot to create a snapshot named Disk-backup
az snapshot create \
-g myResourceGroup \
--source "$DiskId" \
--name osDisk-backup
How do I create an Azure managed disks snapshot?
Admins can also use Azure managed disks snapshots to rebuild a VM or perform a point-in-time restoration based on a previous snapshot. Azure Disk Backup protects data in managed disks and provides snapshot lifecycle management.
Admins can download the disks from Azure. In the GUI, navigate to the snapshot blade, select the desired snapshot, click Snapshot export, then follow the wizard.
Use the generate download URL. This will provide an HTTP link to download the image for other uses and safe keeping. It's best to use a download tool that supports resumption because it's a big file to have to redownload if it breaks and doesn't auto-resume.
Checking the snapshot is simple. Use the Get-AzSnapshot command and it will list the snapshots within that subscription.
To convert the snapshotted disk to a fully managed disk, navigate to the snapshots blade, highlight the appropriate snapshot and click Create disk, as shown in Figure 3. The only additional item required is a disk name. Give it an appropriate name and submit the request. Record the settings for the impacted VM and use that data, such as VM type across. It is also possible to delete the damaged VM and recycle the network card and its details. Once the disk is created, the next step is to create the VM. Click on the newly created disk, shown under the disks blade in Figure 4. If the data disk is valid, there will be an option to create a VM from the disk.
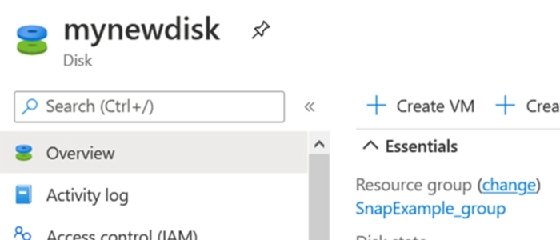
Once the disk is created, the next step is to create the VM. Click on the newly created disk, shown under the disks blade in Figure 4. If the data disk is valid, there will be an option to create a VM from the disk.
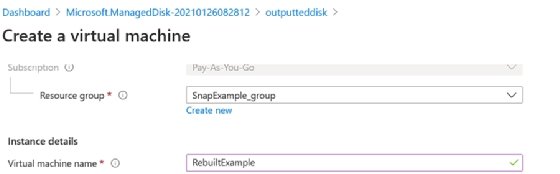
Create an Azure snapshot disk by selecting Create VM.
Once initiated, the wizard will provide the standard VM setup options to change as required, using the snapshotted disk. Figure 5 uses a separate Azure snapshot disk from another disk but is at the same stage of the process.
When should I NOT use VM snapshots?
VM snapshots are not perfect for every situation. If users want better backup options, consider the following:
Azure Backup
Given the steps involved, manually creating point-in-time copies isn't always the best backup method. Automated backups are essential. This is where Azure Backup comes into play. Admins can use Azure Backup to restore the entire VM -- a process that is not automatically available with Azure Virtual Machines. Azure Backup functions much the same as manual snapshots.
Azure VM restore points
Alongside Azure Backup, there are now Azure VM restore points. They allow point-in-time snapshots to be taken across a group of machines and can be restored as needed. They are more operationally useful as a backup tool -- but do not replace snapshots -- and have a different cost structure, setup and management. Whilst based on the same technology they have fundamentally different use cases.
This article was updated to include additional information on snapshots for Azure VMs.
Stuart Burns is an enterprise Linux administrator at a leading company that specializes in catastrophe and disaster modeling.