
Getty Images
Why and how to enable Azure Backup Instant Restore
Azure Backup Instant Restore has minimal wait time, is set at a modest price and has backup options via policies. Learn how to configure this service to restore failed VMs.

When a cloud service fails, fast recovery is a top priority.
Azure Backup Instant Restore enables admins to restore a failed VM to a point-in-time VM snapshot. The point-in-time snapshot is cached at the production site before it is replicated to the DR site.
To tap into the benefits of the service, admins must properly configure policies and settings via the Azure Backup offering.
The basics of Azure Backup Instant Restore
When a restore is needed, Instant Restore ensures there's minimal delay to complete replication to the backup site. The service eliminates the need for potentially large volumes of data to travel over the WAN, which adds complexity and downtime. By default, any hot point-in-time VM snapshots are kept for two days before newer snapshots overwrite them. Admins can adjust the number of snapshots to suit their requirements.
The Instant Restore functionality is included in the base Azure Backup offering. There is an additional cost for snapshot use. But it is relatively modest, consisting of only the additional storage cost incurred for holding these snapshots. However, used too frequently or incorrectly, Instant Restore could noticeably inflate cloud bills.
Use the Azure pricing calculator to work out approximate costs. In addition, after setting up Instant Restore, use Azure Cost Management and Billing to track and project future costs.
Enable Instant Restore via Azure Backup
The Azure Backup functionality has several requirements. The maximum single disk size supported is up to 32 TB. All disks combined in a VM can be no larger than 256 TB.
Enabling this functionality on a new VM server requires little navigation on the console. When creating a new VM in the Azure Portal, select Enable backup, as shown in Figure 1:
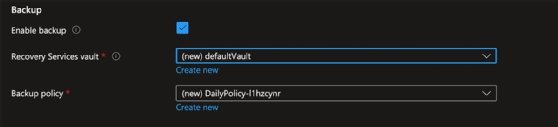
If a backup vault and policy don't already exist, users can choose the Create new option, as shown in Figure 1. While it is possible to go with the default settings, selecting Create new will allow the administrator to configure options to meet their specific requirements.
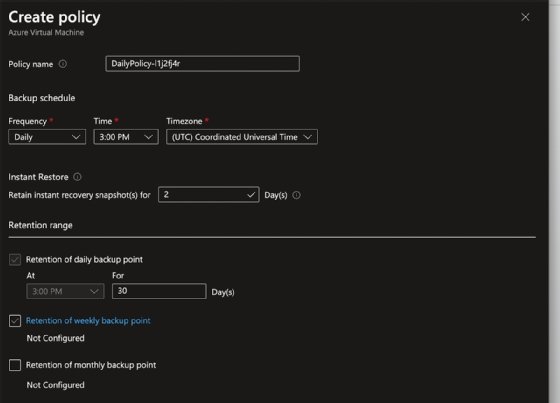
As with most things in Azure, admins can configure backup options via policies, as shown in Figure 2.
To change the Instant Restore policy to store more snapshots, use the search functionality to find the Backup center and navigate to the Backup policies tab, as shown in Figure 3. In this example, we have several policies although this may not always be the case. Each policy may affect the number of snapshots and, ultimately, the costs incurred.
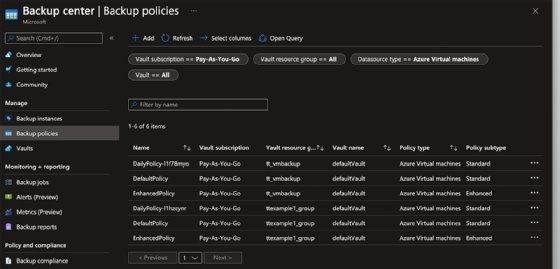
To view the policies and the items they are assigned to, click the "…" at the right side of each policy listing. This enables you to edit those assignments.
Select the appropriate policy -- for example, the DailyPolicy we created above with the VM -- and then select edit from the "…" on the left-hand side. Change the Instant Restore option to reflect the number of days a recovery snapshot is kept. You can modify the policy settings to ensure that any VM in a resource group gets Instant Restore.
Use PowerShell to configure Instant Restore
Admins can also configure Instant Restore settings using PowerShell.
Connect to the appropriate Azure subscription using the Connect-AzAccount PowerShell command. This will connect the session to the Azure account. In addition, use the Get-AzRecoveryServicesVault command to return useful Recovery Services information, including the vaults used in the subscription.
The below PowerShell code gets the backup policy for VMs, sets the snapshot policy to 4 days and then sets the policy to the updated variable:
       $MyPolicy = Get-AzRecoveryServicesBackupProtectionPolicy -WorkloadType "AzureVM"
       $MyPolicy.SnapshotRetentionInDays=4
       Set-AzRecoveryServicesBackupProtectionPolicy -policy $MyPolicy