Partition UEFI/GPT HDD Using Diskpart

The most common way to set up a hard disk for Windows installation is by default. That is, users present the installer with a clean or wiped disk drive, and let the Windows Installer take things from there. While this works perfectly well, this comes with certain consequences. In this guest blog post from Kari the Finn, he describes a series of diskpart commands one can enter while booted into the Windows Recovery Environment to do the job manually. These commands show how to partition UEFI/GPT HDD using Diskpart. For those smart or informed enough to understand that the Recovery Partition works best as the final partition on a boot/system drive, this technique lets them set things up “properly.” The rest of this post is straight from Kari himself. Here goes:
How to Partition UEFI/GPT HDD Using Diskpart
Let’s do this once manually to see how it works in this blog post. In the next post that follows this one, we’ll collect all these commands into a script so it can run in a single step.
To start, boot the target PC from your install media. Instead of selecting region and keyboard layout, press SHIFT + F10 to open Command Prompt. Type diskpart and press Enter to start Disk Partitioning Utility.
First, you need to select the correct disk (that’s Disk 0 in my case). Type the following commands one at a time, pressing Enter after each of them (three commands):
select disk 0
clean
convert gpt
OK, now let’s create partition 1, the 100 MB EFI System partition, format it using the FAT32 file system and label it as System (in two commands):
create partition efi size=100
format quick fs=fat32 label=”System”
The hidden 16 MB MSR partition comes next. It will neither be formatted nor will it get a label:
create partition msr size=16
Next comes the Windows partition, the proverbial C: drive. Because we want all available space on Disk 0 to be used for this partition, we do not use the size=XXX option at the end of the create partition command. Instead, we create this partition using all available free space, then shrink it by 450 MB, which is the recommended size for the Windows 10 WinRE (recovery) partition. We format this partition using NTFS and label it as Windows, where this partition’s type is Primary. No drive letter need be assigned: Windows setup assigns C: to this partition automatically (two commands):
create partition primary shrink minimum=450
format quick fs=ntfs label=”Windows”
Last but not least comes the recovery partition. It must be an NTFS formatted primary partition, it should have a specific label, and it requires a specific ID. Because no size=xxx option is used, it consumes all available disk space. Because of the setup for the Windows partition in the preceding step, this is 450 MB. (That’s what we took away from C: partition using the shrink minimum=450 item; three commands follow.)
create partition primary
format quick fs=ntfs label=”WinRE”
set id=”de94bba4-06d1-4d40-a16a-bfd50179d6ac”
That’s it! Now, the boot/system disk is configured just the way we like it. Type Exit to quit DISKPART, then close the Command Prompt. You are now free to continue installing Windows. When you get to disk configuration screen you will see that the boot/system drive is partitioned exactly as we wanted it:
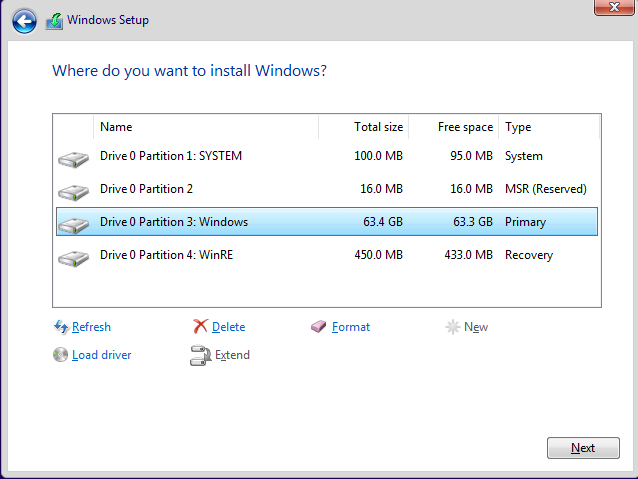
The sequence of Diskpart commands shown in this post creates this disk layout captured running the Windows Installer in a VM.
In the next blog post, we’ll show how to automate this process as a script you can run during the install process. Stay tuned!