How to install Connection and Security servers with VMware View
Learn how to install Connection and Security servers -- and protect your enterprise – in part nine of our series on the basics of VMware View.
This is the ninth article in a series on the basics of VMware View.
One of the most important VMware View components is the Connection Server, because it ensures that users are connected to their virtual desktop.
In the series so far, we have only installed one VMware View Connection Server, and if it went down or became unavailable we would be in a heap of trouble. The solution to this single point of failure is to install a second Connection Server referred to in VMware View as a "replica". More than one Connection Server is referred to as a VMware View Connection Server Group. It is a very easy task to carry out.
It's important to understand the limits of what a replica server can deliver. Replica servers are intended to offer high availability, not fault tolerance. Once a user is actively connected to a VMware View Connection Server, if it becomes unavailable – the sessions it is holding do not magically get moved to the replica.
- Create a new Windows 2003 VM.
- Double click at the VMware-viewconnectionserver-N.N.N-NNNNNN.exe file.
- Accept the usual suspects of the Welcome Screen, EULA and the install path for the software.
- Select Replica from the list.
- Accept the EULA.
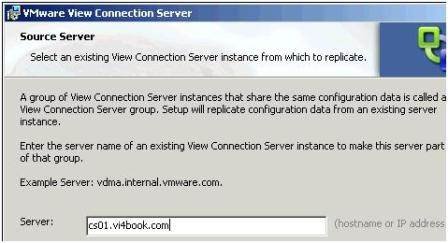
- Type in the name of any Connection Server, as shown in Figure 1, to make a VMware View Connection Server Group.
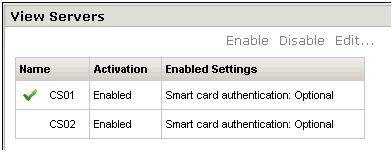
If the install has been successful you will see the replica listed under View Servers in the Configuration Page of the web-administration pages (Figure 2). Additionally, you should be able to load the View Client and configure it for the replica and still receive the same desktop list.
Figure 2 (click to enlarge)
Install a Security Server
Despite the fact that VMware View Connection Servers offer an encrypted certificates-based SSL Tunnel from the client to the virtual desktop, they are not appropriate for being patched to a DMZ. This is for two reasons:
- They are members of the corporate Active Directory Domain, and as such have domain privileges to a private network
- Ports are open to allow Active Directory communication which a hacker could utilize to facilitate other virtual desktop attacks
As an answer to the problem, VMware View has the Security Server – it can be left in a workgroup and does not require domain access. It only responds to 443 requests and allows the firewall administrator to only open (inbound) secure ports to the external firewall.
As with installing a second VMware View Connection Server, installing a Security Server is very easy. It is possible to have more than one for fault-tolerance – however, a Security Server has a relationship with only one Connection Server at any one time. As you might recall there is no built-in load-balancing feature for either the Connection Server or Security Server from VMware, as such you will need some third party load-balancing solution.
- Create a new Windows 2003 VM and join it to your Active Directory Domain.
- Add second NIC to the VM, configure the first NIC to communicate to your internal firewall and the second NIC to communicate to your external firewall.
- Double click at the VMware-viewconnectionserver-N.N.N-NNNNNN.exe file.
- Accept the usual suspects of the Welcome Screen, EULA and the install path for the software.
- Select Security Server from the list.
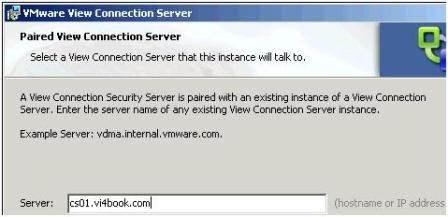
- In the next dialog box type in the name or IP address of one of your existing Connection Servers, shown in Figure 3.
Given the Security Servers special role in the DMZ – you might find the name resolution fails for you. You can always use hosts files or an IP address to complete the dialog box.
As with the Connection Server, after the install you should be able to connect to the Security Server. Remember that as the Security Server is not joined to a Microsoft AD Domain there will be no automatic dynamic DNS update. As it is the Security Servers are more likely to respond to external internet IP addresses resolved by the public DNS system. If you wish to test the Security Server configuration you could use an IP address or a hosts file.
Secondary VMware View Security Servers are installed in exactly the same way – but two Security Servers are not allowed to be paired with one Connection Server. The pairing is a one-to-one relationship, in the case I have configured, ss01.vi4book.com is paired with cs01.vi4book.com and ss02.vi4book.com is paired with cs02.vi4book.com.
Again, having more than Security server as with having more than one VMware View Connection server is intended to deliver high availability to the environment, not fault tolerance. If a Security server goes down the users session to the virtual desktop will become disconnected.
Load balance Security Servers (Microsoft NLB)
There are many options for load balancing your VMware View environment. Ideally, whatever solution you use it should be load balancing (as you might expect) but also be able to detect when nodes in the cluster become unavailable. Load balancers vary in quality and some do not handle this second requirement very efficiently.
Hercules is an IP based load-balancer which runs as a virtual appliance and is free to download from VMware's Market Place. I first came across this system from teaching the old VMware Virtual Desktop Manager course – where we used it in the student labs. It does the job and simplifies the end-user connection as they only need to connect to one IP address. True load-balancing appliances which are either physical or virtual are likely to come in pairs to prevent them becoming a single point of failure but respond to one single IP address. You can download Hercules here.
The default login is root and the password is root – and you will have to use the Linux text editor Vi to edit the /etc/network/interfaces file to modify its IP address. Once you have set the IP address of Hercules, you can use its PEN command to set the two Security Servers, and it will load-balance like so:
pen 443 192.168.2.175:443 192.168.2.176:443
Alternatively, a cost-effective solution is to use Microsoft Network Load-Balancing to create an NLB cluster of two or more Security Servers. Microsoft NLB is relatively easy to set up, and whilst it does handle load-balancing successfully, I've found it somewhat lacking in detecting whether one of the nodes in the NLB cluster has gone down. It doesn't seem to have much awareness of the IP dependencies between the various components between the systems.
The more I have investigated these options the more I think how simpler life would be if I only had one Security Server and Connection Server – and they were protected by VMware Fault-Tolerance. However, the one thing that stops this configuration is patch management and upgrades. If you only have one VMware View Connection server and Security server it then becomes impossible to take down one of the roles to carry out maintenance of the server.
What follows is very much a "Getting Started" guide to Microsoft NLB; it will not cover every single option or setting. My intention here is merely to show you an example of a load balancing system and how it affects the configuration of the Security Server.
Configure the Security Servers for Internet Access
Before you enable Microsoft NLB (or any load-balancing system) it's important to create a special configuration file called "locked.properties" for each Security Server. The locked.properties file has two main purposes – to hold the external or "internet" FQDN for connections to the Security Servers and the TCP port number. In my scenario the true identities of my Security Servers and Connection Servers will never been known to my end-users. My users will log on to a URL called virtualdesktops.vi4book.com using port 443, the IP address for virtualdesktops.vi4book.com will be a public IP valid for the multicast IP for the internet in the 193.x.x.x range – and it will be the Microsoft NLB clusters' job to respond to this IP address. Without the locked.properties file on each Security Server they would return their FQDNs which is undesirable and will be inaccessible directly because they will be using internal IP addresses in the 192.168.2.x range.
The locked.properties file can be created by hand using a text editor, from VMware View 3 onwards there is now a webpage that you can use to list your VMware View Security Servers, specify their settings and download a .properties file. I prefer this method because it validates your entries – and prevents typos. As you've probably guessed from reading this book I'm not the best typist in the world. I could give you a complete history about how mild dyslexia initially inhibited my success in my teenage years in the mid-80s until I discovered word-processors and auto-correct – but I will spare you the sob story!
Anyway, once the locked.properties file has been created you will need to restart the VMware Security Service to make sure it is effective.
- Login to the one of the Connection Servers web-page management tools, in my case https://cs01.vi4book.com/admin or https://cs02.vi4book.com/admin.
- Select the Configuration option.
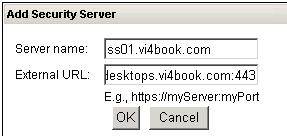
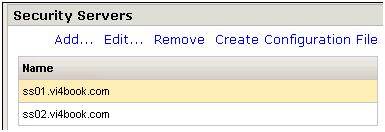
- In the Security Servers panel, click the Add… button, shown in Figure 4.Type in the name of your security server and the public FQDN that will be used, shown in Figure 5.
-
Figure 5
Unfortunately, this page is not very wide so you cannot see everything I have typed in the box. For the external URL, I typed https://virtualdesktops.vi4book.com:444.
- Repeat this task for each Security Server you have, shown in Figure 6.
-
Figure 6
- Next, select the Security Server entry, as I have done above and click the Create Configuration File link.
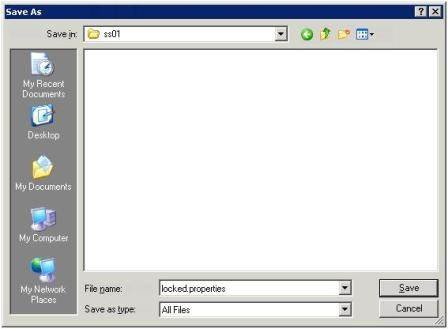
- Click Save, and in the Save dialog box rename the file to be locked.properties, and change the file type to be All Files, shown in Figure 7. I created a SS01 and SS02 folder on my desktop to hold each locked-properties file.
-
If you do not make these changes in the Save Dialog box like this you will end up with a file with the wrong file name and the wrong extension called config.properties.txt.
- Copy the correct locked.properties file to each Security Server to this path:
ss01 c$Program FilesVMwareVMware ViewServersslgatewayconf
ss02 c$Program FilesVMwareVMware ViewServersslgatewayconfIn this auto-generated format the locked.properties file does contain unique security thumb-prints which make the ss01 locked-properties file different from the ss02 locked-properties file. So we cannot just take one copy of the file and copy that to every Security Server.
- Next login to the Security Server, and restart the VMware Security Service. Personally, I like to have a tiny Microsoft .BAT/CMD file which does this for me – such that if I discover I have created a typo or need to modify the locked.properties file all I have to do is double-click the batch file:
net stop wsnm
net start wsnm
Important
Before you head off to set up the Microsoft NLB Cluster, you can do a couple of checks at each Security Server, shown in Figure 8. Firstly, can they ping each other by FQDN name? Secondly, can you run an nslookup test on the public FQDN and receive a positive response?
If you cannot get name resolution working you could use a hosts file on each Security Server – in my lab environment I often cheat and allow my Security Servers access to my DNS servers – which some people would regard as insecure. That said a text file held on a local server in a DMS could be regarded as less secure than the DNS host. You pay your money and you take your choice. Technically name resolution between the Security Servers is NOT required – but name resolution to the external/internet FQDN is.
In the screen grab above I have edited the image to not reveal the actual IP address which is the result. Successful responses to both of these questions will make the set up of Microsoft NLB easier.
Enable NLB clustering for Security Servers
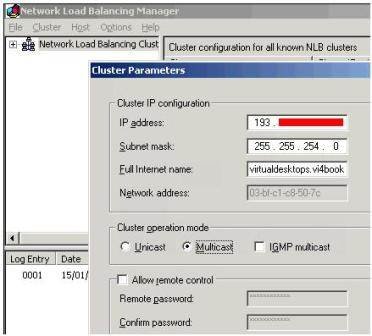
Microsoft NLB comes in two formats, a unicast and multicast method. I would strongly urge you to use multicast as the method, for two main reasons. A unicast Microsoft NLB is incompatible with VMotion whereas multicast is compatible. If you are forced to use a unicast address you will have to modify the "Notify Switches" setting on the properties of a port group or vSwitch.
Secondly, a unicast configuration is designed for when Windows has more than one network card. Since the way we do NIC teaming is so different in virtualization compared to the physical world – it's not necessary to add more than one NIC to the Security Server for this purpose. However, you will need more than one NIC in the security server so it can communicate to the Connection Servers behind the internal firewall, and also communicate to the external firewall.
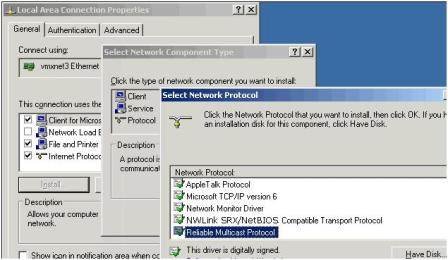
So for this configuration to work you will need to install the "Reliable Multicast Protocol," shown in Figure 9, for the Local Area Connection of each Security Server in the Microsoft NLB Cluster.
- On one of the Security Servers (It really doesn't matter which) open the Microsoft Network Load Balancing Manager held within the Administrative Tools menu in Windows
- In the menu choose Cluster, New
-
When selecting multicast, I also enabled the IGMP Multicast option – this can improve the reliability and performance of the Microsoft NLB cluster, shown in Figure 10. Be very careful with the IGMP Multicast as it can generate a significant amount of broadcast traffic. It's perhaps a good idea for these reasons to place the Security Servers in a VLAN of their own so their traffic does not adversely affect other systems.
-
Whereas this first dialog box allows you to set the "primary" IP address of the cluster, the following dialog box allows you to add additional IP addresses for the cluster if needed.
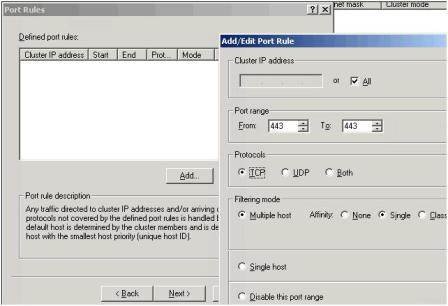
- In the Port Rules delete the default rule and create a rule which is limited to listening for inbound 443 connections on TCP, shown in Figure 11.
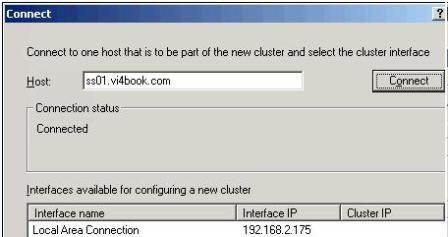
- Next add the first node into the cluster, shown in Figure 12.
During this initial setup phase you can only add one server to the cluster. This server then builds the cluster which then allows other servers to be added to the cluster once it has completed its tasks.
- Select the Local Area Connection, and click Next.
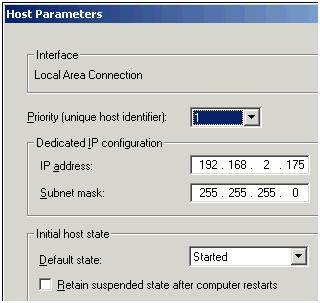
- Accept the default settings in the Host Parameters dialog box, shown in Figure 13
Figure 13
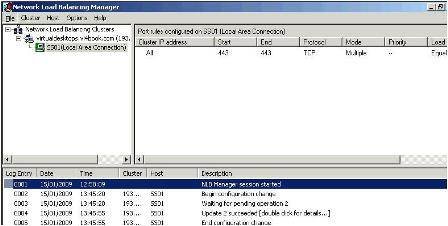
Notice how this first host in the NLB cluster has a unique host identifier of 1, the second and third nodes added to the NLB cluster will each be given unique host identifiers of 2, 3 and so on. After you have waited a while, the cluster will be created with the first node joined to the cluster, shown in Figure 14.
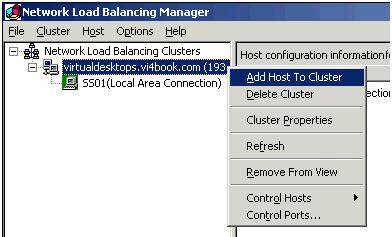
- To join additional servers to the cluster, right-click the cluster name, in my case virtualdesktops.vi4book.com, and select Add Host to Cluster, shown in Figure 15.
-
Figure 15
After adding the second NLB host, there is a converging process before both nodes become active, shown in Figure 16.
Test the load-balanced configuration
Before you crank-up a VMware View Client and try to login to the VMware View "NLB Cluster", first confirm that the client can resolve the external/internet FQDN to the correct address – in my case virtualdesktops.vi4book.com to my 193.x.x.x/23 address. My ISP does allow ICMP packets (which surprised me) so I can even ping my cluster from the internet because my hosting provider allows ICMP packets as well (which surprised me even more!)
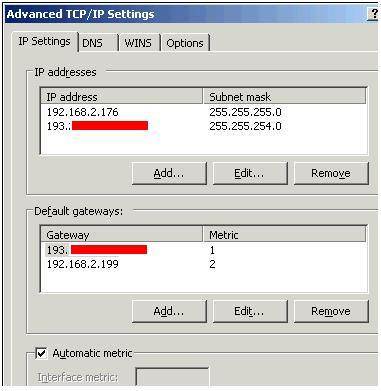
In my case I had to manually set the appropriate gateway settings on the properties of the Local Area Connection of Security Server for this to work. Additionally, I had to adjust the metrics for my gateways (because I have more than one) to set the external/internet based gateway address to be the preferred one, shown in Figure 17.
Figure 17
VMware has a document that describes in more detail your options for load-balancing. Although this document was originally written for VMware Virtual Desktop Manager 2, the load-balancing technologies sit independently of the broker and therefore should work for any broker. Additionally, VMware View 3 is the "new name" for VMware Virtual Desktop Manager – and they share the same historical code base.

GETTING STARTED WITH VMWARE VIEW
- Part 1: What's new with VDI?
- Part 2: Installing VMware View
- Part 3: Publishing individual virtual desktops
- Part 4: Publishing virtual desktop pools
- Part 5: Basics of VMware Composer and linked clones
- Part 6: Managing linked cloned desktop pools
- Part 7: Using a Virtual Desktop offline
- Part 8: Desktop restrictions with group policy objects
- Part 9: Installing Connection and Security servers
- Part 10: Creating and applying certificates
ABOUT THE AUTHOR:
Mike Laverick is a professional instructor with 15 years experience in technologies such as Novell, Windows and Citrix, and he has been involved with the VMware community since 2003. Laverick is a VMware forum moderator and member of the London VMware User Group Steering Committee. In addition to teaching, Laverick is the owner and author of the virtualization website and blog RTFM Education, where he publishes free guides and utilities aimed at VMware ESX/VirtualCenter users. In 2009, Laverick received the VMware vExpert award and helped found the Irish and Scottish user groups. Laverick has had books published on VMware Virtual Infrastructure 3, VMware vSphere4 and VMware Site Recovery Manager.
