Desktop restrictions with Group Policy Objects
Learn how to set up desktop restrictions within a VDI environment with Microsoft's Group Policy Objects in part eight of our series on the basics of VMware View 4.
This is the eighth article in a series on the basics of VMware View.
In the early days of VDI there was much talk of a virtual desktop being this ultra-rich environment that the user could customize with impunity. There was frequently talk of a virtual desktop being your own computer or laptop, which you could access and customize anywhere with an Internet connection -- without any desktop restrictions.
When I heard this I smiled wryly knowing that corporate standards often decree restrictions over what users can and cannot do. It's a sobering thought in the current economic climate how repeated studies show that end-users waste time and are unproductive during working hours if they are "distracted" by a computing environment that facilitates work-avoidance behavior. Personally, I find this a rather cheerless view of working life and I think to some degree these studies have taken on a rather Dickensian view of the world of work. Nonetheless the facts and studies speak for themselves and if it was my company…
So it would be somewhat remiss of me not to acknowledge in some way the significance of desktop restrictions within a VDI environment – despite the fact that this isn't a VMware issue or VDI problem persay. After all, it's not Microsoft who puts PinBall and Solitaire on the Start Menu. I'm assuming you're probably already familiar with removing access to the run command or access to the registry tools in Microsoft Active Directory Group Policies.
Indeed you may have gone so far as the use of GPOs in favor of some other desktop bolt-down tool such as Scriptlogic or PowerFuse. After all, there are some limitations with GPOs that reduce your ability to configure unique per-user settings for each application. That said, Microsoft GPOs remain popular because they ship "free" as part of Active Directory.
With those caveats and assumptions in mind, in this short section on virtual desktop restrictions I want to explain and demonstrate some little known or used GPO settings. If I am forced to use Microsoft Active Directory GPO, my goal is to use as few settings as possible as this speeds up the login – and users spend less time reading the "applying your personal settings" message during the login process.
Redirect the desktop
As you probably already know, redirection of folders that normally appear in the user's profile has a number of benefits since it:
- Reduces the size of the profile.
- Ensures that files are properly saved to network locations by making sure My Documents points to a network drive.
- Centralies shortcuts that makeup the Start menu and desktop – allows for easy changes at the central location – without the need to modify each user profile. These shared locations can be marked as read-only and this will prevent users right-clicking their desktop to save files. This is especially important in non-persistent pools where the virtual desktop is deleted at log off.
1. Start by creating some folders and shares on a file server. Create the folder structure you would like for the start menu and desktop. Populate with shortcuts to applications associated with the user's virtual desktop. In Figure 1, I've created a folder structure for the Sales Group Virtual Desktop and the Student Group Virtual Desktop.
Be careful when you create the shortcuts – if you take them from the server's Start menu, they can often be hard-coded to a particular path or not use variables like %SystemRoot% system32 notepad.exe or "%ProgramFiles% Windows NT Accessories wordpad.exe". Finally, allow that the folder called "Start Menu" is not "hard-coded", while the use of the folder "Programs" is. If GPOs are set properly, you can replace the default "Program" folder -- which appears at the top of the Windows Start Menu -- with your own.
2. Next in Active Directory create a GPO Object that will be used to restrict the user's virtual desktop. This raises the issue of what is the best way to apply the restriction. I prefer to apply a GPO to the computer where possible. So the user receives one set of restrictions if they login to a virtual desktop, but an entirely different set elsewhere. This allows them to be heavily restricted in the VDI session, but less restricted on other computers in the domain. After all, it's the virtual desktop I'm trying to secure from the end-user. Right-click the Organizational Unit, choose Properties and Select the Group Policies Tab. Click the button to create a policy (Figures 2 and 3).
-
Personally I would recommend using the Microsoft Group Policy Manager which is available as a separate download to Windows 2003 Active Directory. It has a much better UI than the default dialog boxes that I'm showing here.
3. Select the GPO and Click Edit
4. Navigate to User Configuration Windows Settings Folder Redirection
5. Right-click the Desktop icon and select Properties
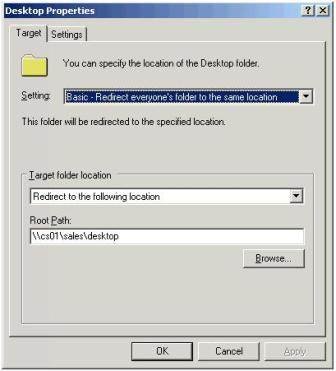
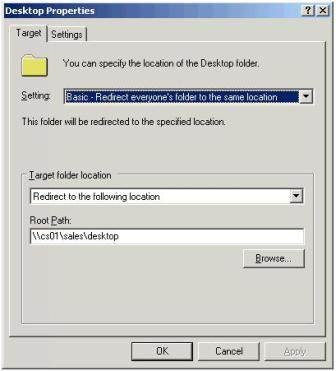
6. In the Desktop Properties Dialog Box, shown in Figure 4, select:
-
- Setting: Basic – Redirect everyone's folder to the same location
- Target Folder Location: Redirect to the following location
- Path: Type or Browse to the location of the Desktop Folder in your share
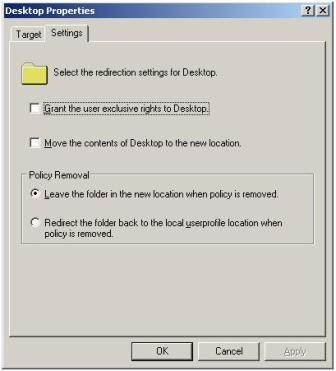
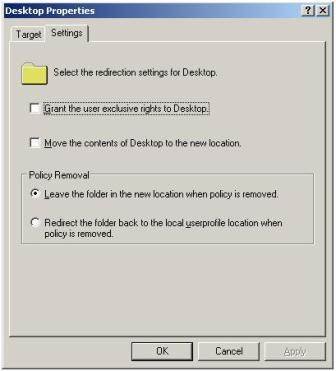
7. Before clicking OK, select the Settings tab in the dialog box, shown in Figure 5, and disable the option called Grant the user exclusive rights to Desktop and Move the contents of the Desktop to the location. Leaving these settings would stop imposing our own desktop shortcuts over the end users.
8. Click OK to apply this change.
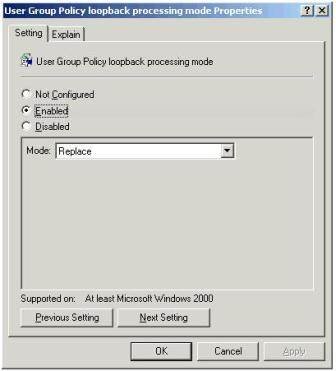
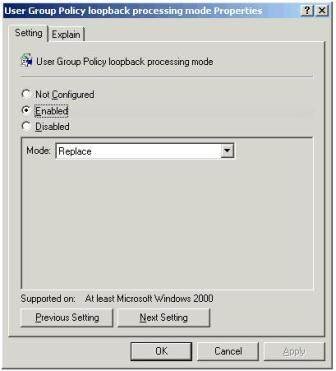
9. Finally, we need to make sure that this computer policy takes precedence over all other user policies. So any settings that normally affect the end-user on a standard computer are ignored – and our special virtual desktop settings are always applied. This option is called Loop Back Processing Mode in Active Directory GPOs. Locate the setting at Computer Configuration Administrative Templates System Group Policy.
10. Double-click at the setting called User Group Policy loopback processing Mode, shown in Figure 6, select the Enable option and set a mode of Replace.
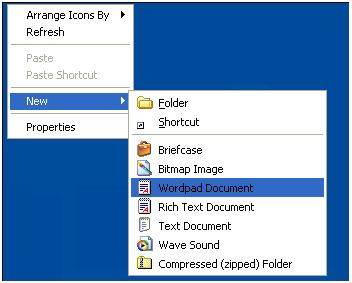
At this stage you can test the policy by logging in as a user. Try hiding one of your shortcuts – you will find it disappears from the user view automatically without a refresh. Additionally, try creating a shortcut in the shared location – it should appear automatically (Figure 7).
Figure 7
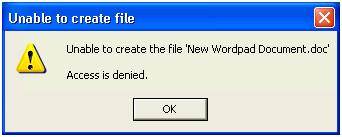
Finally, try as an end-user to right click and save a file on the desktop. If you have set the permissions correctly on the share, then you should find the user gets the access denied message shown in Figure 8.
Figure 8
Caution
Synchronizing offline files in Windows XP often interferes with this dynamic functionality – I would recommend disabling the feature on this share. This can be done with the Microsoft GPO at this location: Computer Configuration Administrative Templates Network Offline Files.
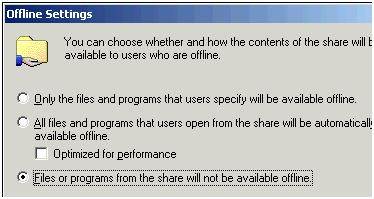
Set the option disabled on the policy setting called Allow or Disallow use of the offline feature. I would have to admit that this policy didn't seem to have the result I was hoping – in the end I lost patience with Microsoft Policies and took advantage of all the disabling options associated with offline files. In fact, I found the best way to stop offline files in their tracks was to make sure the share settings on Windows Shares did not enable the feature. In Windows 2003 offline folder support is enabled by default by Microsoft, it can easily be changed with the Offline Settings dialog box on the properties of a share, shown in Figure 9.
Figure 9
Additional tips
By default Windows XP creates a Recycle Bin and Internet Explorer icon for users. If you would like a completely blank desktop with only your icons then enable: Remove Recycle Bin icon from Desktop and Hide Internet Explorer icon on desktop located at User Configuration Administrative Templates Desktop
To be ensure that My Network Places and My Documents do not appear on the desktop under any circumstance, I also enable in the same location: Remove My Documents icon on the desktop and Hide my Network Places icon on the desktop.
Additionally, if you want to stop users accessing the Display Properties control panel, and using the Desktop Tab and Customize Desktop button which allows them to add icons to the desktop, then I recommend enabling the following policy: Remove display in Control Panel located at User Configuration Administrative Templates Control Panel Display.
If you make a major change in the policy rather than repeated logging in and out of the virtual desktop to check your work -- issue the gpupdate command in Windows XP for a refresh of the policy. Unfortunately, gpupdate in Windows XP is not perfect – and will sometimes not update your changes. An example of this is switching to a "classic" start menu.
Redirect the Start Menu
Once you have redirected the desktop – redirecting the start menu is very much the same. Many people prefer to enforce the "classic" start menu of Windows 9x/NT days – rather than the Window XP start menu. A word of warning – if you do this after redirecting the desktop, it will add icons to the desktop regardless of the settings we have previous outlined, namely My Computer and My Network Places. You might ask how these icons get created if we have made the "desktop" share read-only. These icons exist in the user profile which is also loaded along with our redirected desktop.
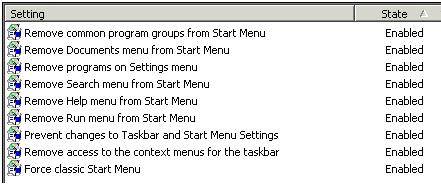
If you want to completely supplant the Windows Start Menu then you will have to engage a significant number of policy settings held in User Configuration Administrative Templates Start Menu and Task Bar, shown in Figure 10.
Figure 10
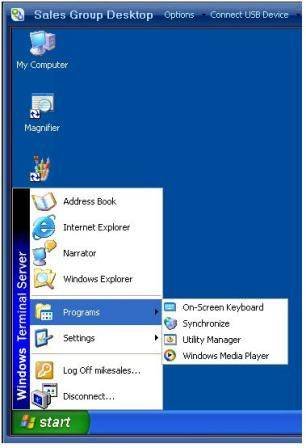
By enabling these options and redirecting the Start menu in exactly the same way as we did with the Desktop Properties, we get a result that looks like Figure 11:
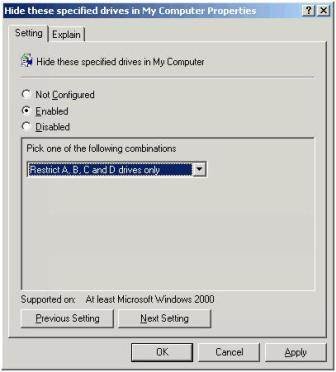
I could go on further – after all there are plenty of other loop holes in Windows that need closing. For example, while your users certainly need to see mapped network drives, they certainly don't need access to the C: Drive of the virtual machine. To hide drives in Windows you can use the following policy location: User Configuration Administrative Templates Windows Components Windows Explorer and enable "Hide these specified drives in My Computer", shown in Figure 12.
Additionally, the users still have access to the Windows Security dialog box via the Settings option on the Start Menu. So perhaps some time spent disabling the Shutdown, Lock Computer and Task Manager options would be in order too. The Windows Security dialog box can be controlled through the following policy location: uLUser Configuration Administrative Templates System Ctrl+Alt+Del Options.
This allows you to disable the Task Manager, and Lock Computer options. Whereas with User Configuration Administrative Templates Start Menu and Taskbar there is an option where you can enable "Remove and Prevent access to the shutdown command.
Finally, I've not touched at all on some of the graphics acceleration settings that inhibit the good performance of Microsoft RDP. Additionally, I didn't cover user profiles – and that old favorite, user profile bloat. Personally, I prefer roaming user profiles, and making sure that Windows is running the user profile clean up service. Occasionally, I've come across customers who set limits on the size of profiles which can be done via GPOs.
I wouldn't personally recommend the concept of mandatory roaming profiles – where many users share the same read-only user profile. In my experience of being a Microsoft Certified Trainer/Administrator in the 90s I always found there were too many per-user settings to allow for a one size fits all user profile. Personally, I wish Microsoft would bring back Windows 95 when user profiles were optional, but I guess that's just not going to happen. Perhaps I should move on with the times.
But I think I've spent plenty of time on the subject already and perhaps made my point some time ago. I hope I haven't bored you too much! If you have been following this section to the letter you will have a very restrictive desktop on which the user can do practically nothing but run the programs we dictate. It looks and feels very much like a TS or Citrix XenApp environment – I wonder if the users will notice the difference or even care.
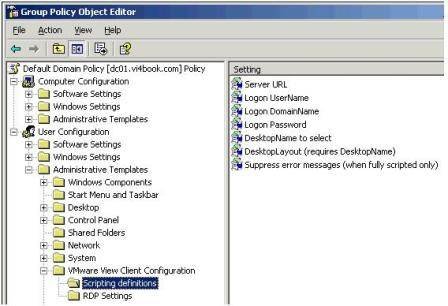
As the final word on policies, you should be aware that the Connection Server holds a number of Microsoft GPO Template files (.ADM) which can be imported into the "Administrative Templates" part of a GPO. These custom ADMs allow you to set very popular Microsoft RDP preferences and also control the VMware View Client, Agent and some small Connection Server settings. You find the .ADM on the C: drive of the Connection Server at C:Program Files VMware VMware View Server Extras GroupPolicyFiles, shown in Figure 13.
More in this series
Part 1: What's new with VDI?
Part 2: Installing VMware View
Part 3: Publishing individual virtual desktops
Part 4: Publishing virtual desktop pools
Part 5: Basics of VMware Composer and linked clones
Part 6: Managing linked cloned desktop pools
Part 7: Using a Virtual Desktop offline
About the author
Mike Laverick is a professional instructor with 15 years experience in technologies such as Novell, Windows and Citrix, and he has been involved with the VMware community since 2003. Laverick is a VMware forum moderator and member of the London VMware User Group Steering Committee. In addition to teaching, Laverick is the owner and author of the virtualization website and blog RTFM Education, where he publishes free guides and utilities aimed at VMware ESX/VirtualCenter users. In 2009, Laverick received the VMware vExpert award and helped found the Irish and Scottish user groups. Laverick has had books published on VMware Virtual Infrastructure 3, VMware vSphere4 and VMware Site Recovery Manager.
