
your123 - stock.adobe.com
How to troubleshoot an RDP remote session stuck at configuring
Admins forced to troubleshoot a Microsoft RDP session stuck at configuration must understand these key steps to fix their issue and be able to adapt them to their environment.

One problem that virtual desktop administrators often encounter is that the Microsoft Remote Desktop Protocol can get stuck at configuring a remote Windows session.
This problem can occur in Windows versions dating back to Windows 7 and Windows Server 2008, but it can also occur in newer Windows versions, including Windows 11 and even Windows Server. The problem can occur regardless of whether Microsoft Terminal Server is in use.
The main symptom of the problem is that it's impossible to establish a remote desktop connection to a Windows server, terminal server or virtual desktop session. Instead, the client displays a message that reads "Configuring Remote Session."
4 steps to troubleshoot an RDP session stuck at configuring
Unfortunately, there are a variety of problems that can result in the Configuring Remote Session error. As such, there is no universal quick fix for the problem. As a virtual desktop admin, you will typically have to use trial and error to resolve the issue, so you should use some of the following methods to determine the cause of the issue.
1. Address memory shortages
One potential cause of errors when Microsoft Remote Desktop Protocol (RDP) is stuck configuring remote sessions is that the target server or virtual desktop is running low on memory. The exact steps required to fix this problem vary widely depending on the version of Windows that the target system is running.
The following steps assume that your system is running Windows 11, but they will vary slightly for other Windows versions.
- Log on to the remote system. You might have to log on locally or reboot the host to be able to log in.
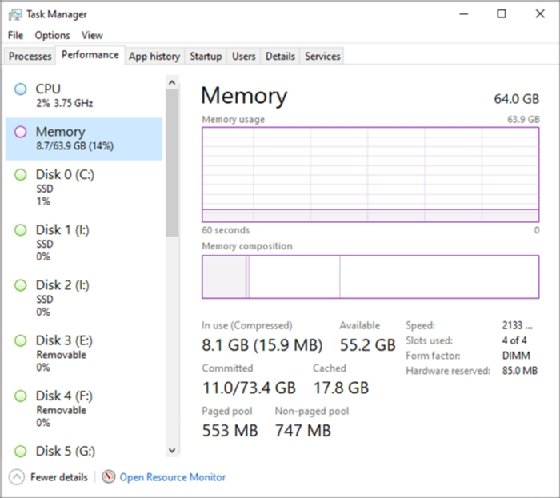
- Press Ctrl + Alt+ Delete and then open the Task Manager.
- Select the Performance tab.
- Click on the Memory option.
- Check to see how much memory is available. Ideally, at least 20% of the machine's memory should be available for use (Figure 1).
If you find that the remote system has insufficient memory, you will need to free up some additional memory. This might mean uninstalling unnecessary software or perhaps installing additional physical RAM. You could also try enabling virtual memory, although virtual memory is usually enabled by default. To check your system's virtual memory configuration, follow these steps:
- Go to Settings.
- Click System.
- Click on About.
- Click Advanced System Settings.
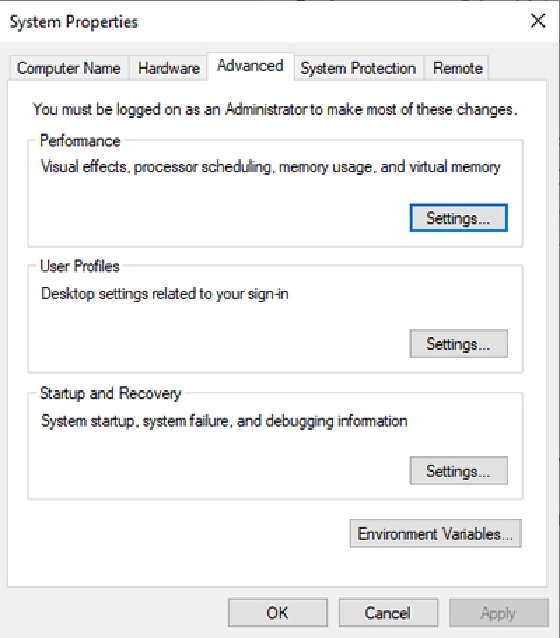
- Click the Settings button found in the Performance section (Figure 2).
- Click on the Advanced tab.
- Click the Change button.
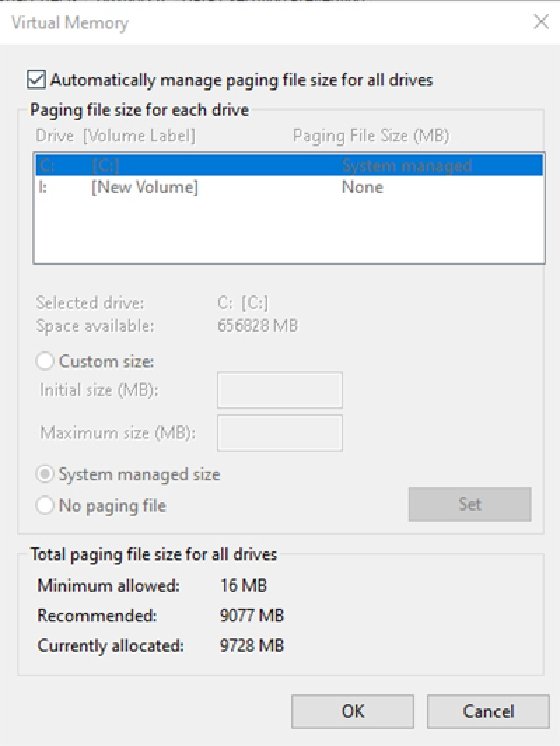
- Select the Automatically manage paging file size for all drives checkbox.
- Click OK (Figure 3).
2. Check the self-assigned remote desktop certificate
Some remote desktop connection problems stem from an invalid or corrupt certificate. This certificate is a local resource, and it resides on the PC that you use to establish the remote desktop connection to the remote machine. To correct this problem, you should follow these steps:
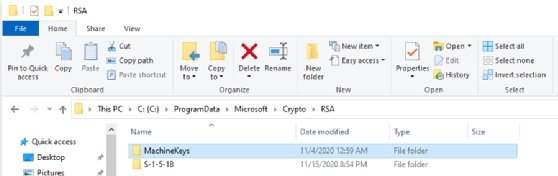
- Open File Explorer and navigate to C:\ProgramData\Microsoft\Crypto\RSA.
- Rename the MachineKeys folder to MachineKeys-Backup. Renaming the folder rather than deleting it gives you a way to retrieve your keys later if it becomes necessary to do so (Figure 4).
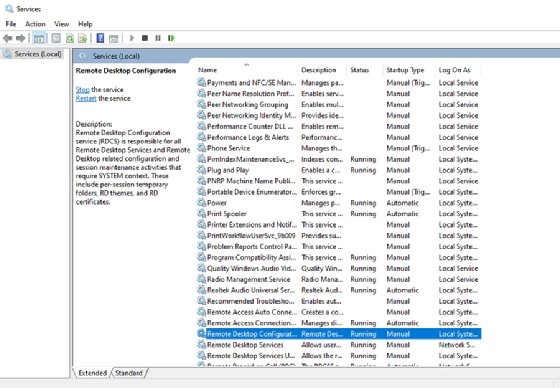
- Launch the Service Control Manager by entering the Services.msc command at the Run prompt.
- Restart the Remote Desktop Configuration service.
- Open File Explorer and navigate to C:\ProgramData\Microsoft\Crypto\RSA.
- Verify that a new certificate was created.
3. Verify that the TSUserEnabled Registry Key is set
If you are working in a Terminal Server environment, then the RDP connectivity problems can also occur if the TSUserEnabled Registry Key is set to 0 instead of 1 on the client. You will only need to make this change if you are trying to connect to a Terminal Server environment. If you are trying to establish an RDP session to a standard Windows Server or Windows desktop OS, then you should leave the registry alone.
If you do need to modify the registry, then keep in mind that editing the Windows Registry is dangerous, so it's important to take the appropriate precautions in case anything goes wrong. You can check this Registry key by following these steps:
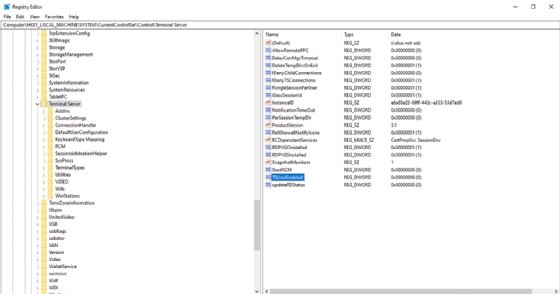
- Open the Registry Editor.
- Navigate to HKEY_LOCAL_MACHINE\SYSTEM\CurrentControlSet\Control\Terminal Server\.
- Make sure that the value of TSUserEnabled is set to 1 (Figure 6).
4. Recreate the user profile
As a last resort, you can try recreating the user profile on the machine that is unable to establish a Microsoft RDP connection. This technique can cause data loss, so it is extremely important to create a backup before attempting this technique.
To recreate the user profile, complete the following steps:
- Open the Registry Editor.
- Navigate to the following location: HKEY_LOCAL_MACHINE\SOFTWARE\Microsoft\Windows NT\CurrentVersion\ProfileList (Figure 7).
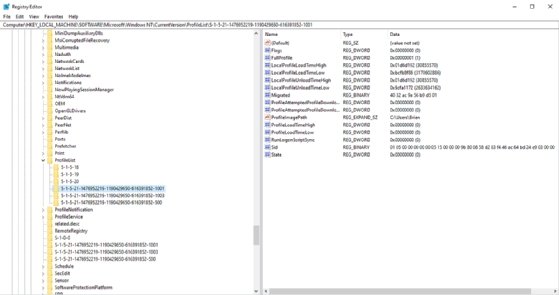
The ProfileImagePath value will tell you which profile is which.
- Right-click on the user profile that you want to recreate -- the ProfileImagePath value will tell you who the profile belongs to.
- Select the Delete command from the shortcut menu to delete the profile.
- Reboot the machine and log in as the user whose profile was deleted.
Editor's note: This article was originally written by Brien Posey in January 2021. He updated this article in May 2025 to include more information on hotspot devices and improve readability.
Brien Posey is a former 22-time Microsoft MVP and a commercial astronaut candidate. In his more than 30 years in IT, he has served as a lead network engineer for the U.S. Department of Defense and a network administrator for some of the largest insurance companies in America.