Part of:Remote desktop troubleshooting for IT administrators
6 steps for when remote desktop credentials are not working
When remote desktop credentials fail, admins should verify account format, cached credentials, lockout status, access permissions, firewall settings and DNS targeting.
Establishing a Windows remote desktop session is normally a simple and reliable process, but IT professionals still need to be ready for remote desktop issues to pop up.
For example, administrators might find that the remote machine refuses the Remote Desktop Protocol (RDP) connection. Fortunately, troubleshooting the problem is usually a straightforward process. In many cases, the issue is not the RDP session itself, but something tied to saved credentials, account permissions or the machine being targeted.
When everything is working properly, establishing a remote desktop session is a simple process. Admins only need to open the Remote Desktop client -- also known as the RDP Client or the Remote Desktop Connection (RDC) app -- and enter the name or IP address of the endpoint that will host the connection. Then, it's as simple as clicking the Connect button to establish the session. If the RDP client has saved credentials on hand from a previous session, then the new session automatically uses them.
Otherwise, the client prompts you to enter a username and password. If these don't yield a successful RDC connection, then IT administrators should take troubleshooting steps to determine and address the root cause of the issue.
What to check first when RDP credentials fail
Before assuming the password is wrong, check the basics first. Confirm that the account is being entered in the right format, that saved credentials are current, that the account is not locked out and that the user still has remote access permissions. After that, check whether TCP Port 3389 is reachable and whether the client is targeting the correct machine and DNS record.
1. Make sure the credentials are correct
The first step is to make sure the credentials are actually correct and entered in the right format. One of the more common mistakes is leaving the domain name out of the credential set.
Consider an IT professional logging in with an administrator account for the example domain PoseyLab. If the IT pro types Administrator instead of PoseyLab\Administrator, then the client would attempt to log in using the endpoint's local administrator account rather than the domain administrator account. Odds are that the local administrator account lacks the permissions to log on to the machine remotely. Even if the required permissions do exist, the local administrator account probably does not have the same password as the domain administrator account, so the logon won't be successful.
2. Update the saved credentials
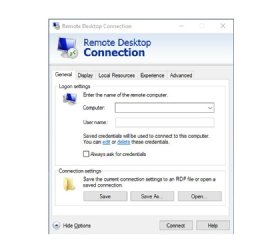
One common cause of remote desktop credential problems is a set of cached credentials that are no longer valid. This usually happens after a password change, when the RDP client is still trying to authenticate with the old password.
Figure 1. Click the 'edit' hyperlink to refresh the saved credentials.
In many cases, the client will prompt for a new password after the old one fails. If that prompt does not appear, the admin might need to update the saved credentials manually.
The easiest way to do this is to open the RDP client, choose the computer to connect to and then click on the Show Options link. This expands the interface to reveal the Logon settings section. The Logon settings section contains an edit link (Figure 1). Clicking this hyperlink opens a prompt that enables an admin to enter and save a new password.
3. Make sure that the account is not locked out
If an admin has completed the first two steps and the remote desktop connection credentials are still not working, the next step is to make sure the account has not been locked out. Most organizations configure their Active Directory environments to automatically lock accounts after too many invalid login attempts as an RDP security measure.
Even if the account was not initially locked out, failed attempts at establishing an RDP session with the remote machine count as logon attempts and might lead to a lockout. It's a good idea to check whether the account is locked and manually override the lockout if it is in place.
One common cause of remote desktop credential problems is a set of cached credentials that are no longer valid.
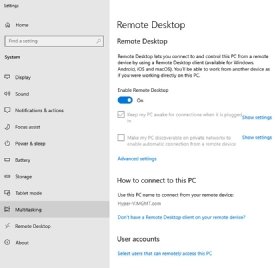
4. See if the account has remote access permissions
Another thing to check is whether the account you are using has permission to log on to the remote machine through an RDP session. Even with a successful RDP connection in place from a prior session, it's always possible that the permission was somehow removed accidentally. Unfortunately, checking the remote access permissions means that someone has to log on to the machine locally.
Figure 2. Make sure that Remote Desktop is turned on, and then click the link to 'Select users that can remotely access the PC.'
The exact steps of this process can vary considerably depending on the version of Windows that the remote machine runs on. With most modern versions of Windows, right-click on the Start button, and then choose the System command from the shortcut menu. Then, select the Remote Desktop tab, and make sure that the Enable Remote Desktop setting is turned on. Next, click on the Select users that can remotely access this PC link found at the bottom of the screen (Figure 2).
Then, verify and, if necessary, add accounts that can establish remote desktop sessions with the machine in question.
5. Check the firewall
Next, administrators should check if RDP traffic is able to flow between the remote machine and the local machine. The protocol that nearly all RDP clients use is TCP Port number 3389. Make sure that Windows Firewall on the remote machine is not blocking access to this port. The same also holds true for any other firewalls that exist between the two machines.
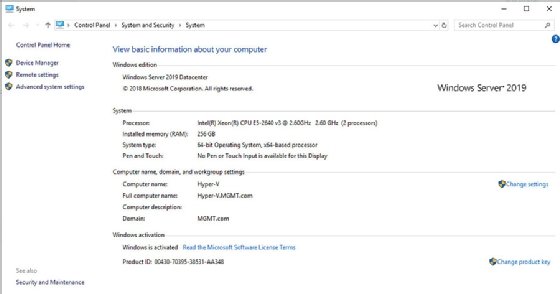
6. Verify that the connection is targeting the correct machine
One more step that IT administrators can take if they are having trouble connecting to the remote machine is to verify they are connecting to the correct machine. Begin the process on the remote machine by right-clicking the Start button and choosing the System command from the shortcut menu. From the About tab within the Settings window, click on the System Info link. This yields some basic information for the remote machine. Verify both the machine name and the name of the domain that the machine is connected to (Figure 3).
Figure 3. Verify the remote machine’s computer name and domain name in Settings.
With the computer and domain names confirmed, the admin should verify the computer's IP address. The easiest way to do this is to open a Command Prompt window and enter the following command:
IPCONFIG /All
This lists the remote machine's IP address, as well as the address of the domain name server that it is using. Finally, look at the domain name server to ensure that the DNS record for the machine lists the correct computer name and IP address.
While remote desktop credential failures often look like small support issues, they can also point to bigger problems around access control, credential hygiene and basic configuration management. For IT leaders, reducing these kinds of failures is not just about fixing one connection at a time. It is also about making remote access more reliable and easier to support at scale.
Editor's note:This article was originally published in 2024 and updated in April 2026 to reflect current remote desktop troubleshooting practices and improve clarity.
Brien Posey is a former 22-time Microsoft MVP and a commercial astronaut candidate. In his more than 30 years in IT, he has served as a lead network engineer for the U.S. Department of Defense and a network administrator for some of the largest insurance companies in America.