
Getty Images
Fix Windows 11 remote desktop credentials that don't work
IT administrators should be ready to deal with credentials issues for remote desktops, as they are major hindrances to productivity. Learn what steps admins can take.

The error message "Your credentials did not work" is a common issue that comes up with Remote Desktop Protocol, or RDP, so desktop administrators should be ready to fix it.
With the latest release of Windows, Microsoft introduced new authentication methods including support for Windows Hello for Business and Entra ID-based authentication. These innovations bring added security, but they can also make troubleshooting RDP issues seem daunting.
As a remote desktop administrator, you will need to understand what the main causes of this error message are for RDP environments and how to fix credential issues for users.
How to ensure a remote desktop connection works
If you want Remote Desktop to work on a target machine, there are three basic things you need to have in place.
- RDP must be enabled on the target machine.
- The user that wants access must be added to the Remote Desktop Users group locally on the target machine or by the local administrator.
- Port 3389 TCP must be open to the target machine and needs to be reachable from the client. UDP 3389 could also be opened but it is not mandatory.
Also, the authentication mechanism will differ depending on whether the target machine is joined to a domain, not joined to a domain, or joined directly to Entra ID. If the machine is joined to a domain, the target will also need to be able to reach a domain controller to authenticate to the machine with that account.
Firstly, we will cover some scenarios to highlight what can go wrong and how to fix them.
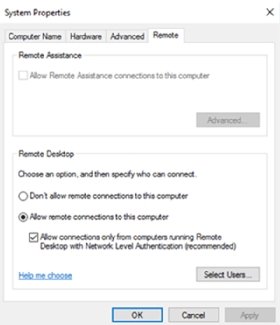
In this first scenario, a user attempts to establish an RDP connection to a target machine, the RDP client first asks which supported protocol is available on the remote machine. In this scenario, the target responded by requesting network-level authentication (NLA). NLA is a feature to ensure the authentication of the user or client before providing access to the remote desktop. It is highly recommended that you enable NLA due to the security benefits.
You can enable or disable this feature using this toggle under System Properties on the target machine, as shown in Figure 1.
Depending on what kind of authentication method is enabled, the RDP client will default to supporting a username and password. However, RDP also supports the following authentication methods:
- Smart cards.
- Entra ID users. If the machine is joined to Entra ID, this also uses an authentication mechanism called PKU2U.
- Windows Hello for Business. This is similar to smart cards because it uses certificates.
The user then enters their username and password which has the correct level of access on the target machine. After this, Windows creates a logon event in the Security table on the target machine with an Event ID of 4624. This ID means an account successfully logged on. You can see this in the Event Viewer by navigating to Windows Logs > Security. The event will also say logon type 3, as seen in Figure 2. This indicates that it is a network-based logon.

Windows also creates an event on the target device, under Applications and Services Logs > Microsoft > Windows > TerminalServices-RemoteConnectionManager > Operational, with an EvenID of 1149 that indicates a successful logon to the device.
Once the Graphical interface begins to transfer to the target device, Microsoft will also create a new event under the same Event View with the Event ID of 21 and 22. Event ID 21 is an indication of the session ID, which was given to the connection, and 22 indicates that the interactive session has been loaded.
If all goes according to plan, the user should see the Windows screen.
How to troubleshoot "Your credentials did not work"
If the user got the "Your credentials did not work " error, then you can take a few different steps to resolve this issue.
User access and permissions
The most common fix is to ensure that you are writing the correct username and password. If you use the wrong account or password, it will generate an Event ID 4625 under the Security Event table on the target machine.
Another step is to ensure that you are using the prefix. For instance, if you want to authenticate with a local account on a machine that is domain-joined, you need to use another prefix for the username when logging in. For example, it could read as .\username or localhost\username.
This will authenticate directly to the machine and with local users. If you want to authenticate with a domain account, you must use either DOMAIN\useraccount or [email protected].
However, the target machine will also need to be able to reach a domain controller to be able to authenticate the account.
If you have disabled NTLM or have plans to disable the use of that protocol, there are some additional requirements that you need in place to make sure RDP is working via Kerberos.
- Make sure you are connecting to the fully qualified domain name (FQDN) of the target -- for example, WS-123.contoso.com.
- Make sure you are using a User Principal Name for the username -- for example, [email protected].
- The client also needs to be able to communicate with the domain controller.
Check for recent updates
In the past, updates from Microsoft have also caused RDP to stop working. This includes the KB5008380 update which first came out in March 2023 and stopped RDP authentication from working when it was released.
To get RDP working again, you would need to remove the update and wait for a new patch from Microsoft. If RDP was working but suddenly stopped working, check if there have been any recent updates installed on the target and the client.
Check that the port is open and is working on the target endpoint
In most cases, if the network or the port is inaccessible it would not yield the message that the credentials are not working. However, it is easy to check if the port is blocked from another Windows machine.
From the client open PowerShell and type the following command:
Test-NetConnection IPaddress -port 3389
If this command yields the message "TcpTestSucceeded," it means that the network and port are reachable. In some cases, if a machine is no longer reachable however but you know that the machine is online, there might be some central changes to the firewall or the Windows Firewall profile.
Windows Firewall categorizes network connections into three profiles by default:
- Domain. This profile is used for computers in Active Directory.
- Private. This profile is for home networks, small office/home office (SOHO) networks, or workgroup networks.
- Public. This profile is for connections in public spaces.
By default, Windows Firewall permits all outbound connections while blocking all incoming connections, except those specifically allowed for each network profile.
You can see which profile a machine has by running the following command in PowerShell
Get-NetConnectionProfile
Then, you can add an RDP allow rule in the Windows Firewall on a specific profile using the following command:
New-NetFirewallRule -DisplayName "AllowRDP" -Direction Inbound -Protocol TCP -LocalPort 3389 -Action Allow -Profile Domain
This will then allow RDP traffic for the Windows firewall profile domain.
Verify whether the machine is joined to Entra ID
Another scenario that will cause the credentials not working error message is when you have a virtual machine (VM) in Azure that is joined to Entra ID.
Here, you might get a similar error message as seen in Figure 3, however, the user is joined to the correct local user groups and the firewall is open. It might appear that nothing is wrong.

For machines that are running in Azure and joined to Entra ID, there are two additional settings that need to be configured for this to function properly.
First, you need to have the correct permissions configured in Microsoft Azure, where there are two roles that you must add to the VM. This is done using Azure's role-based access control Navigate to Virtual machine > Access Control > Add Role assignment and give the desired user either Virtual Machine User Login or Virtual Machine Administrator Login.
The Azure agent on the VM will add the user as a remote desktop user or administrator on the target machine.
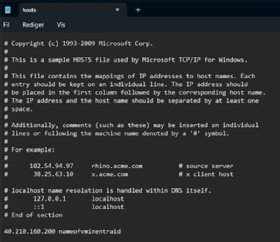
Secondly, you need to configure a DNS name for the machine or modify the host file locally. This is because Entra ID uses JSON Web tokens to authenticate to the machine, hence the token needs to match the name of the VM registered in Entra ID with the public FQDN of the machine.
The simplest approach is to add the Entra Device name in the hosts file locally on the client, where you add the IP of the machine and the hostname it is registered with, as seen in Figure 4.
It is not recommend to have a VM in Azure with a public IP and RDP port open, since it will increase the probability of a brute-force attack significantly. The best approach would be to have a form a secure connection to the remote desktop such as a VPN tunnel which would allow you to securely communicate with a network before using RDP.
Marius Sandbu is a cloud evangelist for Sopra Steria in Norway, who mainly focuses on end-user computing and cloud-native technology.