
Getty Images
Prep data for ML training with SageMaker Data Wrangler
Are you ready to wrangle some data? Follow this step-by-step tutorial, and learn how to load, analyze and transform data to train a ML model with Amazon SageMaker Data Wrangler.

When working with big data, one of the most time-consuming tasks is processing data sets. Unless you're familiar with a tool like PySpark or Pandas, it can be incredibly difficult to do efficiently.
But what if there were a tool that could help you process data quickly and easily? What if that tool could do the heavy lifting to process your data, analyze it and create a repeatable document to replicate those steps, all with little or no code?
Amazon SageMaker Data Wrangler is one of the AWS machine learning (ML) offerings that can help you transform, analyze and prepare your data for training.
By the end of this step-by-step tutorial, you should know how to take a data set, analyze it and transform it using the tools built into Data Wrangler to get it ready for machine learning.
Data Wrangler prerequisites
To get started, you need a few things:
- An AWS account or a user/role in one with access to SageMaker.
- An Amazon SageMaker Domain and a user in that Domain. The demo for this article can be done with a quick setup Domain or a standard setup Domain.
AWS provides sample data for anyone who is learning how to use Data Wrangler. But, if you want to use your own data set, you also need to add that data to one of the supported data sources, like S3 or Redshift. Then, grant the invocation role of your SageMaker user access to that data source. For the demos in this article, you only need the sample data.
Step 1. Import data
To start using Data Wrangler, go to your SageMaker Domain, and click on it. That should take you to the Domain Details page, with the User profiles tab open. If you picked a quick start SageMaker Domain, you have one user named default- followed by a long, random number.
On the right-hand side of the screen, there is a drop-down menu labeled Launch. Use that menu to select Studio, which launches AWS SageMaker Studio. Data Wrangler is one of the tools built in to SageMaker Studio.

Since you are only going to be processing data in this tutorial, select Import & Prepare Data Visually from the Quick Actions pane in SageMaker Studio. That opens up a new tab with a .flow extension and a menu. There are several different data sources available here, some other AWS services and some third-party services. For now, click the button on the right side labeled Use sample data.

Step 2. Explore the data
When you understand the Data Wrangler features, you can better clean and transform the data set before training your machine learning model with it.
This data set is a passenger manifest of the 1912 Titanic voyage. There's information about each passenger's cabin, age, class and if they survived or not. You can see the source of the data, which is Amazon S3, and a transform block connected to it, which assigns each column a data type.

Click on the + icon next to the first transform. There is a menu listing several of the operations you can take on the data. Click on Get data insights, which reveals a menu with a preview of the data on the left side of the page. There is also a panel with some options for the type of analysis you want to run. Select Data Quality and Insights Report.
Next, click on the Classification radio button under the Problem Type field at the bottom of the right-side panel. Then, click Create. This generates a summary of each of the features in the data set, a graph showing that feature at a high level and metadata about it, such as type, validity, missing or unique entries, and ranges.

This kind of metadata is helpful when determining what you need to do next. For example, if you wanted to make a model to predict the likelihood of an unlisted passenger surviving the wreck, the age and passenger class features are helpful. Information like ticket number, on the other hand, is not as useful.
Step 3. Transform the data
Since you may want to use this data for separate projects or analysis later, Data Wrangler isn't going to remove this column from the original document. Instead, define the steps you want to take on the data set, and Data Wrangler previews them before creating a copy of the data and saving it to a separate location in S3.
Now that you have an idea of the features of this data set, you can prepare the data. Since you've already identified the ticket number feature as not relevant to your analysis, you can drop it. On the Data Flow page where you created the insights report from in the last section, click on the + icon again, and click on Add transform. This brings you to a page with the preview of the data.

On the right, there is a list of steps that Data Wrangler takes before you train your model. You can see the first two steps already: S3 Source and Data Types. Click on Add Step, and then look for Manage columns.
With this transform, you can perform numerous actions on one or more of the columns in your data, including duplicating, renaming and dropping them altogether. Next, select Drop Column, and target the Ticket column. Then, add it to the steps list. In the next generated preview, the Ticket column is gone.

Create custom transformations
What if you need to do some custom transformations? You can use PySpark or Pandas on data as a part of the Data Wrangler pipeline.
After the Drop Column transform, select Custom Transform, and then choose PySpark. Enter the below Python snippet as your transform code. This takes the Survived column and casts it as Boolean:
from pyspark.sql import types

df = df.withColumn("survived", df["survived"].cast(types.BooleanType()))
After that's done, notice that the values in the Survived column are now true and false instead of 1 and 0. You can use Pandas, PySpark, NumPy, scikit-learn or SciPy in your functions.
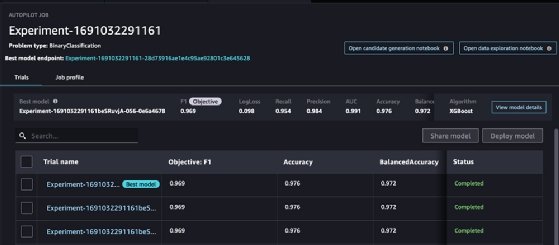
Step 4. Train the ML model
Now that the transforms are complete and everything is prepared, you're ready to train your machine learning model. If you've been following along, your Data Wrangler data flow should look something like Figure 7.

Click on the + icon at the end of the PySpark step, and select Train Model. A prompt asks where in S3 you'd like to save the model. Once you select a location, you are shown an Autopilot experiment. You can select any features from the data you want to target, and SageMaker takes care of the rest.
This takes several hours to run because SageMaker is going through several trials of the experiment to find the optimal model. Once finished, you have a deployable model that you can use for your applications, as well as an endpoint to access it.
Dig Deeper on Cloud provider platforms and tools
-
![]()
Sample Questions for AWS' Machine Learning Associate Certification
By: Cameron McKenzie
-
![]()
Free AWS AI Practitioner Practice Exams
By: Cameron McKenzie
-
![]()
GCP Certified Data Practitioner Sample Questions
By: Cameron McKenzie
-
![]()
AWS Machine Learning Associate exam topics, tips and practice exams
By: Cameron McKenzie


