
Getty Images
Get started with this quick Amazon SageMaker Autopilot tutorial
Building machine learning models can be a daunting and complicated task. Learn how Amazon SageMaker Autopilot can help and how to start an Autopilot experiment.

Choosing the right machine learning model requires multiple iterations and complex tasks in areas such as ML algorithm and model selection, data set selection, input data refinement, model training and deployment, and metric evaluation tasks for each iteration. To ease the process, developers can employ automated ML tools, such as Amazon SageMaker Autopilot, to automate each step of the ML workflow.
Learn more about Amazon SageMaker Autopilot and how to create an Autopilot experiment in this step-by-step tutorial.
How does Amazon SageMaker Autopilot work?
Amazon SageMaker Autopilot is an automated ML (AutoML) tool that simplifies and automates the process of building and deploying ML models for application owners.
Amazon SageMaker Autopilot performs these key tasks on autopilot, or with various levels of human intervention if desired:
- Data analysis and preprocessing.
- Model selection.
- Hyperparameter optimization.
- Model training and evaluation.
- Model deployment.
Developers provide a tabular data set to train the model and specify a target data column for prediction. Next, Autopilot runs and evaluates multiple ML algorithms against the provided data set and produces test result metrics and visualizations for developers to evaluate. Ultimately, this feature provides a way to deploy the chosen model into a live environment. Additionally, it produces a ranked list of recommendations for all the models, including their metrics, to determine the best-performing model.
How to create an Autopilot experiment
Before you start an Autopilot experiment, ensure you configure a SageMaker Domain. This configuration is also a prerequisite for other features, such as SageMaker Studio, Canvas and JumpStart. The domain configuration includes user profiles, Identity and Access Management permissions, Elastic File System shared storage system and VPC details. Once you configure a domain, you are ready to create an Autopilot experiment.
Step 1. Navigate to the Studio page from the SageMaker console, and open the Studio landing page.

Step 2. From the left navigation bar, click on AutoML to launch the Autopilot page.
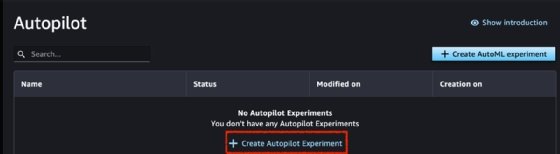
Step 3. Click on Create Autopilot Experiment to launch a new Autopilot Experiment.
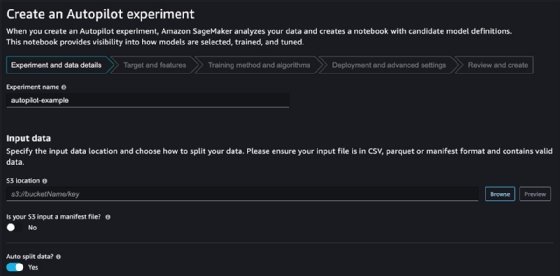
Step 4. Select the experiment name.
Step 5. Input data location in S3. This data must be in CSV or Parquet format.
Step 6. Input the split data configuration. By default, the ratio used for training and validation is 80% for training and 20% for validation.
Step 7. Define an S3 manifest file, which contains metadata such as the S3 location of the data set file.
Step 8. Select the S3 location for the output data.
SageMaker Autopilot outputs and recommends depending on the quality and relevance of the provided data set. Make sure the data set accurately reflects the nature of the data that will be predicted in a live environment.
The next page displays the Target and Features configuration. Target is the column in the input data set that the generated SageMaker models predict.
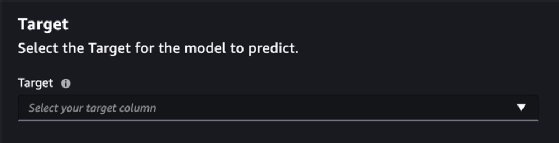
The Features section enables users to select the columns in the data set that is used for ML model training. It automatically selects all columns, except the one that was chosen as the Target, which the models predict.

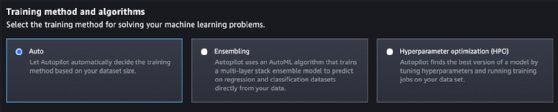
Step 9. Select the training method from three options: Auto, Ensembling and Hyperparameter Optimization. Ensembling is a better fit for data sets smaller than 100 MB, but unless there is a specific requirement known to developers, it is recommended to let SageMaker automatically choose the training method.
Step 10. Auto deploy models. This is recommended when doing an initial analysis of a particular data set and multiple ML models.

The Advanced settings menu provides a set of additional configurations, which, in an initial experiment, could be configured with its default values. An important setting for potential long-running and heavy experiments is the Runtime section. This section enables developers to select the maximum number of hours or minutes for trials and job runs. This could reduce the risk of potentially unexpected AWS costs, given that ML jobs often require high compute capacity for a long period of time.

Step 11. Update the summary page, or initiate the relevant tasks by clicking on Create experiment.

The experiment completion can take several minutes or even hours, depending on the data set, selected training method and number of evaluated models. Once the experiment is completed, Autopilot displays a summary of all the evaluated models and a set of metrics associated with each model. It also marks the model that Autopilot considers the best one, based on these metrics.

Clicking on each trial model displays a more detailed page with metrics.
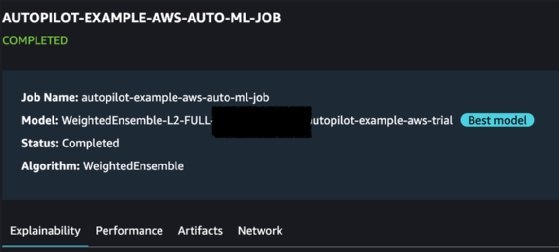
It goes into four types of metrics:
- Explainability. The Explainability report includes a summary of the evaluated columns in the data set and their corresponding relevance when predicting the value for the Target column.
- Performance. The Performance report includes a set of SageMaker-generated metrics that relate to how accurate and reliable the model predictions are, based on the Target column values provided in the input data set.
- Artifacts. The Artifacts section provides details on the location of SageMaker artifacts, which are placed in the S3 location that was configured when launching the experiment.
- Network. The Network section summarizes additional network and encryption configurations.
Users can download reports in the Explainability and Performance sections and evaluate each model in detail, outside of the SageMaker console.

Developers have the option to deploy each model with a single click and set specific configurations. There is the option to launch a Notebook and execute source code against the deployed model. This is required in most situations when evaluating a particular model using specific application scenarios.

Dig Deeper on Cloud provider platforms and tools
-
![]()
Sample Questions for AWS' Machine Learning Associate Certification
By: Cameron McKenzie
-
![]()
AWS Machine Learning Associate Practice Exams
By: Cameron McKenzie
-
![]()
AWS Machine Learning Associate exam topics, tips and practice exams
By: Cameron McKenzie
-
![]()
AWS AI Practitioner Certification Exam Dumps and Braindumps


