Wbadmin backup tips for backing up Windows
The Windows Wbadmin backup command can appear deceptively simple to use. In this tip, we'll teach you the basics of using Wbadmin and its commands.
What you will learn in this tip: The Windows Wbadmin backup command can appear deceptively simple to use, and your options with it can be limited by the operating system version you’re running. In this tip, we’ll teach you the basics of using Wbadmin and its commands.
Versions of Windows Server prior to Windows Server 2008 used NTBackup as the built-in backup tool. In some of these Windows Server versions, it was possible to control the backup software from the command line by using the NTBackup.exe command. In Windows Server 2008, Microsoft replaced the aging NTBackup with Windows Server Backup, and as a result, the NTBackup.EXE command no longer works. Instead, Microsoft now supports command line backups using the Wbadmin command.
What you need to know about Wbadmin
Even though Wbadmin was introduced in Windows Server 2008, it also works in Windows Server 2008 R2, Windows Vista and Windows 7. But the functionality that you can achieve from Wbadmin varies based on the version of Windows that you are using.
The Windows Server 2008 R2 version of the command supports the use of a number of commands that were not available in the original release. But subsequent versions available in Windows Vista and Windows 7 support fewer functions than either Windows Server 2008 and Windows Server 2008 R2.
In fact, the Windows 7 version will not even let you configure a regularly scheduled backup.
Wbadmin also must be run from a command prompt window, not a PowerShell window. When you use Wbadmin, you should be working within an elevated Command Prompt window. You can launch an elevated Command Prompt by right-clicking on the Command Prompt option and choosing the Run As Administrator command from the resulting shortcut menu.
Needless to say, there are certain permissions that you will need to have in order to use Wbadmin. If you want to create a regularly scheduled backup then you must be a member of the Administrators group. For all other tasks, you must be a member of either the Administrators group or the Backup Operators group.
What commands are supported?
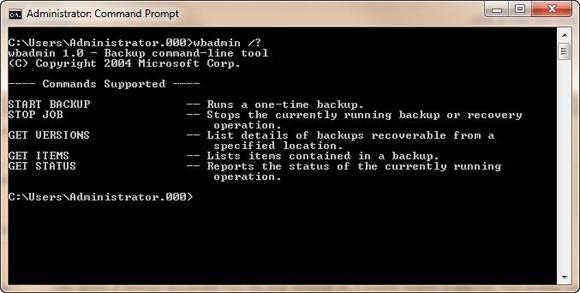
Before you can use Wbadmin, you need to find out what commands are supported by your operating system. The easiest way to do so is to enter the WBADMIN /? command. Doing so causes Windows to display the available commands, as shown in Figure 1 below.
Figure 1: What commands are supported?

You can use the WBADMIN /? command to see what commands are supported.
The figure above was created from a machine that is running Windows 7. As you can see, Windows 7 only supports five Wbadmin commands. Even so, this screen makes it look as though using Wbadmin is simpler than it really is. For example, this screen would lead you to believe that you can run a one-time backup by simply typing WBADMIN START BACKUP. However, there is more to the process than meets the eye. After all, you need to be able to specify which files are included in the backup as well as the backup destination.
There are actually more than a dozen different command line switches that you can use to create a backup. The most important switches involve specifying the backup source and the backup target. If the backup is being written to a remote share, then you might also have to supply a set of credentials for the share. For example, a simple backup might use a command like this one:
WBADMIN Start Backup –BackupTarget:F: -Include:C:
In the command above, the "Backup Target" (in this case F:) is the location where the backup will be written. The “Include” switch tells Windows what to back up. In this case we are backing up C:, but we could just as easily backup multiple paths by separating each one with a comma. For example, suppose that you wanted to back up C: and the Temp folder on D:. You could do so by using a command like this one:
WBADMIN Start Backup –BackupTarget:F: -Include:C:,D:\Temp
If you also wanted to include the system state in the backup then you could append the –SystemState switch to the command.
About the author: Brien M. Posey, MCSE, has received Microsoft's Most Valuable Professional Award four times for his work with Windows Server, IIS and Exchange Server. He has served as CIO for a nationwide chain of hospitals and healthcare facilities, and was once a network administrator for Fort Knox. You can visit his personal Web site at www.brienposey.com.


