
Getty Images
How to use Git to save PowerShell scripts
Git eases scripting by pushing developers into better habits -- especially around change documentation. Get familiar with the technology and how to use it with PowerShell.

While the easiest way to save scripts might be to mash Ctrl+S every few minutes and update the script's change log occasionally, there is a better way. Git, a purpose-built tool, tracks changes with only minor workflow adjustments.
Instead of using Ctrl+S, commit with Git. Follow this tutorial to learn how to use Git to save PowerShell scripts.
How Git works
Git is a managed, distributed database that tracks a group of files as they change. A contained group of files is called a repository. Each change, which can affect multiple files at a time, is called a commit and requires admins to save by committing, or instating, those changes.
To back up changes, you push changes to a central Git server or service. If someone else has made changes, you can pull those changes into a local copy of the repository.
If multiple people or teams work within the same repository, each can maintain their own copies of the files in the repository with a branch. This copy is based on the main branch, or copy, of the files -- formerly called the master. Upon completion of the work, they can update the main copy by merging their branch with the main branch so that the main copy has the newest code.
A simple, real-world Git example
Imagine a shared folder that holds all your IT team's scripts to automate various processes. Every time you change a script, you make a copy, edit it into a working state and then overwrite the original.
Or if you take the approach that I once did: I prepended "new" to the script post-update, in case I needed to roll back to the old script. This creates multiple scripts with names like new_NewUserScript.ps1 and forces admins to sort by date modified to find the right one. When someone uses an older, buggy script, it breaks the process. But this is where Git shines.
Instead of a shared folder, create a shared repository. In that repository, commit the best copies of each script. To update a script, make a local copy of the repository -- called cloning -- and make changes to the cloned script. When all changes are tested and approved, overwrite the main repository by pushing your local copy to the repository. Whenever someone needs to access the best copy of a script, the main branch is in a known-good, up-to-date state.
Git put into practice
For this Git-PowerShell tutorial, install Visual Studio Code -- VS Code hereafter -- and Git. Both tools are cross platform. I use GitHub as my Git provider, but there are other Git service providers, such as Azure DevOps and GitLab. For those new to Git, I recommend a hosted option to start.
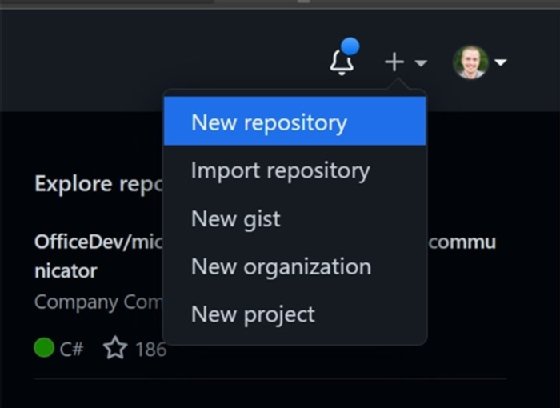
First, initialize a repository. Log into your GitHub account and click on the plus sign in the top-right corner. From there, select New repository from the drop-down list, as seen in Figure 1.
On the resulting screen, seen in Figure 2, name the repository. Call it something simple.
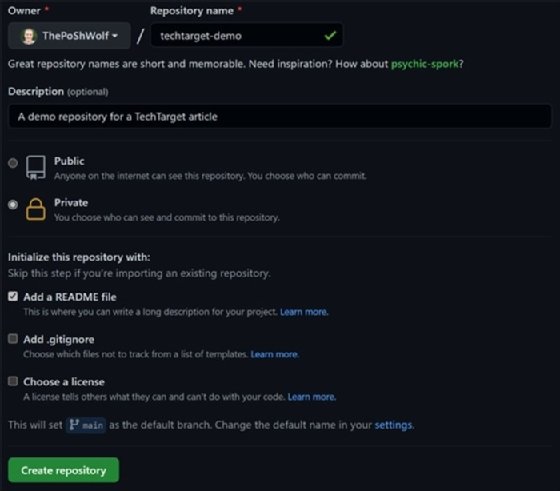
A README file is a useful way to let others know what the repository is for.
The .gitignore file identifies files that Git will ignore. For this tutorial, this is out of scope, so you can ignore it as well.
A license is necessary only for code shared publicly.
Once you fill in these options, click on Create repository.
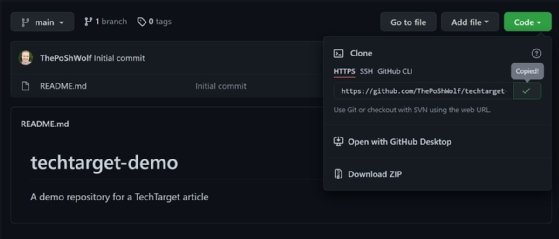
With the repository created and loaded, clone it to make a local copy. Click the green Code button and copy the clone URL, as shown in Figure 3.
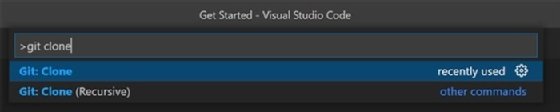
With that URL in hand, switch over to VS Code. Press the F1 key to open the command palette and type in 'git clone' as displayed in Figure 4.
Hit Enter to select that command. Then paste in the URL from your clipboard and hit Enter again. It will ask you to authenticate to GitHub -- go ahead and do so. Next, it will ask for a folder to store the repository. I store all my repositories in a local folder called Git to find them easily.
Once complete, a pop-up will appear in the bottom-right corner of the VS Code window, as Figure 5 shows.
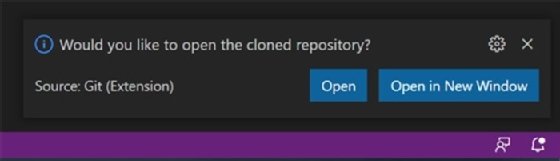
If there is another project open in VS Code, select Open in New Window, otherwise select Open.
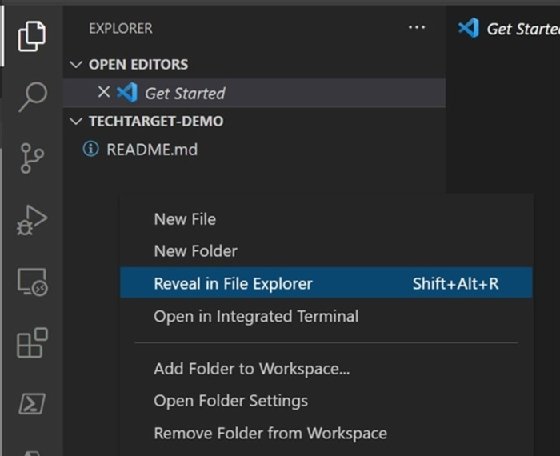
Either way will open the repository in VS Code. From here, move all the scripts into the repository. The easiest way is with File Explorer. As seen in Figure 6, right-click under the README.md file and select Reveal in File Explorer.
Paste in the files you'd like to store in Git. Then return to VS Code and open the Source Control tab as shown in Figure 7.

Git notices the new files and suggests you commit them into the repository. Fill in a brief comment about the changes in the message box. The message will be stored as part of the commit.
In this case, a good, simple message would be "Initial script commit." Next, click on the check mark above the text box to commit the files locally.
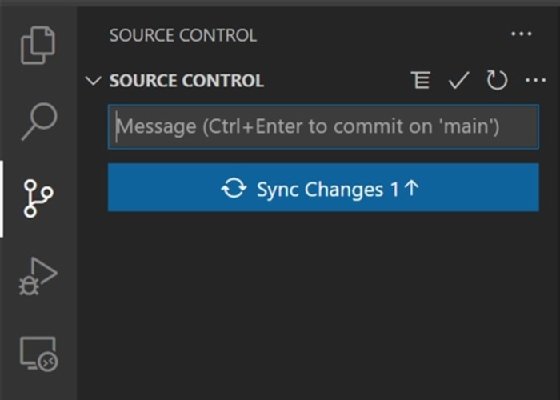
From there, push the files to GitHub to back them up. VS Code offers to sync the repository. This is a combination of both a pull, which copies changes from GitHub, and a push, which copies changes to GitHub.
Click on the blue Sync Changes button as shown in Figure 8.
Return to your browser and refresh the GitHub repository page. It should show each script and the timestamp of its last update as displayed in Figure 9.

Make changes to existing files
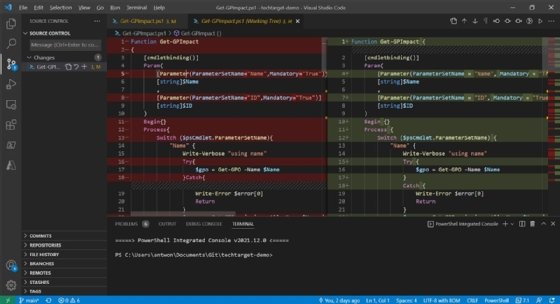
Say you committed an old script that used a nonstandard syntax format and you want to standardize that script on the best practices VS Code uses. Take one of those scripts and highlight everything. Right-click and use the Format Selection option -- part of the PowerShell extension. Commit those changes locally and push them to GitHub.
Navigate to the Source Control tab again, but this time click on the changed file. This will show all the changes to the file, as seen in Figure 10.
Commit those changes with a message, such as "Formatting syntax," and push them back to GitHub.


