How to copy files from source to destination in PowerShell
Take a closer look at these Copy-Item coding examples to build advanced PowerShell scripts that copy files with safety measures to ensure the duplicates reach their destinations.

Copying files between folders, drives and machines can be a waste of your time if you do it manually on a regular basis. A bit of PowerShell know-how automates this tedious process and even handles the most complex situations.
Once you understand the parameters associated with the Copy-Item command and how they work together, you can produce comprehensive scripts with more advanced PowerShell commands to copy files and directories.
The examples in this article work on both Windows PowerShell and PowerShell 7.
PowerShell has providers -- .NET programs that expose the data in a data store for viewing and manipulation -- and a set of generic cmdlets that work across providers.
These include the following cmdlets:
- *-Item
- *-ItemProperty
- *-Content
- *-Path
- *-Location
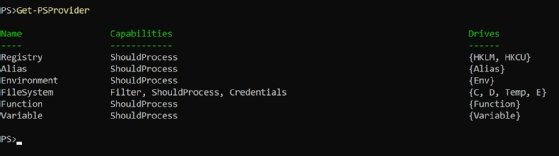
With a default installation of PowerShell or Windows PowerShell, you can use the Copy-Item cmdlet to copy files, registry keys and variables. This is facilitated by the provider feature that enables interaction with different content types with the same command. Some modules include custom providers, such as the AD module, which enable you to use those generic cmdlets in the AD data they expose. Run the following command to see the PowerShell providers in your PowerShell session.
Get-PsProviderFor example, these are the providers available in the PowerShell 7 session on my Windows 11 machine.
How do you use the Copy-Item command?
The simplest form of Copy-Item involves a source path and a destination path. To use the FileSystem provider, specify the paths by starting with a drive letter and a colon on Windows or a forward slash on Linux.
Using .\ or ./ to represent the current directory infers the current path based on the current working directory, which doesn't have to be a FileSystem provider path. You can always check your current working directory with the Get-Location command.
The example in the following PowerShell command copies a single file located at the Path parameter to the location specified in the Destination parameter.
Copy-Item -Path C:\source\path\file.txt -Destination D:\dest\path\text.txtTo use a shorter command, PowerShell offers several aliases for its major cmdlets. The following command shows the three aliases -- copy, cp and cpi -- for the Copy-Item cmdlet.
Get-Alias -Definition Copy-Item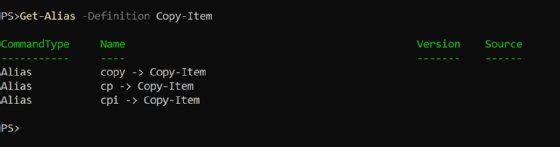
In PowerShell on Linux, the cp alias does not exist since there is an existing Linux command called cp.
How can you use PowerShell commands to copy files?
To show how the various Copy-Item parameters work, create a test file with the following command.
Get-Process | Out-File -FilePath c:\test\p1.txtUse this command to copy a file with the Destination parameter. You do not specify a file name in the Destination parameter. In this case, it uses the original file name of p1.txt.
Copy-Item -Path C:\test\p1.txt -Destination C:\test2\The Copy-Item command does not display any message or confirmation when a copy operation is successful, which can be confusing for new users.

To take advantage of both the command's alias and position parameters, specify the source and destination in order.
Copy C:\test\p1.txt C:\test2\Alias use in saved scripts isn't considered best practice and should be avoided for the most part.
To get feedback from Copy-Item, use the PassThru parameter. This feature returns objects for each of the items that were copied. It's a helpful tool to confirm the command performed properly.
Copy-Item -Path C:\test\p1.txt -Destination C:\test2\ -PassThru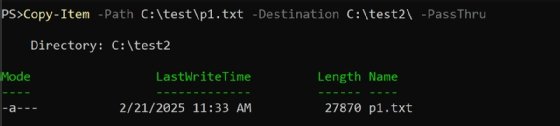
The other option to see the results from the Copy-Item command is to use the Verbose parameter.
Copy-Item -Path C:\test\p1.txt -Destination C:\test2\ -Verbose
The Verbose parameter displays information as the command executes, while the PassThru parameter gives the resulting file object.
By default, PowerShell overwrites the file if a file with the same name exists in the target folder. If the file in the target directory is set to read-only, you get an error.
Copy-Item -Path C:\test\p1.txt -Destination C:\test2\
You need to be a PowerShell Jedi to avoid this error by using the Force parameter.
Copy-Item -Path C:\test\p1.txt -Destination C:\test2\ -ForcePowerShell can rename files as part of the copy process. For example, this code creates nine copies of the p1.txt file called p2.txt through p10.txt.
2..10 | Foreach-Object {
 $newname = "p$_.txt"
 Copy-Item -Path C:\test\p1.txt -Destination C:\test2\$newname
Verbose
}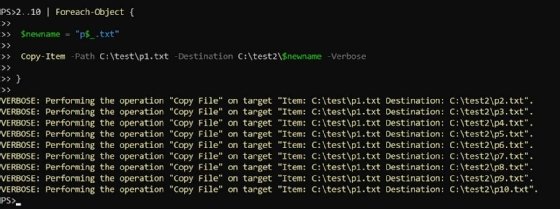
In this case, the .. operator creates an array of integers from two to 10. Then, for each of those integers, the code creates a file with the new name.
How to use PowerShell commands to copy multiple files or folders
There are a few techniques to copy multiple files or folders when using PowerShell.
Copy-Item -Path C:\test\*.txt -Destination C:\test2\
Copy-Item -Path C:\test\* -Filter *.txt -Destination C:\test2\
Copy-Item -Path C:\test\* -Include *.txt -Destination C:\test2\
These commands copy all the .txt files from the test folder to the test2 folder, but the Include parameter lets PowerShell be more selective. For example, this command only copies files with a 6 in the file name.
Copy-Item -Path C:\test\* -Include *6*.txt -Destination C:\test2\ -PassThru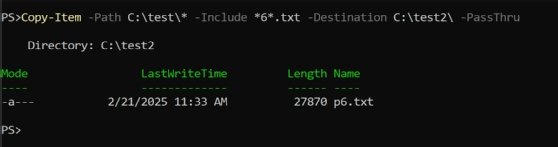
Copy-Item has an Exclude parameter to reject certain files from the copy operation. This PowerShell command only copies text files that start with the letter p unless there is a 7 in the name.
Copy-Item -Path C:\test\* -Filter p*.txt -Exclude *7*.txt -Destination C:\test2\ -PassThru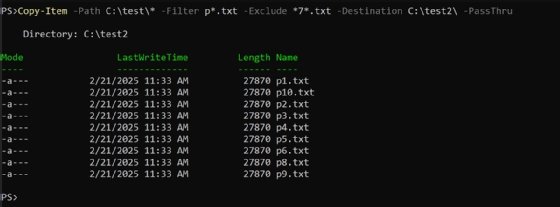
How to use the Path, Filter, Include and Exclude parameters
A combination of the Path, Filter, Include or Exclude parameters refines the copy process even further. However, if you use Include and Exclude in the same call, Exclude is applied after the inclusions.
For example, combine Path, Filter, Include and Exclude. In this example, the Path parameter selects all files in C:\test, the Filter parameter finds all files that start with the letter p, the Include parameter specifies only .txt files from that selection and the Exclude parameter eliminates files with 7 in the name.
Copy-Item -Path C:\test\* -Filter p* -Include *.txt -Exclude *7* -Destination C:\test2\ -PassThru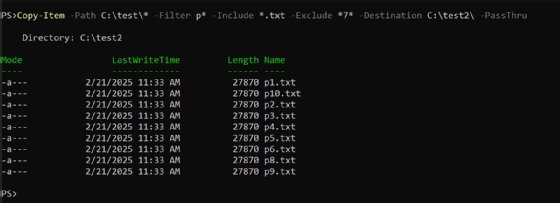
You can also supply an array of file names. The path is simplified if your working folder is the source folder for the copy.
Copy-Item -Path p1.txt,p3.txt,p5.txt -Destination C:\test2\The Path parameter also accepts pipeline input. In the following example, PowerShell checks the p*.txt files in the C:\test folder to see if the second character is divisible by two. If so, PowerShell copies the file to the C:\test2 folder.
Get-ChildItem -Path C:\test\p*.txt | Where-Object
{(($_.BaseName).Substring(1,1) % 2 ) -eq 0} |

Copy-Item -Destination C:\test2\
If you end up with a folder or file name that contains wildcard characters -- *, [, ], ? -- use the LiteralPath parameter instead of the Path parameter. LiteralPath does no interpretation of any wildcard characters and specifies the exact path to an item.
How to test the Filter, Include and Exclude parameters
If you are using a complex combination of Filter, Include and Exclude, it can be hard to predict what files PowerShell will copy. To test a Copy-File command before executing it, append the WhatIf parameter to any Copy-File command. PowerShell outputs a description of the operation rather than executing the action.
Copy-Item -Path C:\test\* -Filter p* -Include *.txt -Exclude *7* -Destination C:\test2\ -PassThru -WhatIf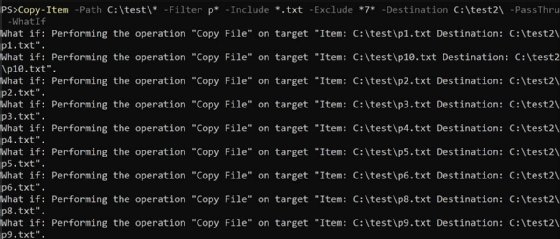
Another method to report on the files is to use Get-ChildItem, which utilizes the same Path, Filter, Include and Exclude parameters. They function in the same way as with Copy-Item. Take the same parameters, remove Destination and apply them to Get-ChildItem. The command outputs the list of files and folder objects that start with the letter p and have a .txt extension, and it removes any files that have 7 in the file name.
Get-ChildItem -Path C:\test\* -Filter p* -Include *.txt -Exclude *7*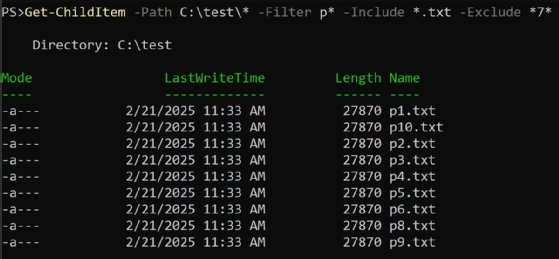
Because the command returns the files in an array, you can then work with the file objects and generate a report on the files that would be copied, among other things.
How to perform a recursive copy
To copy a folder and its entire contents, use the Recurse parameter.
Copy-Item -Path c:\test\ -Destination c:\test2\ -RecurseA recursive copy works its way through all the subfolders below the C:\test folder. PowerShell then creates a folder named test in the destination folder and copies the contents of C:\test into it.
When copying between machines, you can use Universal Naming Convention paths to bypass the local machine.
Copy-Item -Path \\server1\fs1\test\p1.txt -Destination \\server2\arc\test\Another option is to use PowerShell commands to copy files over a remoting session. The following command prompts the user for the password to the Administrator account on the remote machine named W16ND01. The session object gets stored in the $s variable, which can be used in ensuing commands to run operations on W16ND01.
$cred = Get-Credential -Credential W16ND01\Administrator
$s = New-PSSession -VMName W16ND01 -Credential $cred
In this case, use PowerShell Direct to connect to the remote machine. You need the Hyper-V module loaded to create the remoting session over VMBus. Next, use the following PowerShell commands to copy files to the remote machine.
Copy-Item -Path c:\test\ -Destination c:\ -Recurse -ToSession $sYou can also copy files from the remote machine.
Copy-Item -Path c:\test\p*.txt -Destination c:\test3\ -FromSession $sThe ToSession and FromSession parameters control the direction of the copy and whether the source and destination are on the local machine or a remote one. Sending data to a remote machine uses ToSession, and recieving files from a remote machine uses FromSession.
Unfortunately, ToSession and FromSession cannot be used in the same command, nor are relative paths supported. To copy something from your user account's home directory on one server to another while connecting to both servers via PowerShell remoting, get creative while specifying fully qualified paths.
In the code in the following example, the remote file from server1 is copied locally and then copied to server2.
$server1 = New-PSSession -ComputerName server1.domain.com -Credential
$cred
$server2 = New-PSSession -ComputerName server2.domain.com -Credential
$cred
$path = 'C:\Users\user\Downloads\file.zip'
Copy-Item -Path $path -Destination .\file.zip -FromSession $server1
Copy-Item -Path .\file.zip -Destination $path -ToSession $server2
How to track the progress of a copy command
A useful addition to Copy-Item is the introduction of a progress bar in PowerShell 7.4. This feature shows a visual representation of the status of a running command and helps the user estimate how long until the operation completes. This is not supported in Windows PowerShell.
The following PowerShell code copies files from the C:\PowerShell folder and its subfolders to the D:\PowerShell folder.
Copy-Item C:\PowerShell\ D:\PowerShell\ -Recurse
The output shows the overall progress of the copy operation in terms of files copied, the total size of data transferred and the current data transfer rate.
PowerShell also introduced a ProgressAction common parameter that can disable the progress bar if speed is of the essence.
Copy-Item C:\PowerShell\ D:\PowerShell\ -Recurse -ProgressAction SilentlyContinueHow to copy files to multiple machines
There are times when a file, such as a configuration file, needs to be copied to multiple remote servers or clients. This is easy enough to do if the machines have PowerShell remoting enabled.
First, import the list of computer names. In this example, assume that there is a list of names in a text file, but this could come from an AD query or another source.
$remoteTargets = Get-Content .\names.txtNext, store the credentials in a variable.
$cred = Get-CredentialNext, use a Foreach-Object loop to take advantage of multithreading in PowerShell 7 with the Parallel parameter to create a session object, copy the file -- a config.json file -- to the device and close the session.
$remoteTargets | Foreach-Object -Parallel {
    $session = New-PSSession -ComputerName $_ -Credential $using:cred
   Copy-Item -Path .\config.json -Destination
C:\ProgramData\app\config.json -ToSession $session
Remove-PsSession $session
}
Note how the code uses the $using: syntax to pass the $cred variable into the Foreach-Object scriptblock.
How to create backups of a file
Copy-Item is also useful to create backups for items such as configuration files or frequently modified files in a file share. This example places each backup in a dated folder to provide multiple copies.
First, define the date string. The frequency of the backup dictates the format. For example, a daily backup has a date string that only includes the year, month and day or YYYYMMDD format. This is also called the ISO 8601 format for dates and is recommended due to its relative ease to sort.
For a simple daily backup, generate the date string with the following PowerShell code.
$dateStr = Get-Date -Format FileDateThis returns a string of the current date as a four-digit year, two-digit month and two-digit day.
Next, define the file paths, and create the new directory if needed.
$source = "C:\ProgramData\app\config.json"
$dest = "D:\Backups\app\$dateStr"
if (-not (Test-Path $dest -PathType Container)) {
    New-Item -ItemType "directory" -Path $dest
}
Lastly, copy the file.
Copy-Item -Path $source -Destination $destTo get the most out of a backup script, schedule it with the Task Scheduler on Windows or as a cron job on Linux.
Use advanced PowerShell techniques to check for errors and resume a copy
The Copy-Item cmdlet lacks error checking or restart capabilities. For those features, you need to write the code.
The following script tests the source file path, calculates the file hash, checks for the file's existence and verifies the integrity of the copied file using a hash comparison. The file copy process occurs within a try/catch block used for exception handling. If an error occurs, a "File copy failed" message is output.
function Copy-FileSafer {
 [CmdletBinding()]
 param (
   [string]$path,
   [string]$destinationfolder
 )
 if (-not (Test-Path -Path $path)) {
   throw "File not found: $path"
 }
 $sourcefile = Split-Path -Path $path -Leaf
 $destinationfile = Join-Path -Path $destinationfolder -ChildPath
$sourcefile
 $b4hash = Get-FileHash -Path $path
 try {
    Copy-Item -Path $path -Destination $destinationfolder -ErrorAction
Stop
 }
 catch {
   throw "File copy failed"
 }
 finally {
   $afhash = Get-FileHash -Path $destinationfile
   if ($afhash.Hash -ne $b4hash.Hash) {
      throw "File corrupted during copy"
   }
   else {
     Write-Information -MessageData "File copied successfully" -InformationAction Continue
   }
 }
}
With additional coding, the script can recursively retry several times. After each copy attempt, the script can calculate the hash of the file and compare it to the original. If they match, all is well. If not, an error is reported.
Anthony Howell is an IT strategist with extensive experience in infrastructure and automation technologies. His expertise includes PowerShell, DevOps, cloud computing, and working in both Windows and Linux environments.