Best practices for using PowerShell ISE for scripting
Administrators who want to break into PowerShell scripting need to work with an editor for a more effective workflow. Learn how to edit and manage scripts with PowerShell ISE.
Editor's Note: Adam Bertram originally wrote this article and Brien Posey has expanded it.
When administrators start coding in PowerShell, they need the right tool and methods to get the most out of the scripting tool.
The PowerShell Integrated Scripting Environment (ISE) is a Microsoft tool designed to edit, run and manage PowerShell scripts. The editor comes preinstalled with Windows and is simple to use. But there are quite a few features newcomers might not know that can help them build useful scripts.
Execute PowerShell code
PowerShell ISE features two windowpanes. The top pane is used to view and edit code, while the bottom pane is a PowerShell console.
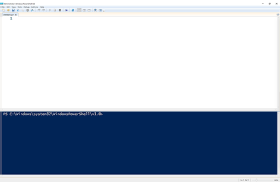
Whether creating a script from scratch or editing an existing script, you always see the code in the editor window and the output in the console window when the code is executed.
For example, test this script to ensure it works as expected.
if (Test-Path -Path C:\FileDoesNotExist.txt) {
 Write-Host 'The file does not exist'
} else {
 Write-Host 'The file does exist'
}
While you can execute the code shown above in the same way that you would run any other PowerShell script, PowerShell ISE enables users to execute a portion of the script rather than having to execute the script in its entirety. This can be extremely helpful when debugging complex scripts.
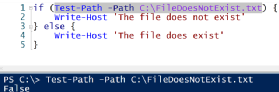
Suppose for example, that you simply wanted to run the Test-Path -Path C:\FileDoesNotExist.txt portion of the script to see what happens. In the ISE editor window, highlight just that code and press the F8 key. Only the selected code is executed.
If on the other hand, you prefer to execute the entire script, there are a couple of ways to do so. If the script has been saved to a file, you can type ./ followed by the path and filename, which is the normal way to execute a PowerShell script. The other option is to simply press the F5 key.
Find the right commands with the Command add-on

The Command add-on can ease scripting in PowerShell ISE. Find the add-on by selecting Show Command add-on in the View menu. A separate window displays a list of available commands. Selecting a command from the list causes the console to display the cmdlet's parameters.
Stay organized with tabs
PowerShell ISE uses the same type of tab navigation as a web browser. You can work on different scripts in multiple tabs. PowerShell ISE has tabs that represent scripts and tabs that represent PowerShell sessions.
When you open PowerShell ISE, you'll have one untitled tab running in a single PowerShell session. You can open other script tabs using the Open option in the File menu or create a new script tab via the New option. PowerShell ISE also has a session tab. Navigating up to File and then clicking on New PowerShell Tab creates a different session.
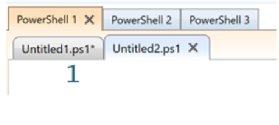
Once you have a few script and session tabs open, you'll see the script tabs appear like child tags of the session tabs. The separate sessions in PowerShell ISE help you stay organized when working on multiple scripts. This feature keeps code separate in the editor and creates different PowerShell runspaces. A runspace in PowerShell encapsulates all the variables and functions into its own space. Working with scripts in multiple runspaces prevents stored variables, functions and other code loaded in a particular session from conflicting with those used in other sessions.
Visual Studio Code vs. PowerShell ISE
When PowerShell 2.0 came out, PowerShell ISE was the first editor designed for the language. Microsoft no longer develops PowerShell ISE and has instead moved to Visual Studio Code (VS Code).
VS Code supports multiple languages and has a robust extension gallery to support common features, such as syntax highlighting and an integrated terminal window. VS Code supports PowerShell via an extension and can mirror the functionality of PowerShell ISE. With the cross-platform PowerShell Core as the new scripting and automation focus for Microsoft, this decision makes sense.
Admins that need new functionality or who work with PowerShell on a platform other than Windows should use VS Code. If they only work on Windows and want a simpler, more stable product to work with and debug PowerShell scripts, PowerShell ISE is an excellent choice. It's worth noting that PowerShell ISE and VS Code aren't the only options for editing PowerShell scripts. You can compose or edit PowerShell code using any text editor. Additionally, while not technically an editor, Windows 11 includes a tool called Terminal that lets you create tabs containing PowerShell, Windows Command Prompts and Azure Cloud Shell sessions.