Getty Images
How to find and customize your PowerShell profile
Give a more streamlined approach to PowerShell by learning how to customize your PowerShell profile to optimize workflows, enhance security and adapt to different environments.

If you run the same commands every time you launch the PowerShell console, consider modifying your PowerShell profile for a better overall experience.
The PowerShell profile loads your settings whenever you launch PowerShell to customize the environment to your needs. You define your settings as a PowerShell script, making the process straightforward. This article will explain the concepts behind the PowerShell profile, how to edit it for the various PowerShell consoles -- PowerShell, Windows PowerShell, Visual Studio Code (VS Code), Integrated Scripting Environment (ISE) -- and several useful additions to incorporate to enhance your workflow and avoid potential issues.
What is the PowerShell profile?
The PowerShell profile is simply a PowerShell script that runs every time you launch PowerShell, except when you launch PowerShell with the -NoProfile flag. The location of the profile varies depending on several conditions:
- The version of PowerShell (Windows PowerShell vs PowerShell)
- Is the profile for all users or the current user?
- Is the profile host application specific? (ISE, VS Code, etc)
The following lists are directories. The names of the profile scripts depend on the host application.
For all users, the profile is located here:
- Windows PowerShell: $PSHOME\
- PowerShell:
- Windows: $PSHOME\
- Linux: /usr/local/Microsoft/powershell/7/
- macOS: /usr/local/Microsoft/powershell/7/
For specific users, the profile is located here:
- Windows PowerShell: $HOME\Documents\WindowsPowerShell\
- PowerShell
- Windows: $HOME\Documents\PowerShell\
- Linux: ~/.config/powershell/
- macOS: ~/.config/powershell/
In these directories, you can have several valid profile files. The difference between the profiles is based on the host application that launches PowerShell. For this tutorial, we will use the ISE and VS Code as examples for hosts:
- All hosts: profile.ps1
- ISE: Microsoft.PowerShellISE_profile.ps1
- VS Code: Microsoft.VSCode_profile.ps1
If a user launches PowerShell in VS Code, the following profiles could run on Windows:
- All users, all hosts: $PSHOME\profile.ps1
- All users, VS Code: $PSHOME\Microsoft.VSCode_profile.ps1
- Current user, all hosts: $HOME\profile.ps1
- Current user, VS Code: $HOME\Microsoft.VSCode_profile.ps1
If any of the files don't exist, PowerShell skips that profile.
How to access the PowerShell profile
The easiest way to access PowerShell's profile is through PowerShell itself. There's no need to remember any of the listed paths because they are all stored in a variable called $Profile.

In this case, the username is hidden.
You'll notice that the only path displayed is the current user's PowerShell host application profile. Thankfully the $Profile variable has some additional properties to show us the other paths. We can find those properties by piping the variable to Get-Member:
$Profile | Get-Member -MemberType NoteProperty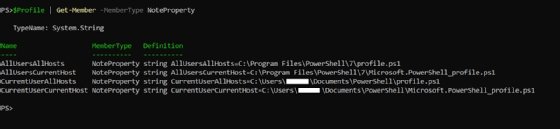
Therefore, if we want to find the path for the AllUsersAllHosts profile, we can do so with:
$Profile.AllUsersAllHostsOn our system, the result is C:\Program Files\PowerShell\7\profile.ps1 for the path. Because the file is in the Program Files hierarchy and we can't edit that without administrative permissions, let's instead focus on the CurrentUserCurrentHost profile with:
$Profile.CurrentUserCurrentHost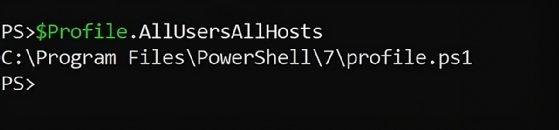
If we want to edit that script, we can call VS Code directly:
code $Profile.CurrentUserCurrentHostThis will launch VS Code and open that file.
Ideas of things to add to your profile
Since the profile is so flexible, you could do many different things with it. Let's look at a few that I've found useful over the years.
Add OS awareness to profile
Not all commands work the same way across the OSes that PowerShell supports, so we need logic to separate different commands. Fortunately, PowerShell makes this very easy with some built-in variables that will all exist cross-platform:
- $IsWindows is true when running on Windows
- $IsLinux is true when running on Linux
- $IsMacOS is true when running on MacOS
if ($IsWindows) {
    # do Windows stuff
} elseif ($IsLinux) {
    # do Linux stuff
} elseif ($IsMacOS) {
    # do MacOS stuff
}
The following suggestions will contain some examples of how to write profile code for multiple platforms.

Customize your prompt
PowerShell allows you to run a script every time the prompt loads, which is every time you run a command. If you aren't already familiar with customizing your prompt, I highly encourage you to do additional research to see some cool prompts folks have blogged about. This article will only cover a very basic example.
For instance, if we wanted to place the cursor on the line below the path and display the # symbol if we are running as administrator on Windows or as root on Linux, we could do something like:
Function Prompt {
    $endChar = '>'
    # check if running as admin
    if ($IsWindows) {
        If (([Security.Principal.WindowsPrincipal][Security.Principal.WindowsIdentity]::GetCurrent()).IsInRole([Security.Principal.WindowsBuiltInRole]::Administrator)) {
            $endChar = '#'
        }
    } elseif ($IsLinux) {
        if ((id -u) -eq 0) {
            $endChar = '#'
        }
    }
    "$PWD`nPS$endchar"
}
Since we want this to run every time PowerShell loads, put it in your profile.
Load a PowerShell module and set default properties
A mistake I regularly make is to use a module that requires authentication before authenticating. Some modules are slick and remind you to authenticate, while others throw a cryptic error. Regardless, if it is a module you use frequently, consider adding the authentication steps to your profile.
Let's use the Microsoft.Graph module as an example. It allows you to authenticate using cached credentials, so, assuming you have previously authenticated, you can simply add the following to your profile:
Connect-MgGraphThough one of the quirks of the Microsoft.Graph.Users module is that returning multiple properties of users requires specifying even the default properties. We can work around this by building a variable in our profile:
$graphUserProps = @(
    'BusinessPhones',
    'DisplayName',
    'GivenName',
    'Id',
    'Mail',
    'PreferredLanguage',
    'Surname',
    'UserPrincipalName'
)
And then whenever we need additional properties for a Graph user, we can reference that variable and add additional properties:
Get-MgUser -UserId <upn> -Select ($graphUserProps + 'AccountEnabled','UsageLocation')Manage PowerShell module versions
If you have a particular module that you want to keep up to date, you can run version checks in your profile or run the Update-PSResource or Update-Module command on every launch. Since you may end up managing many modules or modules that are large themselves, we could initiate this part of the profile in a ThreadJob:
$modulesToUpdate = @('az', 'microsoft.graph')
$null = Start-ThreadJob -Name "Update modules" -ArgumentList $modulesToUpdate {
    param([string[]]$modulesToUpdate)
    foreach ($module in $modulesToUpdate) {
        Update-PSResource -Name $module -Force -Confirm:$false
    }
}
Since this example runs as a ThreadJob, the modules will update in the background without slowing your profile.
Add security features
Since your PowerShell profile will load every time you run, this is a great place to enable some security features.
For example, if your organization uses Just Enough Administration (JEA), you can pre-emptively set up some JEA sessions:
$jeaDcSession = New-PSSession -ComputerName 'DC01' -ConfigurationName 'JEA_DC'
Import-PSSession -Session $jeaDcSession -Prefix 'JEADC'
Then, if you wanted to see what commands were imported, you could run:
Get-JEADCCommandAnother use case is for unlocking secret vaults. If you use the Secrets Management module, you can unlock your most-used vault in your profile:
Unlock-SecretVault -Name VaultName -Password (Read-Host -AsSecureString)However, this will prompt you for the vault password on every run.
If your infosec team requires you to log all your PowerShell activity for ingestion into your company's SIEM, you could even add transcript logging to your profile:
Start-Transcript -OutputDirectory C:\Path\To\SIEM\DirectoryAdding aliases and argument completers
Another excellent use case for the PowerShell profile is adding aliases. If you work a lot in PowerShell interactively, then aliases can save quite a bit of typing. If we go back to the previous Microsoft.Graph example, you could shorten Get-MgUser to gmu:
New-Alias -Name gmu -Value Get-MgUserHowever, one of my favorite aliases is for the Kubernetes command line tool kubectl. I alias it to the letter k:
New-Alias -Name k -Value kubectlKubectl includes a PowerShell argument completer -- the function that offers dynamic hints for parameter values for commands to speed up coding. If you use kubectl a lot, that is an excellent addition to your profile.
Load custom functions
A lot of times, you may find yourself writing one-off functions to help with your work. They may not feel worth adding to a module, but they help you get your work done. So after you have them in source control, your profile can dot-source them all to load them when you load PowerShell:
. C:\path\to\Function.ps1Apply environment awareness
If you have hosts with standard names or an easy way to identify what environment a host is in, you can make environment-aware adjustments to PowerShell. For example, you could force the background to be red when you are in production.
if ($IsWindows) {
    if ($env:COMPUTERNAME -like 'prod-*') {
        $Host.UI.RawUI.BackgroundColor = 'DarkRed'
    }
}
Or you could even update the window title, giving another layer of warning:
$Host.ui.RawUI.WindowTitle = "POWERSHELL in PRODUCTION"Ways to sync a PowerShell profile
Once you've perfected your profile, you won't see those customizations when you hop onto another system. To solve that, we can introduce some profile synchronization.
A common and easy fix is to use a file-syncing application, such as OneDrive. Be sure to enable the Documents folder redirection to sync your profile. If you do this, also be aware that your modules will also be synced, which could introduce latency unless you configure your Documents folder to be stored locally on your device. Whenever you import a module, OneDrive will download the files associated with the module.
A better approach would be to store your profile in a place that is easily accessible. If you work in a corporate environment, this could be on a file server or even an Azure File share. Then, any time you launch PowerShell on a new machine, you just need to copy the profile onto your local system:
Copy-Item Z:\share\home\profile.ps1 ~\Documents\PowerShell\Profile.ps1This approach also has the advantage of being supported on servers where installing an application such as OneDrive is prohibited.
Another method is to use a GitHub gist to make the profile available for download. Gists are publicly available, so only use this method if your profile contains no private information, such as information about your internal environment.
An excellent example of using a gist to sync your PowerShell profile is the from Steve Lee, the principal software engineer manager of the PowerShell development team from Microsoft. His profile uses a comment to identify the published version:
# Version 1.2.13He also includes logic that compares the version in the local profile with the public version. If the public profile version is greater, then the profile will be downloaded and made available the next time PowerShell launches.
The following code downloads a PowerShell profile from a gist and saves it as the local PowerShell profile.
$gist = Invoke-RestMethod https://api.github.com/gists/a208d2bd924691bae7ec7904cab0bd8e
$gist.files."profile.ps1".content | Out-File ~\Documents\PowerShell\Profile.ps1
These are just a few examples of how to customize your PowerShell profile. Experiment with some of these suggestions and incorporate them to optimize and simplify your workflow when working with this automation tool.
Anthony Howell is an IT strategist with extensive experience in infrastructure and automation technologies. His expertise includes PowerShell, DevOps, cloud computing, and working in both Windows and Linux environments.
Dig Deeper on IT operations and infrastructure management
-
![]()
Using GitHub Copilot to accelerate PowerShell scripting
By: James Bannan
-
![]()
How to use Microsoft 365 DSC to avoid configuration drift
By: Liam Cleary
-
![]()
What is PowerShell and how to use it: The ultimate tutorial
By: Stephen Bigelow
-
![]()
Manage the Windows PATH environment variable with PowerShell
By: Anthony Howell