
Sergey Nivens - Fotolia
How to deploy VMware Folding@Home Fling
To deploy VMware's Fling appliance and use the Folding@Home software, you must have at least vCenter Server 6, a username and passkey, an IP address, a gateway and a DNS.

VMware Folding@Home Fling uses distributed computing to join and share CPU cycles from anyone who installs the software. The aim is to improve collaboration on disease research. To deploy the Fling appliance, admins must meet specific requirements, such as obtaining login credentials, an IP address, a gateway and an OS root password.
Distributed computing is critical to improve knowledge of global issues, including how to cure diseases such as COVID-19, cancer and Parkinson's. VMware released its Fling appliance for the Folding@Home (F@H) initiative on March 19, 2020.
VMware's contributions to F@H are vital because COVID-19 research requires significant CPU power to resolve issues and find new medications. F@H Fling automatically uploads and executes code using the computer's free resources. For example, you can install the software on your home computer and run it during off hours, such as the weekend. Users can start and stop the software at any time.
An intro to VMware Folding@Home Fling
VMware F@H Fling is a virtual appliance preinstalled within the F@H client software. Once you deploy the Fling appliance, the F@H client is ready to run. VMware configures F@H to automatically join VMware Team, which connects F@H users and provides a dashboard of each members' progress with the F@H initiative.

There are versions of the F@H software available for Windows, Linux and macOS, as well as a software alternative for Docker and GPU containers. The following tutorial is for the VMware Folding@Home Fling only.
Editor's note: Flings are experimental, and admins should avoid running them on production systems to protect mission-critical applications.
Create an F@H username and passkey to get started.
How to deploy VMware Folding@Home Fling in vCenter
You must have at least vCenter Server 6 to install the Fling appliance. You can download an Open Virtualization Appliance (OVA) file directly from VMware's Fling website.
Author's note: To run this software on individual ESXi hosts not attached to vCenter Server, follow VMware's deployment instructions.
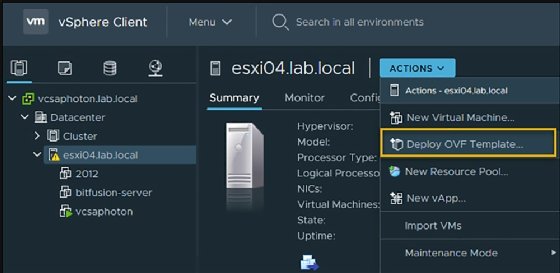
Connect to vCenter Server via a web browser and download the OVA file. The OVA file contains both OVA and Open Virtualization Format (OVF) extensions. From there, select the host or cluster to host the F@H Fling OVA. Navigate to Datacenter and select Deploy OVF Template under the Actions tab in the vSphere Client.
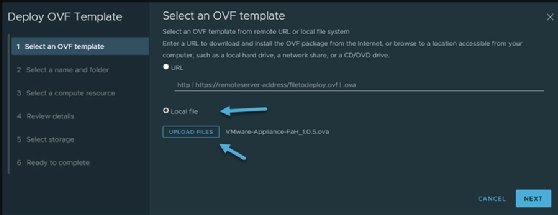
An assistant guides you through the configuration process after deployment. First, select an OVF template from a remote URL or a local file system. Click Upload Files and select the OVA file downloaded prior to configuration.
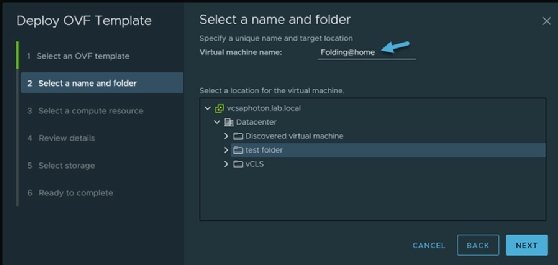
Next, choose the location and name for the VM appliance.
Then, follow the assistant and continue to enter the deployment requirements, such as an IP address, a gateway, a DNS, an OS root password and a GPU. After, power off the VM appliance, right-click on the VM and select Edit Settings to adjust the desired CPU number to dedicate to the appliance. From there, you can start the VM and open the F@H console.
Ensure the F@H Fling can access the internet. To run the Fling behind a proxy or firewall, fill in any details for the proxy IP address, as well as an F@H login and passkey combination.
How to troubleshoot F@H Fling
The F@H Fling initiative has a large community of contributors, thanks to the VMware Team dashboard. Still, this can make it difficult for your personal F@H Fling appliance to find work. If you encounter any issues, you can use a few commands to troubleshoot the appliance:
- Start and stop the appliance: /etc/init.d/FAHClient start and /etc/init.d/FAHClient stop
- Restart the appliance: /etc/init.d/FAHClient restart
- Check the status and logs of the appliance: /etc/init.d/FAHClient status and /etc/init.d/FAHClient log -v
- Check the CPU status of the appliance: top
Once you open the Fling console, you can view CPU and RAM usage and progress on the work that the appliance is doing.
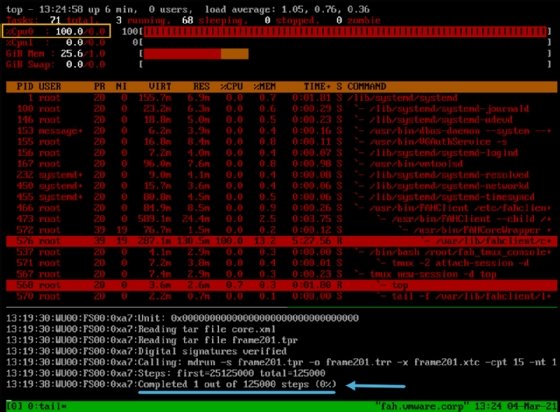
For example, the image above shows that the Fling appliance downloaded a compressed TAR file, which is the main source of work. There are 125,000 steps to complete and once the appliance completes all of them, the console initiates another download. In this way, the Fling appliance contributes to work on parts of a global project.