
Getty Images/iStockphoto
An Azure Repos tutorial to build a container image
Azure Repos is a tool for IT teams working with repositories and code versions. Get to know the tool better, and see how to use it alongside pipelines to build a container image.

Azure DevOps repositories are a key part of Microsoft's DevOps offering. The Azure Repos service provides version-controlled source code and files, and it enables other Azure DevOps components, like pipelines and CI/CD. Using Azure Repos alongside Azure Pipelines simplifies the typically complicated process of building repositories and pipelines.
It takes some effort to master Azure Repos, but the tool is a foundational element of Azure DevOps that enables IT teams to streamline workflows, collaborate effectively, and track code changes and projects. Follow this tutorial to get started with Azure Repos and use it alongside a pipeline to build a container image.
Get started with Azure Repos
The Azure DevOps platform contains a sidebar with available services, such as Boards, Repos, Pipelines, Test Plans and Artifacts. Clicking on Repos opens the repository management functionality to manage code, branches, pull requests and other features.
Azure Repos yields different results depending on how it has been configured. The screen for a new project, for example, shows options on how to set up and configure a repository for use.
By default, all new Azure DevOps projects use Git as the version control method of choice. Users can change this default option by clicking Advanced on the initial setup page and selecting the legacy version control. Azure Repos also supports Team Foundation Version Control, which is a centralized version control system compared with Git's distributed design.
Use Azure Repos with a pipeline
Microsoft developed Azure Repos to tightly integrate with all components in Azure DevOps, such as Azure Pipelines. This integration makes it easy to use code stored in Azure Repos. To demonstrate, let's use Azure Repos alongside a pipeline to build a container image.
At its fundamental level, a pipeline provides a degree of build automation. It can include files from disparate systems or incorporate previous outputs, both of which can be error-prone, time-consuming manual processes. In short, a pipeline makes building and checking easier.
Build a container image
Here is a quick walkthrough for Azure users who want to use a local Azure repository to build a basic container. This example assumes the user has a container registry set up already and can access it.
Step 1. Log in to Azure DevOps -- you can search for it in the Azure portal if needed. Create a new project, and name it. Set the project as private, and click Create project. At this point, the project setup is empty.

Step 2. Move on to other required background items, such as setting up a Git repository to store the pipeline code and Dockerfile code.
To initialize the repository, click on Repos, scroll down to Initialize and create the repo by clicking the button.

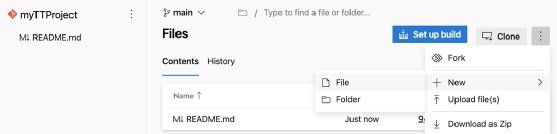
Step 3. Once you create the repository, you can access it under Repos > Files. For this example, we're using a disposable repository for testing. You can follow the earlier instructions to clone the repository. Another option is to click the three dots to the right of Clone and select New > File.
To create the Dockerfile, copy the contents below, and paste them into the newly created file -- this file must be called Dockerfile, and don't forget to save and commit it:
FROM ubuntu
INSTALL Apache
RUN apt-get update -y
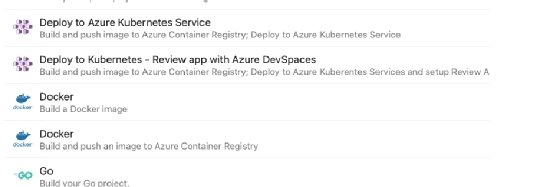
Step 4. Create the pipeline. Within the Azure DevOps sidebar, navigate to Pipelines. If a user doesn't have existing pipelines, the platform provides a prompt to create a new pipeline. Select New pipeline. The next screen displays Where is your code? For this example, select Azure Repos Git.

The next prompt is to select a repository to pull into the pipeline. Choose the repository you just created. In this case, the repository is called MyTTProject.
Step 5. Next, configure the pipeline. We don't want the default options for this example, so click Show more, which presents another range of options. Select the Docker build option, and push to the selected repository.
The setup wizard needs to know the Azure subscription to which it should push the container image. Select the appropriate Azure subscription, and click Continue.
Step 6. Select the Dockerfile repository to push to and the build file to use for the pipeline. Select the appropriate options, and select Validate and configure.

Next, select Save and run. Name the commit, and click Save and run again.
Step 7. Review and run the pipeline. Assuming everything looks good, click Save and run. This creates the new container image and uploads it to the specified container.


