
Grafvision - Fotolia
How to deploy Terraform code in an Azure DevOps pipeline
Automation in the cloud will not only make you move faster, it will do so in an efficient way. Learn how to create an Azure DevOps pipeline with Terraform code.
Infrastructure as code applies programming concepts to infrastructure configuration and is one of the best tools in a developer's toolbox. However, getting the code set is just the first step.
Once the infrastructure is converted to code, you need to automatically and continuously deploy it. Provisioning creates a hosting environment for the first time. Updates and fixes reconfigure said infrastructure with new information, such as a different VM size.
HashiCorp Terraform, used with Microsoft Azure DevOps, provides one way to set up automated infrastructure-as-code deployments. This tutorial shows how to accomplish two objectives. First, create an Azure storage account as version-controlled code in a Terraform configuration file, then make a build and release pipeline in Azure DevOps for the storage account.
Prerequisites
To follow along with this step-by-step tutorial, you need the following:
- An Azure account;
- An Azure DevOps organization and project;
- Terraform installed, and beginner- to intermediate-level knowledge of the tool;
- A storage account in Azure to store Terraform files; and
- A text editor.
The tutorial uses Microsoft Visual Studio Code (VS Code) as a text editor. Although VS Code is not required, it is recommended.
Create a repository in Azure Repos
First, create a repository in Azure Repos. This provides a centralized location and source control for the Terraform code. Not only does the repository ensure proper source control, we can build the code in the Azure DevOps pipeline from the source so we don't have to worry about creating build artifacts and a separate pipeline for the continuous integration (CI) process.
Log into the Azure DevOps portal and choose an organization and project to work in.
Go to Repos > Files to create a new repository for the Terraform code.
Click on the default repository and choose + New repository. What you see as your default repository will differ from what is shown in the screenshot.

In the Repository name section, write TerraformCode. This name isn't a requirement, but it's what we'll use throughout the rest of the tutorial. Once completed, click the blue Create button.
To work with the repository, clone it locally. Click the grey Clone button and copy the HTTPS URL.
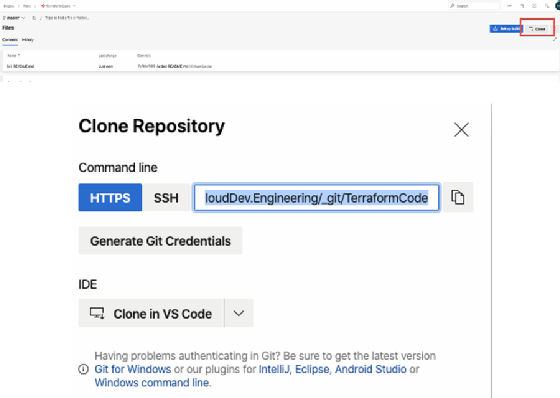
Open a terminal, cd to the desktop where the repository can be cloned and run the following command to clone the repository:
git clone HTTPS_URL
You have successfully created and cloned the repository. In the next section of this tutorial, we'll write the Terraform code to use with Azure DevOps.
Write the Terraform code
Now that you created and cloned a Git repository from Azure Repos, you can implement code with Terraform rather than create Azure storage accounts manually. This tutorial covers three Terraform configuration files: the main configuration, variables and runtime variables. The variable configurations are to ensure the code is reusable for any environment.
Create the configuration files in the text editor you prefer. In VS Code, go to File > Open and open the TerraformCode repository.
Create a new folder called StorageAccount-Terraform, or choose a naming convention that suits your work. Add three Terraform configuration files in the StorageAccount-Terraform folder:
- tf -- Main configuration where all the resources to create in Azure reside.
- tf -- The names and types (strings, integers, etc.) of the variables.
- tfvars -- The variables that are passed in at runtime.
variables.tf configuration. An Azure storage account requires certain information for the resource to work. Let's start with required variables.
Open the variables.tf configuration file and put in the following variables, required per Terraform for the storage account creation resource:
- resourceGroupName -- The resource group that the storage account will reside in.
- location -- The region in Azure that the storage account will reside in.
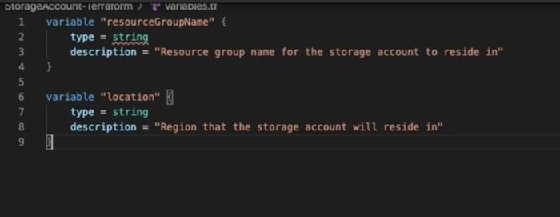
variable "resourceGroupName" {

    type = string

    description = "Resource group name for the storage account to reside in"

}

variable "location" {

    type = string

    description = "Region that the storage account will reside in"

}
The type switch specifies what the variable attribute of data -- string, integer, etc. -- will be and the description switch specifies a brief metadata description about the variable.
As shown in the screenshot, the variables are now added to the variables.tf configuration file.
terraform.tfvars configuration. With the variables in place to create an Azure storage account, specify the values of these variables.
To specify the variable values for runtime, open the terraform.tfvars configuration file and write the key-value pairs. An example key-value pair is shown in the code below, where dev2 is the resource group and eastus is the location.
This is how the tfvars look in VS Code:
resourceGroupName = "dev2"
location = "eastus"
main.tf configuration. Once the variables and values are configured, write the main.tf configuration. Open the main.tf configuration file to add in the necessary code by sections to create a storage account in Azure.
The first section covers the Terraform back end. Terraform's tfstate configuration file stores the metadata for an environment to be created, updated and modified. If a tfstate configuration doesn't exist, Terraform attempts to recreate the entire resource configuration rather than update it.
The first section should look like this:
terraform {

  backend "azurerm" {

    resource_group_name = "dev2"

    storage_account_name = "storemfwmw3heqnyuk"

    container_name = "testcontainer"

    key = "terraform.state"

    }

}
The second section is the azurerm provider, which connects Terraform with Azure. A Terraform provider makes API calls to the specified provider, in this case Azure. The example below is from Terraform version 2.0.0.
provider "azurerm" {

  version = "2.0.0"

  features {}

}
The final part of the main.tf configuration is resource creation. The resource name depends on what type of resource you create with Terraform. The resource to create a storage account is called azurerm_storage_account.
The TechTargetSG name shown here is a metadata name to identify the resource. Name the metadata anything that makes sense in your organization.
The switches, such as name and resource_group_name, are the values for creating the storage account. As you can see for resource_group_name and location, it uses the variables identified in the previous terraform.tfvars section.
resource "azurerm_storage_account" "TechTargetSG" {

Name	= "ttstorage92"
resource_group_name	= var.resourceGroupName
Location	=	var.location
account_tier	=	"Standard"

account_replication_type = "GRS"

tags = {

environment = "development"
}
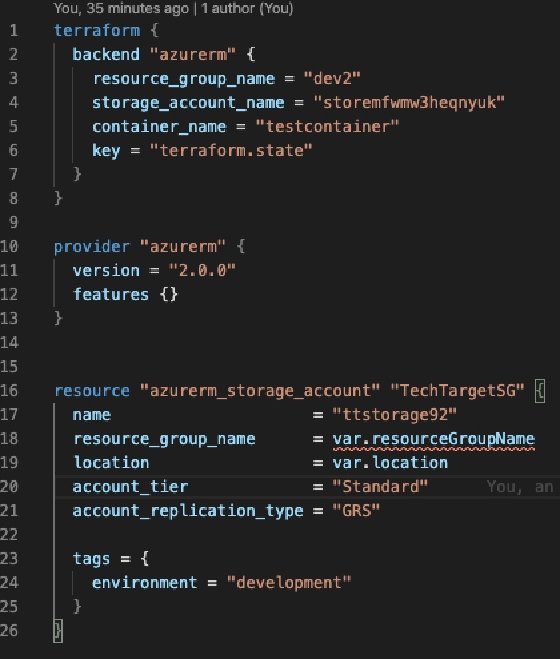
The screenshot is what the entire main.tf configuration looks like.
Commit the Terraform code
Once the Terraform code for the Azure storage account is written, you can commit to the TerraformCode repository in Azure Repos. Open a terminal in VS Code and run the following three commands:
- add . -- Stages a Git repository with newly add changes;
- commit -m -- Creates a commit message that is shown on the repository;
- push -- Pushes the code from the local git repository to Azure Repos.
git add .

git commit -m "Adding Terraform code to Azure Repos"

git push origin master
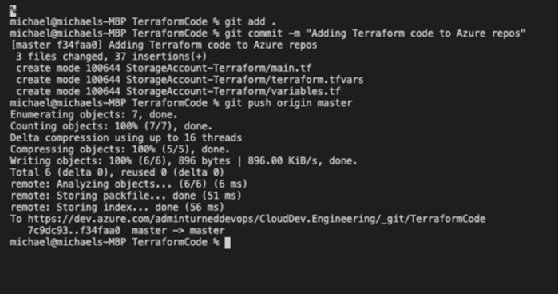
The output in the terminal should look like the screenshot.
Create the YAML deployment pipeline
Now that the Terraform configuration code is ready, create a YAML pipeline to deploy the code. YAML is a way to format code. A YAML pipeline codifies the way pipelines are created. Instead of using a UI to create tasks in a release pipeline, you create one YAML pipeline for both the build and release.
Open the Azure DevOps portal and go to Pipelines. Click the blue New pipeline button.
In the Where is your code? section, choose Azure Repos Git. Azure Repos is where you create the repository for the now-committed Terraform code.
Choose Starter pipeline so you can customize it as much as you'd like.
On the Review your pipeline YAML page, delete lines 13-19, which are just pseudo code for outputting Hello World.
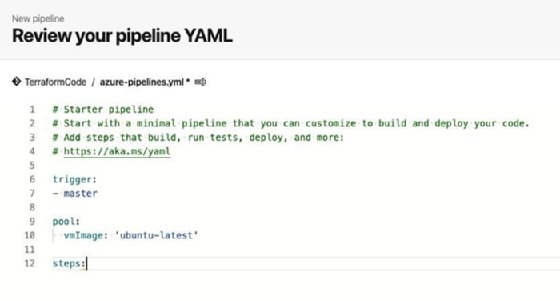
Add the following information under steps. These values are needed for the YAML pipeline:
- Subscription;
- Resource group name that the Azure storage account should reside in; and
- Container name that the Terraform tfstate configuration file should reside in.
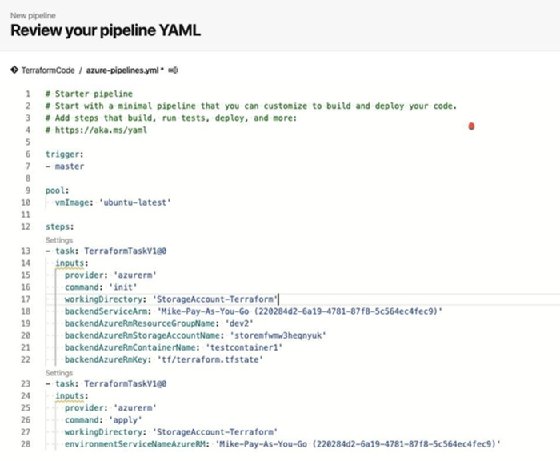
There are two terms in the code for the YAML pipeline that DevOps teams should understand:
- Task -- The API call that Terraform makes to Azure for creating the resources.
- inputs -- All values that are passed in, either for the initialization or creation process. Notice the workingDirectory. This is the directory that you created for the Terraform code earlier in this tutorial.
task: Terraform
TaskV1@0
inputs:
     provider: 'azurerm'

     command: 'init'

     workingDirectory: 'StorageAccount-Terraform'

     backendServiceArm: 'your_subscription'

     backendAzureRmResourceGroupName: 'your_resource_group_name'

     backendAzureRmStorageAccountName: 'your_storage_account_name'

     backendAzureRmContainerName: 'your_container_name'

     backendAzureRmKey: 'tf/terraform.tfstate'

task: Terraform
TaskV1@0
inputs:
     provider: 'azurerm'

     command: 'apply'

     workingDirectory: 'StorageAccount-Terraform'

     environmentServiceNameAzureRM: 'your_subscription'
The screenshot shows what the YAML pipeline should look like.
Run the pipeline
Now that the YAML pipeline is ready, run it to create the storage account.
Click the blue Save and run button, as shown in the screenshot. Under this screen, leave the defaults and allow the YAML code to commit directly to master. This setup means that every time code gets committed to master, the YAML pipeline automatically runs. Click the blue Save and run button.
The pipeline will now begin to run. Click on the Job button to watch the progress.
Once the job is complete, it should look like the screenshot.

You have successfully created a Terraform deployment of infrastructure as code with Azure DevOps. Keep learning and trying new things. For your next challenge, do the same thing, but instead of using Azure Repos, use GitHub.


