Getty Images
Use Kubernetes and Terraform together for cluster management
Kubernetes and Terraform provide many container cluster management benefits -- but combining the two makes them even stronger. In this tutorial, discover how to use them together.

Separately, Kubernetes and Terraform are powerful and popular tools for IT operations teams. When an enterprise decides to use them together, it can see even more benefits for container cluster management.
Before we can learn how to create a Kubernetes cluster on Azure Kubernetes Service (AKS) using the Azure command-line interface (CLI) and Terraform, we need to understand a little about each tool and what we need to implement them together. By the end of this tutorial, you should be able to provision a Kubernetes cluster and deploy an application on top of it, fully automated through Terraform.
What is Terraform?
Terraform is an open source infrastructure-as-code provisioning tool from HashiCorp for cloud service management. Terraform enables IT operations teams to write an infrastructure and application provisioning plan, then preview and apply changes to the cloud provider of their choice.
The benefits of Terraform for cluster provisioning and management include the following:
- Lifecycle management. Control an entire cluster lifecycle from creation, update and deletion of resources on multi-cloud infrastructure deployment.
- Infrastructure as code. Use code and configuration files to manage and maintain resources. This makes it easier to track version control changes and easily roll back if required.
- Automated infrastructure deployments and reduced time and overhead. Terraform configuration files create repeatable resource provisioning in a predictable manner. Overall, they reduce the time to deploy one or more environments by simply tweaking variables or parameters.
Prerequisites
Before we jump into this Kubernetes and Terraform tutorial, let's make sure all the prerequisites are met. To follow along and create your own AKS cluster using Terraform, first do the following:
- Create an Azure account and log into the Azure Portal.
- Create a subscription with Owner rights.
- Install the Azure CLI, the latest Terraform image and the latest kubectl image.
Set up and initialize your Terraform project
Now that we understand why we should use Terraform for AKS and Kubernetes provisioning and have the prerequisites installed, let's set up a Terraform project with all the necessary files. For this, I've created a GitHub repository that has all the files required for a simple Terraform provisioning of Azure AKS cluster.
First, clone the following GitHub repository:
git clone https://github.com/PrateekKumarSingh/aks-cluster-terraform
Next, change the directory to the folder as shown below:
cd aks-cluster-terraform
This will grant access to all the Terraform files on your local system. The list of files will include the following:
- main.tf
- variables.tf
- versions.tf
- outputs.tf
- terraform.tfvars
Main.tf is Terraform's primary entry point. It creates the Azure resource group and Kubernetes cluster, which is shown in the following code snippet, written in the domain-specific declarative configuration language HashiCorp Configuration Language.
provider "azurerm" {
  features {}
}

resource "azurerm_resource_group" "default" {
  name     = "demo-aks-terraform-rg"
  location = "West US 2"

  tags = {
    environment = "demo"
  }
}

resource "azurerm_kubernetes_cluster" "default" {
  name                = "demo-aks-cluster"
  location            = azurerm_resource_group.default.location
  resource_group_name = azurerm_resource_group.default.name
  dns_prefix          = "demo-aks-cluster-dns"

  default_node_pool {
    name            = "default"
    node_count      = 2
    vm_size         = "Standard_D2_v2"
    os_disk_size_gb = 30
  }

  service_principal {
    client_id     = var.appId
    client_secret = var.password
  }

  role_based_access_control {
    enabled = true
  }

  tags = {
    environment = "demo"
  }
}
In the variables.tf file, declare any variables we use, like appId and password in this case. Provide a description of these variables so that they can be used within the Terraform modules.
variable "appId" {
  description = "Azure Kubernetes Service Cluster service principal"
}

variable "password" {
  description = "Azure Kubernetes Service Cluster password"
}
The terraform.tfvars file defines the values to these variables and stores secrets, like your Azure service principal ID and password. Edit this file and provide the appropriate values to the appId and password variables from the service principal that will deploy these resources to Azure.
appId    = "xxxxxxxxxxxxxxxxxxxxxxxxxxxxxxxxxxxx"
password = "xxxxxxxxxxxxxxxxxxxxxxxxxxxxxxxxxxxx"
In the versions.tf file, define and list the providers and their respective versions required for the Terraform deployment. For example, we define hashicorp/azurerm as the required provider for all Azure deployments.
terraform {
  required_providers {
    azurerm = {
      source  = "hashicorp/azurerm"
      version = "2.66.0"
    }
  }

  required_version = ">= 0.14"
}
The outputs.tf file contains the names and values of the variables available in the command line when the Terraform deployment is complete. For example, the name of the resource group and Kubernetes clusters once they are provisioned.
output "resource_group_name" {
  value = azurerm_resource_group.default.name
}

output "kubernetes_cluster_name" {
  value = azurerm_kubernetes_cluster.default.name
}
Once we set up these files locally, we can use Terraform to provision our first AKS cluster.
How to provision an AKS cluster with Terraform
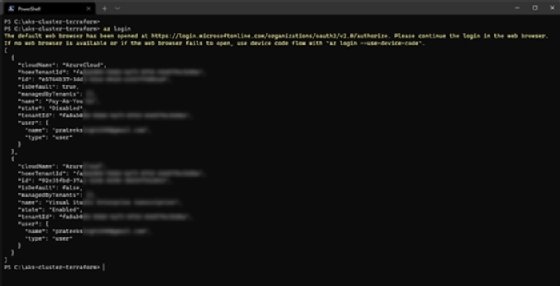
First, go to the command line, where we use the Azure CLI and log into Azure via the following command:
az Login
After a successful login, you will get a JSON output in the command line. This output contains tenant and subscription details, as shown in Figure 1.
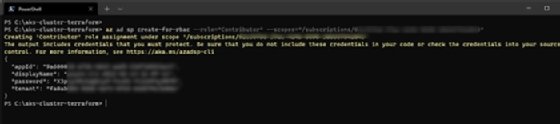
Next, use the following command to create an Azure service principal to give Terraform access to provision resources in Azure. Provide a valid Azure subscription ID in the following command under the --scopes parameter.
az ad sp create-for-rbac --role="Contributor" --scopes="/subscriptions/<Your Subscription ID>"
Once the service principal is created, we see appId and password as outputs in the command line. Use these in the terraform.tfvars file to declare variables, as discussed in the previous subsection, so that Terraform can authenticate and authorize Azure deployments.
If you have multiple subscriptions, use the following command to specify the subscription. This sets the correct context for Terraform so that it understands the target Azure subscription on which to deploy and provision the resources.
az account set --subscription <Your Azure Subscription ID>
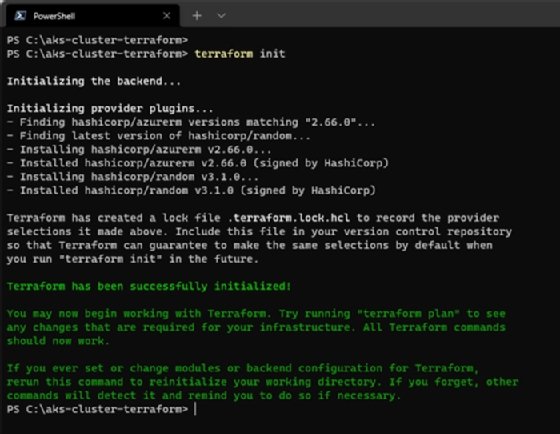
Next, use the following command to initialize provider plugins and create a lock file for all external dependencies:
terraform init
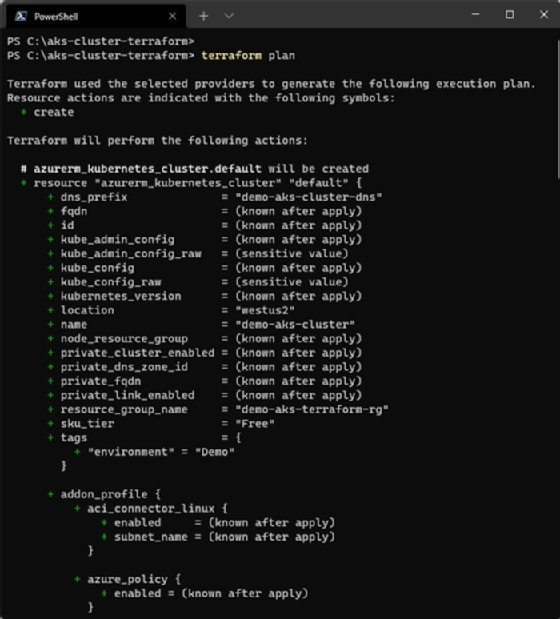
To preview the changes Terraform will make in Azure, run the following command to create an execution plan:
terraform plan
Once you are confident with your execution plan, run the following command to apply this plan and provision your Azure resources:
terraform apply
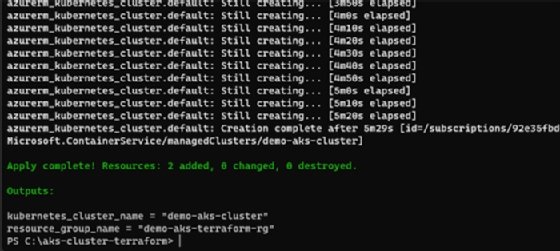
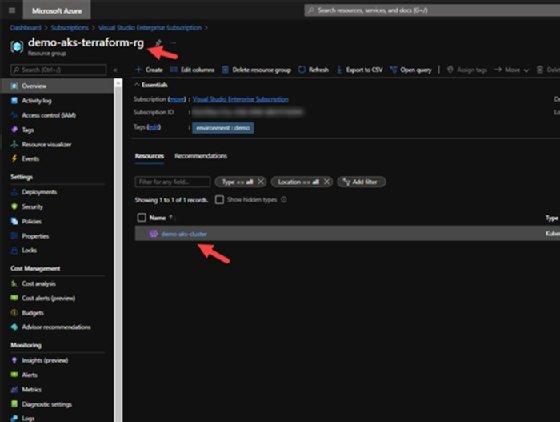
Once the deployment is complete, Apply Complete will appear in the command line and output variables -- which we mentioned in the outputs.tf file, like the Kubernetes cluster name and the Azure resource group. You can also validate this from the Azure Portal by visiting the resource group, where you will see a Kubernetes service deployed, as shown in Figure 6.
Deploy a simple app to test the cluster
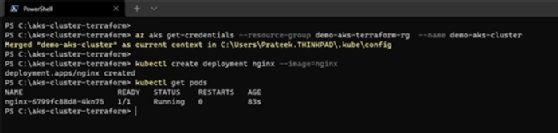
Now that our Kubernetes cluster is provisioned, let's configure kubectl to point to this Azure Kubernetes cluster. Use the following command:
az aks get-credentials --resource-group demo-aks-terraform-rg --name demo-aks-cluster
Run the following command to create an Nginx deployment and verify that the pods are in a started or running state:
kubectl create deployment nginx --image=nginx
kubectl get pods
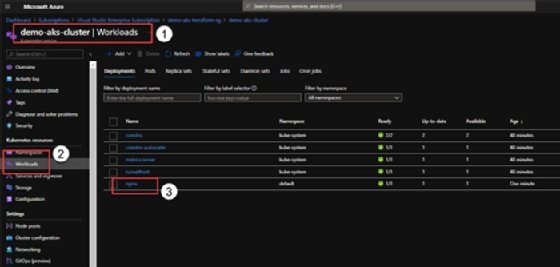
Alternatively, go to the Azure Portal and find the deployment under the Workloads section of the Kubernetes cluster.
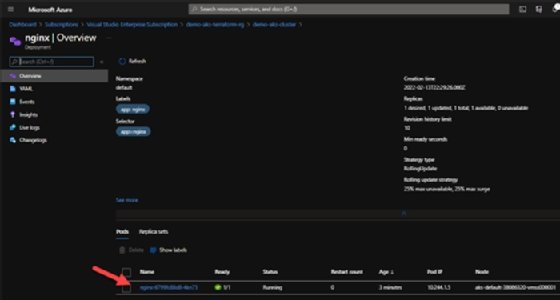
And if we drill down into the specific deployment, we can also see the deployed containers.
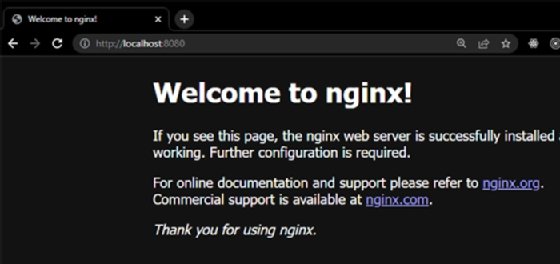
To verify if the Nginx server is running, forward the ports to your local machine using this command:
kubectl port-forward nginx-6799fc88d8-4kn75 8080:80
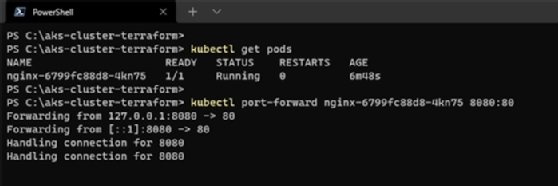
If you visit http://localhost:8080 in your web browser, you should see your web server running, as seen in Figure 11.