
kornienko - Fotolia
Deploy and configure a basic setup of Linux's LXD hypervisor
Admins looking to use Linux's hypervisor dedicated to container technology can use several commands to deploy and configure a basic setup of the hypervisor.

For admins looking to experiment with Linux's LXD hypervisor, the basic setup is quite straightforward. The LXD hypervisor comes preinstalled on the Ubuntu 18.04 LTS server by default, which most admins have downloaded and configured on their networks, but admins must be a member of the LXD group before they can use the LXD hypervisor.
The LXD hypervisor is an extremely lightweight hypervisor with 4 GB of host RAM, which can fit several containers. It also functions as an API-first management infrastructure, which enables admins to quickly program deployment and automation.
Linux commands for LXD hypervisor deployment and configuration
If admins are not members of the LXD group, they can use the following command to become a member:
sudo usermod -a -G lxd stuart
Once admins add themselves to the LXD group, they can then start the LXD container service using this command:
sudo lxd init
The LXD server provides a set of questions, such as whether admins want to create LXD clusters, new storage pools or network configurations. For example, in the configuration below, admins can go with the following default options except for the password, which requires a password of their choosing.
The default configuration creates a storage pool inside a file that the system can consume. But admins working in a production environment should know that the LXD hypervisor requires more configuration than this. For example, admins might also require a separated, dedicated storage pool backed by a high-performance storage array, as well as redundant network uplinks for redundancy and cgroups to limit resource utilization by individual containers.
Deploy container images with the LXD hypervisor
Once admins finish the configuration step, the LXD container service automatically starts to boot and the LXD service installation completes. Admins can now deploy images in a simple and straightforward manner. For example, to deploy a simple Ubuntu server, admins can use the following command:
lxd launch ubuntu mytestserver
The above command does two things: First, it pulls down a container image and, second, it runs the image. By default, the LXD command downloads the latest Ubuntu image. But LXD can also work with many images other than Ubuntu, such as Docker and Microsoft's SQL Server 2017. To see what images are available, admins can use this command:
lxc image list images: | more
This command suddenly changed from lxd to lxc because admins no longer work with the LXD daemon, but the applications that manage the containers.
If admins require a specific distribution, they can modify the command as follows:
lxc image list images: 'debian'
Admins can also specify other versions by appending the version after the image name. For example:
lxc launch ubuntu:16.04 mytestserver02

Now that admins have one or two Ubuntu servers running, they can get inside them by substituting web for their running instance with the following command:
lxc exec web -- /bin/bash
To exit the session, admins can type exit into the bash session. The container instance continues after admins exit the bash session.
Admins can also easily run Linux commands on their container instances using the exec function. For example, they can install Apache on a test server called mytestserver using the following commands:
lxc exec web -- apt update

lxc exec web -- apt install apache2
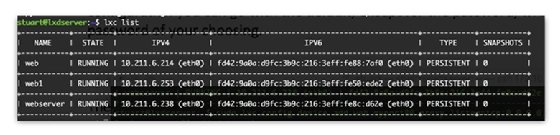
To find out what instances run on the host, admins can use the following command:
lxc list
If admins must stop a container, they can input this command:
lxc stop <container name>
To delete a container, admins can use this command:
lxc delete <container name>
At this point, admins can deploy, delete and enter containers, and they can begin to shift their focus to networking. As with most hypervisors, admins can deal with networking in a variety of ways, but most LXD admins generally stick with the default option.
Proxying a container is clear-cut: Admins connect to the hypervisor IP and the system forwards the port they connect to into the container. For example, the following command configures port 80:
sudo lxc config device add web1 port80 proxy listen=tcp:0.0.0.0:80 connect=tcp:127.0.0.1:80
Admins can configure other port configurations just as easily by substituting the port numbers with a new alias.
At this point, admins have successfully created a basic setup of the LDX hypervisor. If they encounter issues during setup, admins can use the following commands to extract useful information for troubleshooting:
lxc network

lxc info