Getty Images
How to use Pulumi Automation API, with examples
In this tutorial, integrate Pulumi's Automation API into existing projects -- and remove the need for CLI to perform infrastructure lifecycle changes in a CI/CD pipeline.

Pulumi is an infrastructure-as-code tool that enables IT administrators to write infrastructure blueprints in higher-level programming languages, such as JavaScript, TypeScript, Go, Python and C#. The tool enables admins to author the infrastructure definition in their preferred language, but the workflow depends on humans to drive these lifecycle changes.
Admins can either run Pulumi Automation API from a developer machine or integrate it into a CI/CD platform using the Pulumi command-line interface (CLI), which talks to the Pulumi engine. This approach is not uncommon. Infrastructure-as-code tools such as Pulumi and Terraform rely on the CLI to read the infrastructure blueprints, queue deployments and talk to the back-end engine for state maintenance.
But this creates an inherent dependency on CLI tools because admins move away from the comfort of their preferred programming language and use a binary to perform lifecycle actions. This was the case with Pulumi, until it introduced the Pulumi Automation API.
What is the Automation API?
Pulumi Automation API provides all the functionality of the Pulumi CLI -- such as the ability to create and update stacks -- but it is available in the programming languages listed above. Machines still require Pulumi CLI to be installed, but infrastructure developers don't have to interface with the CLI anymore. Instead, they can use Automation API constructs to perform the same changes the CLI drives. The Automation API delivers the functionality of the CLI in the language admins develop infrastructure on.
What problem does it solve?
The reliance on human intervention to automate workflows adds an extra layer of dependency.
Automation API helps relieve the need for human intervention. It includes features such as the following:
- Easier integrations with CI/CD workflows; no reliance on the Pulumi CLI to perform changes.
- Delivery of self-service tools to drive developer productivity.
- Build a CRUD REST API to self-service the approved infrastructure within an organization.
- Build a CLI so developers can manage the lifecycle of these environments on their own.
Pulumi Automation API with Azure DevOps pipeline
This tutorial will revisit a project created with the Pulumi CLI for a CI/CD project.
This tutorial refactors that project to use the Automation API instead of the Pulumi CLI. Using Automation API with an existing Pulumi project is referred to as a local program in the Pulumi documentation. This shows what Automation API does and how it integrates with existing projects.
Tutorial prerequisites
A few modifications have been made to the existing project: The project has been switched to the new Azure Native provider and .NET 6, and the test project has been removed from the directory. Due to these modifications, it's recommended that you complete the first tutorial before tackling this one. The first tutorial, using the Pulumi CLI, walks you through the full setup process via the CLI. Once complete, come back to this tutorial to learn how the Automation API integrates with existing projects and eliminates reliance on the Pulumi CLI.
Automation API documentation often refers to local and inline programming to define how one creates or references Pulumi projects inside the Automation API:
- Local program. This refers to a traditional human-driven workflow with Pulumi CLI, where a project has its own directory, a Pulumi program and a Pulumi.yaml file, along with YAML files for the corresponding stack. Automation API can be used to drive the lifecycle of these programs along with the CLI. This is the use case we are tackling in this tutorial.
- Inline program. Because Automation API enables admins to skip a traditional workflow, this approach means separate files do not have to be created on disk to refer to a project, program and stack. IT ops admins can use Automation API to perform this inline in the source code, thus unlocking features to generate infrastructure abstractions quickly.
The goal of using Automation API with an existing Pulumi project is to cut the reliance on the Pulumi CLI in the CI/CD pipeline to perform infrastructure lifecycle changes.
In the sample Azure DevOps repo, there are two branches. These include the following:
- Main. This is the old branch, which uses an existing Pulumi project driven by the CLI.
- Feature/Automation. This is the new branch, which shows how to use Automation API inside an existing project. Use this branch as a reference for this tutorial.
To achieve this with Pulumi Automation API, follow the steps below:
- Add Automation project. Add a .NET console app. This uses the Pulumi Automation API to read the current project, stack details and make infrastructure changes.
- Modify the CI/CD pipeline. Refactor the pipeline to use .NET tooling and remove dependency on the Pulumi CLI to make infrastructure changes.
Add an Automation project
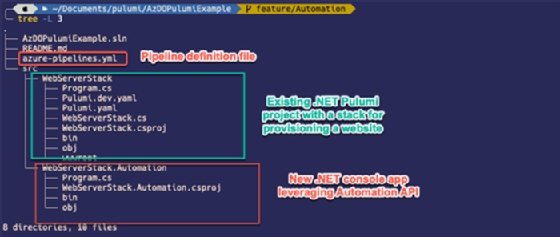
To start, add a new .NET console project under the src directory named WebServerStack.Automation. This project will contain our own CLI, which will replace the usage of Pulumi CLI. This project has been set up using the Pulumi Automation API sample for a local program using .NET as reference. Walk through using the feature/Automation branch in our sample project.
Below is a list of the Automation API constructs -- C# classes -- that admins must understand before authoring automation on top of it:
- Workspace. This construct corresponds to an execution context that encapsulates a single Pulumi project, a program and multiple stacks. It provides environment creation, deletion and plugin installation. It enables admins to bootstrap a Pulumi project and stack.
- LocalWorkspace. LocalWorkspace relies on Pulumi.yaml and Pulumi.[stack].yaml as the intermediate format for project and stack settings. This implementation enables admins to modify the project and stack settings programmatically without touching the corresponding YAML files.
- Stack. Stack is an isolated and independent instance of the Pulumi program. The API object for stack exposes methods to perform the entire lifecycle's operations on this instance.
The Program.cs file in our WebServerStack.Automation project contains the Main() method, which is the entry point for our console app.
using System.Reflection;
using Pulumi.Automation;

namespace WebServerStack.Automation
{
   class Program
   {
       static async Task Main(string[] args)
       {
           // to destroy our program, we can run "dotnet run destroy"
           var destroy = args.Any() && args[0] == "destroy";

           var preview = args.Any() && args[0] == "preview";

           string stackName = "stage";

           // need to account for the assembly executing from within the bin directory
           // when getting path to the local program
           var executingDir = new DirectoryInfo(Assembly.GetExecutingAssembly().Location).Parent.FullName;
           var workingDir = Path.Combine(executingDir, "..", "..", "..", "..", "WebServerStack");
           Console.WriteLine($"Working Dir - {workingDir}");
The Program class defines the static async Main() method, which takes input arguments.
Perform a check to see if any arguments passed. If they match destroy or preview, the console application will update the stack by default. We have defined a string variable to hold a stackName, such as stage.
Then, use reflection in the console application to locate and display the directory information. Pulumi retrieves the infrastructure definition using a reflection process, which enables IT admins to see the directory -- but not to edit it. The console application examines metadata within the source code, which enables it to create a path to the WebServerStack project in question.
Next, create a path pointing to the WebServerStack project. This is an existing Pulumi project created in the above-mentioned prior tutorial, using the Pulumi CLI, and contains the infrastructure definition to deploy a WebServerStack.
After discovering the path -- via reflection -- to the directory containing our Pulumi program that defines our infrastructure blueprint, use the Automation API construct named LocalWorkspace to discover the existing Pulumi stack.
The method CreateOrSelectStackAsync() can either create or select an existing stack. In our case, we created a dev stack using the Pulumi CLI originally, but here we will create a new stack called stage with the code below:
// In-code steps to create a new/update a stack
           var stackArgs = new LocalProgramArgs(stackName, workingDir);
           var stack = await LocalWorkspace.CreateOrSelectStackAsync(stackArgs);

           Console.WriteLine("Stack Initialization successful...");
After creating the stack, use the code below to set specific stack configurations in the default location. This is equivalent to using the Pulumi CLI for configuration.
// set stack configuration, similar to constructing the pulumi.stage.yaml
           await stack.SetConfigAsync("azure-native:location", new ConfigValue("southeastasia"));
           Console.WriteLine("Setting configuration successful...");
After setting the stack configuration, follow the usual Pulumi lifecycle to make changes to the stack. Start by refreshing the stack. This reads the current state from the Pulumi back end.
// refresh the stack it reads from Pulumi
           await stack.RefreshAsync(new RefreshOptions {OnStandardOutput = Console.WriteLine});
           Console.WriteLine("Refresh successful, state read from cloud…");
Based on the arguments specified when running our console application, conditional statements are executed.
If the destroy argument is passed, the condition below is run.
if (destroy)
           {
               Console.WriteLine("destroying stack...");
               await stack.DestroyAsync(new DestroyOptions {OnStandardOutput = Console.WriteLine});
               Console.WriteLine("stack destroyed!");
           }
The same happens for a preview argument.
else if (preview) {
               Console.WriteLine("previewing stack...");
               var result = await stack.PreviewAsync(new PreviewOptions {OnStandardOutput = Console.WriteLine});
               Console.WriteLine("end preview stack...");
           }
If no argument is specified, then it will update the stack.
else
           {
               Console.WriteLine("updating stack...");
               UpResult result = await stack.UpAsync(new UpOptions {OnStandardOutput = Console.WriteLine});

               if (result.Summary.ResourceChanges != null)
               {
                   Console.WriteLine("update summary:");
                   foreach (var change in result.Summary.ResourceChanges)
                   {
                       Console.WriteLine($"....{change.Key}: {change.Value}");
                   }
               }
               Console.WriteLine($"Website url: {result.Outputs["Endpoint"].Value}");
           }
Use the .NET CLI to run the project locally and specify the preview argument to mimic Pulumi CLI.
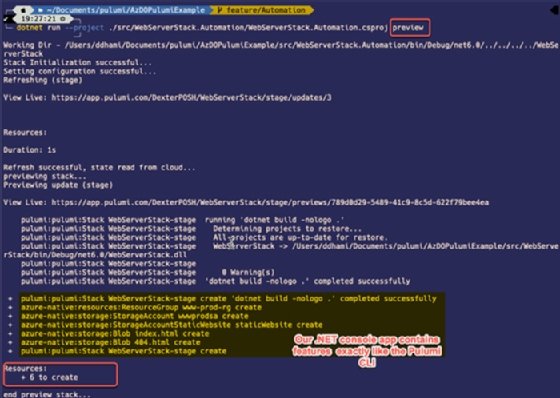
We can specify the create argument as well, but we will wait for our pipeline to run, which is the next step.
Modify the CI/CD pipeline
Our existing pipeline setup uses a Pulumi Azure DevOps task, which runs Pulumi CLI behind the scenes to perform changes. The azure-pipelines.yaml file in the main branch holds the references to the Pulumi task. Below is the task that generates the preview.
- task: Pulumi@1
       displayName: pulumi preview
       inputs:
         cwd: '$(System.ArtifactsDirectory)/pulumi'
         azureSubscription: $(azServiceConnection)
         command: 'preview'
         stack: $(pulumiStack)
         createStack: true
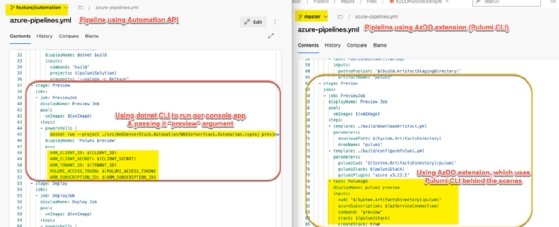
However, since we switched to using the Automation API completely, we'll be refactoring the pipeline to use a new workflow already familiar to software developers.
Figure 3 shows the changes that will follow.
Our pipeline definition has changed slightly for usage with Automation API. The triggers must also change to run the pipeline on the feature/Automation branch.
This pipeline has two variable groups:
- pulumi_var_group. This variable group contains the variable PULUMI_ACCESS_TOKEN, which is later used to authenticate Pulumi.
- az_spi_auth. This variable group contains the details of a service principal in Azure AD. This was created and granted Contributor access on the subscription where the stacks will be deployed. It contains these four secrets:
- CLIENT_ID contains the unique ID for the service principal;
- CLIENT_SECRET contains the secret for the service principal;
- TENANT_ID contains the Azure tenant ID; and
- ARM_SUBSCRIPTION_ID contains the subscription ID.
name: AzDOPulumiExample-Automation-API-Pipeline

trigger:
 - feature/Automation

pr:
- master

variables:
 - group: pulumi_var_group
 - group: az_spi_auth
 - name: pulumiSolution
   value: AzDOPulumiExample.sln
 - name: vmImage
   value: 'ubuntu-latest'
Build stage
This stage restores and builds the .NET solution, but for brevity, we skipped adding a test project here. It is the same as the Build stage we performed previously without Automation API. We will not publish artifacts in this tutorial.
- stage: Build
   displayName: Build
   jobs:
   - job: Build
     pool:
       vmImage: $(vmImage)
     steps:
     - task: DotNetCoreCLI@2
       displayName: dotnet restore
       inputs:
         command: 'restore'
         projects: $(pulumiSolution)
         feedsToUse: 'select'
     - task: DotNetCoreCLI@2
       displayName: dotnet build
       inputs:
         command: 'build'
         projects: $(pulumiSolution)
         arguments: '--nologo -c Release'
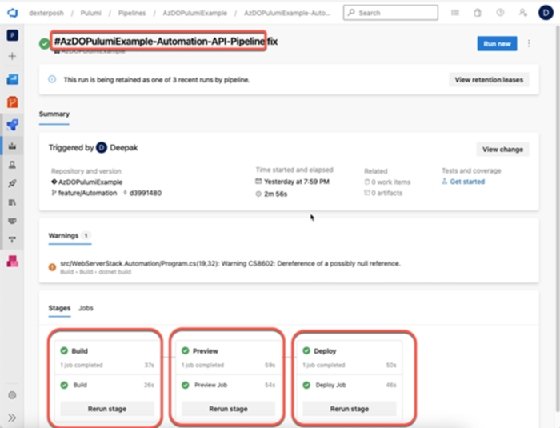
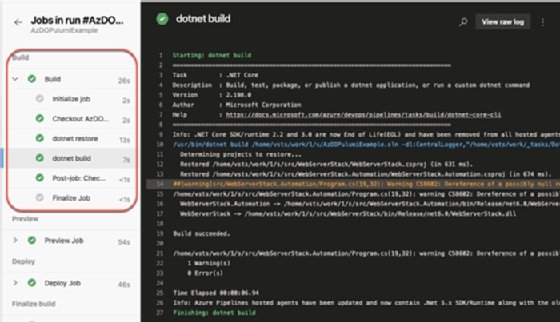
Figure 4 shows this in a completed pipeline.
Preview stage
Automation API enables us to perform the preview operation from the .NET console app itself rather than having to branch out to an Azure DevOps extension. The extension runs Pulumi CLI behind the scenes and makes these changes.
Below is the YAML snippet, which defines this stage:
- stage: Preview
   jobs:
   - job: PreviewJob
     displayName: Preview Job
     pool:
       vmImage: $(vmImage)
     steps:
     - powershell: |
         dotnet run --project ./src/WebServerStack.Automation/WebServerStack.Automation.csproj preview
       displayName: 'Pulumi preview'
       env:
         ARM_CLIENT_ID: $(CLIENT_ID)
         ARM_CLIENT_SECRET: $(CLIENT_SECRET)
         ARM_TENANT_ID: $(TENANT_ID)
         PULUMI_ACCESS_TOKEN: $(PULUMI_ACCESS_TOKEN)
         ARM_SUBSCRIPTION_ID: $(ARM_SUBSCRIPTION_ID)
We use a PowerShell task to run the .NET CLI locally and pass the preview argument to the console application.
The catch is that we must pass the below environment variables:
- PULUMI_ACCESS_TOKEN. Automation API uses this to do a noninteractive login to Pulumi's back end.
- ARM_*. These environment variables are used by the Pulumi Azure provider to authenticate using an SPI, or serial peripheral interface.
The end execution of this stage can be seen in Figure 5.

Deploy stage
Finally, let's revisit our Deploy stage, which will deploy the changes. The YAML definition is similar to the Preview stage, but no argument is passed to the console application. Without any arguments, the application will perform update operations on the stack.
- stage: Deploy
   jobs:
   - job: DeployJob
     displayName: Deploy Job
     pool:
       vmImage: $(vmImage)
     steps:
     - powershell: |
         dotnet run --project ./src/WebServerStack.Automation/WebServerStack.Automation.csproj
       displayName: 'Pulumi up'
       env:
         ARM_CLIENT_ID: $(CLIENT_ID)
         ARM_CLIENT_SECRET: $(CLIENT_SECRET)
         ARM_TENANT_ID: $(TENANT_ID)
         PULUMI_ACCESS_TOKEN: $(PULUMI_ACCESS_TOKEN)
         ARM_SUBSCRIPTION_ID: $(ARM_SUBSCRIPTION_ID)
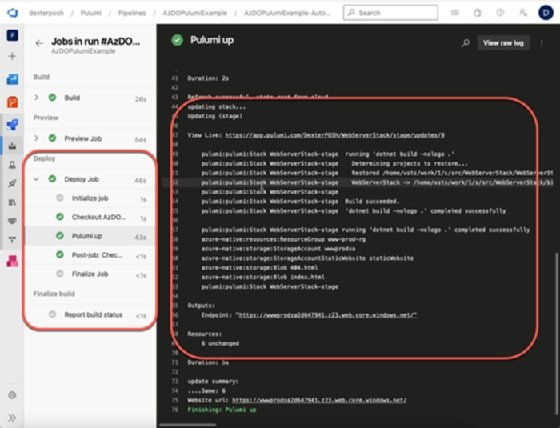
The result of the above stage looks like Figure 6 in an end-to-end pipeline.
Once these changes are in place, run a pipeline and see if the stages were successful. Perform the lifecycle operations for our infrastructure without using PowerShell to invoke the Pulumi CLI.