
Getty Images
Control user storage using Linux quotas
Explore uses and functions of Linux storage quotas plus a step-by-step example of quota configuration. Admins can roll out quotas with minimal disruption to users.

Users typically consider storage to be cheap and relatively unlimited, and even some administrators might think this way. While storage disks continue to increase in capacity and generally decrease in price per gigabyte, it's still essential to manage storage carefully, for example, through Linux quotas.
Storage efficiency impacts more than just the cost of buying additional disks or cloud capacity. It also affects the following:
- Backup time.
- Restore time/recovery time objective and other disaster recovery tasks.
- Migration times.
- Physical-to-virtual migrations.
- Disk indexing and searching capabilities.
- Data deduplication efforts.
It's crucial to leave some storage space available on system disks for the operating system to use for its regular activities, including temp file creation, logging, updates and fragmentation.
Fortunately, Linux administrators can implement storage quotas to govern how users consume capacity.
What are Linux quotas for storage?
Quotas are a feature and function of the file system, not the operating system. File systems, such as ext4, XFS and Btrfs, support quotas. The ZFS also offers quotas, but it's not part of the mainline Linux kernel.
You have two different configuration options when deploying quotas. The first approach is an information-gathering method, where you set quotas without preventing users from saving files when they exceed their allocated space. These are known as soft quotas, and they are handy for learning and understanding how your users consume storage space. The second approach is hard quotas, which does prevent them from saving files when they exceed their quota.
Begin with soft quotas. Use these Linux quotas for a few months to gather data about what resources would be blocked by hard quotas without actually inflicting those limits on your users. From there, communicate storage expectations with users and then implement hard quotas.
A typical timeline could look like this:
- Begin by using soft quotas and gather usage data over time.
- Consider the best storage rules and communicate them to your users to prevent surprise and frustration.
- Implement hard quotas once users have had time to clean up directories.
- Audit quotas regularly to account for changes in user storage requirements over time.
Linux implements quotas on a per-file system basis. This is an important consideration when designing your quotas. You can control user and/or group storage consumption for each file system where you have enabled quotas.
Group quotas are the sum of all storage capacity consumed by group members on the file system.
Implement Linux quotas for storage
You'll need three components to get started:
- A file system that supports quotas.
- Users subject to quota limits.
- Groups subject to quota limits.
Begin by planning. Quotas apply to an entire file system. That means if you implement a 10 GB quota on a user to control the home directory storage space, that same limit applies to any other directories on that file system, such as a project or department directory. You could inadvertently impact the user's workflow by blocking consumption in other parts of the directory structure.
The result is that you must plan which storage areas need quota controls and create them as separate file systems. The two most common candidates are /home and /var/log.
- /home is the default storage location for all local user home directories. These directories typically include user documents, images, music files and other resources.
- /var/log is the storage directory for system and application log files. Many administrators keep this location on a separate file system to prevent an out-of-control log file from consuming the partition where the file system root resides. Quotas can also help protect this space.
However, administrators often centralize user home directories on a single server. For example, you might map the home directories for the 20 members of the dev team to a single server, making it easy to back up and secure their files.
Administrators can also configure rsyslog log file forwarding to consolidate all log files to a single server for easier troubleshooting, log file analysis and archiving. Suppose you're responsible for 20 Linux servers; imagine how much more efficient it would be to push all their log files to a single centralized storage location. However, you must also ensure runaway log files don't consume too much space.
Your server might also host other mapped directories that store department or project-specific data. Placing these on a separate file system enables you to manage their capacity with quotas.
Deployment steps
Once you determine the best file system structure for your needs, implement quotas using the following steps:
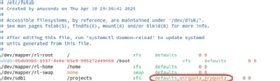
1. Enable quotas for the target file system by adding the options to the mount points in the /etc/fstab file. Add usrquota for users, grpquota for groups, or both.

2. Remount the file system to integrate quota management: sudo mount -o remount /home. Note that, in many cases, a full reboot is recommended instead.

3. Initialize the quota database: sudo quotacheck -ugm /home where u is the targeted user, g is the targeted group, and m is an option to avoid remounting the file system as read-only. This command generates the aquota.user and aquota.group files at the file system root. This step might be unnecessary in some modern file systems.
4. Enable the quotas for the targeted file system: sudo quotaon -v /projects.

5. Configure a quota for user user1: sudo edquota -u user1.
6. Configure a quota for group devteam: sudo edquota -g devteam.
By default, you'll set quota limits in blocks, which equal 1 KB. To set a 10 GB limit, perform the following calculation:
10 GB = 10 x 1024 x 1024 = 10,485,760 KB
Quota reporting
Run the repquota command to report quota status. Use the available options to filter for exactly the results you need, such as user or group utilization.
Here are some of the more common options:
- -a - Display results for all quota-enabled file systems on the system.
- -s - Display human-readable output.
- -u - Display only quota results for all users.
- -g - Display only quota results for all groups.

Note that a + character appears in the second column following the username if the user has exceeded the Linux quota.
To display quota utilization for individual users or groups, use the quota command.
- To report on a specific user, type quota -u {username}.
- To report on a specific group, type quota -g {groupname}.

Create a Bash script or cron job to schedule regular reporting.
Troubleshooting tips
Use the following troubleshooting tips to maintain your quota management program.
- Verify quota support in the file system. Most modern file systems support Linux quotas.
- Verify you mounted the file system with the quota options in the /etc/fstab file (usrquota or grpquota).
- Reboot or remount the file system. You can also try systemctl daemon-reload after the remount command.
- Verify the storage capacity using tools like du, df, lsblk and mount.
- Confirm management tools exist, including quota, edquota, quotacheck, quotaon and quotaoff.
- Confirm you initialized the quota files: quotacheck -cug /home.
- Check the /var/log/message log files for entries related to quotas.
The kernel parameter quotacheck.mod manages how the system checks quotas at boot time. It uses the systemd-quotacheck.service to handle these checks. You can force or skip checks. The default is to automatically check quotas as needed.
Damon Garn owns Cogspinner Coaction and provides freelance IT writing and editing services. He has written multiple CompTIA study guides, including the Linux+, Cloud Essentials+ and Server+ guides, and contributes extensively to Informa TechTarget, The New Stack and CompTIA Blogs.