How to create a VDI test deployment with VMware Workstation
It's a good idea for IT pros to test out their VDI deployment before they move users to virtual desktops. They can use VMware Workstation to do just that.
As an IT professional, you can use VMware Workstation -- a 64-bit hosted hypervisor -- to build a VMware Horizon VDI test deployment for experimentation.
A VDI test deployment, which you can create using Workstation on Windows, is designed to allow you to test and experiment with Horizon. The following example assumes you already have an Active Directory (AD) infrastructure in place.
Create a VDI test deployment step by step
Step one. Download VMware Horizon, the vCenter appliance and ESXi installation media from the VMware website. You may have to create a VMware account to get access to the installation media. To use Horizon, you will also need to obtain a Horizon evaluation key.
Step two -- Set up a virtualized ESXi host. Open Workstation and select Create a virtual machine from the File menu. Select the custom option. Workstation can tell what OS you want to install when you select which ISO file to use. Use the browse function to select the ISO file you previously downloaded. It should detect ESXi 6.5.
Walk through the wizard to create a VM with 32 GB of RAM, 2 CPU cores and 300 GB of disk space. Be sure to select bridged networking so all the VMs you create appear on the same network as the physical workstation you use. Click through to finish the installation wizard and turn the VM on.
Use the ESXi install disk as the CD to boot from. You need to build a big VM because you must install a complete VMware Horizon infrastructure in the test deployment.
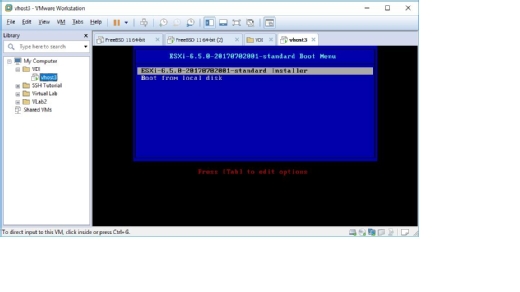
Install VMware ESXi.
Step three. Go through the ESXi setup and accept all the default settings. You also have to create a password. Once you do that, reboot the VM. Log in using the F2 key with the root username and root password you created.
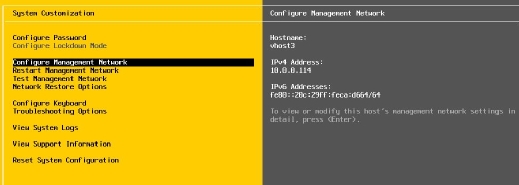
Navigate to Configure Management Network and set the IP address, netmask and gateway. Select the IPv4 configuration and choose the static option. You should also add the IP to the domain name system (DNS) records.
It is very important for the DNS to be correct for the VDI deployment to function correctly. Configure the hostname and DNS server in the DNS configuration option and DNS suffixes in the Custom DNS suffixes menu.
Configure ESXi networking options.
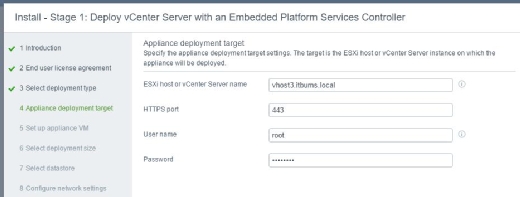
Step four -- Deploy the vCenter appliance. Think of the vCenter appliance as the management plane for VMware that manages everything, including high availability, clustering and VM operations. Open the ISO file you downloaded earlier in vCenter. Navigate to the vcsa-ui-installer/win32 folder and run the installer.exe file.
You can run this installation routine on the physical desktop because you can specify which host vCenter is going to deploy. Select the install option to open the install wizard. Click through the installation page until you reach the Select deployment type page. Choose the embedded option and click Next.
On the fourth page, enter the ESXi host you created earlier when you installed the ESXi hypervisor. The username and password are the same as the ones you created in step three.
Deploy the vCenter appliance.
The fifth page asks you to set up the appliance VM. Name the appliance, set a password and click Next. On the next page, it will ask you to select a deployment size -- choose Tiny, and then click Next.
The next page covers storage. Tick the Enable think disk mode box. On page eight, enter the appliance network details, click Next and then Finish. This deploys the vCenter appliance onto the ESXi host.
Next, click Step two and enter the Network Time Protocol server. You can get the time from the ESXi host.
The next step is to fill in the Platform Services Controller (PSC) screen. It's a good idea to use the prefilled values and a good password. PSC is a core VMware requirement and an alternative directory service for VMware. At this point, you can click through and select Finish.
Step five. You can now turn your attention to deploying your Horizon VDI test suite. Log in to the vCenter appliance with the credentials you set up in the last step -- the username is [email protected] -- to log in to the PSC with the password you created. The URL for vCenter should be shown when stage two is complete.
Step six. In vCenter, right-click New Data center and give it a name. Navigate into the data center and click New cluster. Give the cluster a name, but leave all the other defaults and click OK. Next, add your ESXi host.
Right-click the Horizon cluster and select Add Host. Enter the fully qualified domain name (FQDN) or IP and click Next. Then, enter the username and password for the host -- the username with root access -- and click Next. Accept the security alert and click Next.
For now, you will use the evaluation license. Click Next and continue clicking through until you get to Ready to complete, and then click Finish.
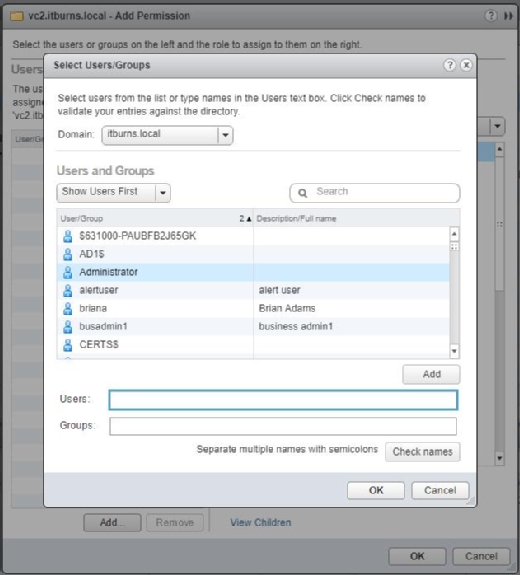
Add the domain administrator. Then, navigate to the root of vCenter and select the permissions tab. Click the green plus icon to add additional permissions. Next, leave the assigned role as Administrator. Click Add at the bottom of the Users and Groups section. Then, change the domain to the AD-enabled domain, select Administrator and click OK until you reach vCenter again.
Set up user vCenter accounts.
Step seven. Create a new VM within vCenter -- this example uses Windows Server 2012 R2.
To create the VM, right-click on the cluster you created and select Create new VM. Open the console and go through the Windows server installation as you would normally. Configure it as you would any other Windows server installation with AD integration. Then, copy the Horizon installation package onto the Horizon server that you created and run it on the machine.
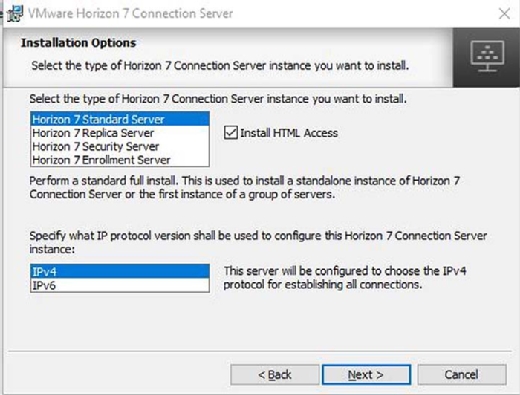
Step eight. Once you upload the package, accept the terms and click Next. Go with the default location and click Next. On the next page, choose Horizon 7 Standard Server and select IPv4 (Figure E).
Configure Horizon View.
Enter a recovery password and click Next. Allow the installation to configure the firewall as needed and click Next.
On the authorization screen, the current domain user for Horizon logon access should be highlighted. Because this is a test lab, you will do everything as a Domain admin. Click through the data collection question on the next screen and choose Install.
Before you can build any servers, there are a few items you must set up.
Step nine. Use an appropriate browser to log in using the FQDN with the administrative URL. Log in using the appropriate credentials -- the domain administrator account. This is the Horizon administration center.
Before you can build any servers, there are a few items you must set up. Navigate to View Configuration on the left side of the screen. Fill in the vCenter server details and click Next. You will be prompted to verify the vCenter certificate. Accept it.
On the next page, it will ask about View Composer. Although View Composer is a key part of automating a VDI deployment, it is not essential for this setup because you will use prebuilt desktops. You can click through to the final page of the wizard and select Finish.
At this point, the VDI test setup is complete and your test deployment is ready for you to create and test VDI deployments.