
Getty Images
Assign GPUs to virtual machines with VMware vGPU mode
Resource delegation across an IT system can be troublesome, but it doesn't have to be. Follow this guide to assign the right amount of GPU to support virtual machines on VMware.

Virtual machines are an efficient and portable mechanism to execute the code that composes applications and services. Traditional CPUs excel at logical operations, but they are woefully ill-equipped to handle floating point and other complex mathematics. The rise of GPUs addressed this limitation and enables applications to run games and other sophisticated visualizations that depend on a complex path.
The addition of GPU support to VMs enables virtualized workloads on premises and in the cloud to handle the demanding computation efficiently for tasks such as real-time data visualization and virtual desktop graphics.
But GPU support isn't automatic. Hypervisors support GPUs in either pass-through or virtual GPU (vGPU) modes. GPU support often must be enabled deliberately and added to VM configurations before the VM can use those GPU capabilities. Let's take a closer look at GPU support and review the steps to include GPUs in hypervisors, such as VMware.
What is GPU pass-through?
A pass-through mode provides access, control and use of an entire device. When a GPU operates in pass-through mode, the hypervisor assigns one GPU to one VM. The VM then has complete use of the GPU and can realize 100% of the GPU's capabilities, including processing power and associated graphics memory. This technique is sometimes referred to as virtual dedicated graphics acceleration (vDGA). However, other VMs cannot access or benefit from that GPU.
Pass-through operates at the chip level, not the core level. This means a GPU chip might have many cores on board, but pass-through assigns the entire GPU chip -- and all its cores -- to the associated VM. Pass-through cannot assign different cores to different VMs within the same GPU chip.
Nevertheless, modern graphics adapters often support multiple GPU chips, and each GPU chip can be assigned to different VMs. For example, the Nvidia M6 has one physical GPU, the Nvidia M60 has two physical GPUs, and the Nvidia M10 has four GPUs -- even though a graphics adapter like the M10 hosts 2,560 Nvidia CUDA (Compute Unified Device Architecture) cores. A business might deploy numerous physical servers, each with a multi-GPU graphics adapter, to provide GPU support for many VMs.
Pass-through mode is ideal for centrally hosted VMs that run the most demanding or graphics-intensive applications. This offers the best performance and provides excellent value if many users share the VM.
Microsoft Hyper-V, Citrix XenServer and VMware ESXi all support pass-through mode.
Using vGPU
The alternative means to virtualize GPUs is the vGPU mode. This approach creates a time-sharing environment that enables multiple VMs to share the GPU's resources. For example, if a GPU is virtualized into 10 vGPUs, and each vGPU is assigned to one of 10 VMs, each VM would have access to the GPU -- and its CUDA cores -- for 10% of the time. This technique is sometimes referred to as virtual shared graphics acceleration, or vSGA.
The basic relationship of the GPU, hypervisor and VMs is illustrated in the diagram below.
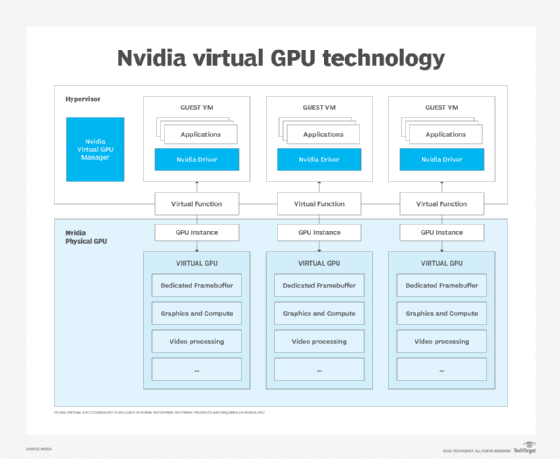
Hyper-V does not yet support vGPU at time of publication, but Citrix XenServer and VMware ESXi can run a virtual GPU manager. The manager handles the segregation of a physical GPU into vGPUs and assigns those vGPUs to VMs. This establishes the time-sharing mechanism that enables VMs to share the GPU. A graphics driver in each VM connects the VM's workload to the vGPU.
Graphics memory is not shareable. The video memory included with the GPU adapter card is split between the VMs using a vGPU. For example, if the graphics adapter has 32 GB and is split between 10 VM-vGPU pairs, each vGPU would have access to 3.2 GB. This combination of GPU time-sharing and nonshared video memory places a practical limit on the number of VMs that can share a GPU. The greater volume of VMs that share a GPU and the level of graphics demands those VMs place upon it, the less effective vGPU performance becomes.
Administrators can adjust performance by configuring vGPU resources. This allocates more or less time "slices" to a VM so that more demanding VMs might get more GPU time, while less demanding or test VMs might get less GPU time.
Most often, vGPU mode handles everyday light graphics tasks such as support for desktop graphics in virtual desktop infrastructure (VDI) environments, where many VM desktops share and benefit from a limited number of GPUs.
Assigning and enabling vGPUs in VMs
Author's note: This series of steps is intended to offer only a brief overview of the process involved. Consult both Nvidia and VMware documentation for more detailed steps and guidance in GPU software installation, GPU setup and vGPU assignments. If other GPU or hypervisor products are used, consult that documentation for specific steps and details.
Before adding vGPUs to VMs, administrators should check for critical prerequisites, which can include the following:
- Put in place a server with a suitable hypervisor, hypervisor management tools and a graphics adapter -- with at least one GPU chip -- that can support vGPU management tools.
- Install vGPU management tools for the correct hypervisor, such as Citrix XenServer or VMware vSphere Hypervisor and ESXi.
- If the vGPU will support VDI deployments, install the desired virtual desktop software, such as Citrix XenDesktop or VMware Horizon.
- Create the VMs that will receive vGPU support and install the desired guest OSes on those VMs.
Once the prerequisites are in place, proceed with the installation and configuration. For example, here is the general process for configuring Nvidia vGPUs with VMware vSphere:
- Stop the ESXi host.
- Install the latest Nvidia virtual GPU manager package for vSphere.
- Use the vSphere Web Client to log into vCenter Server and then click Configure > Graphics > Host Graphics > Edit to change the default graphics type in vSphere to vGPU -- a shared direct graphics type -- before configuring a vGPU.
- Accept changes to set the graphics type to Shared Direct.
- Use the Graphics Devices tab to verify the configuration of each GPU where vGPUs will be configured. Reconfigure any GPUs still set to Shared to Shared Direct.
- Restart the ESXi host.
The VM console in the VMware vSphere Web Client is not available for VMs running a vGPU, so have an alternate means of access to the VM -- such as VMware Horizon or VNC Server -- before configuring a vGPU.
To configure a vSphere VM with an Nvidia vGPU, follow these steps:
- Stop the desired VM.
- Open the vCenter web interface.
- Right-click the desired VM and choose the Edit Settings button.
- Select the Virtual Hardware tab.
- In the New Device list, select Shared PCI Device and click Add. The PCI device field should already show Nvidia GRID vGPU.
- Use the GPU Profile drop-down menu to select the type of vGPU to configure and select OK.
- Use the vCenter web interface to check that VMs running a vGPU have all guest memory reserved.
- Accept any changes and start the reconfigured VM.
- Use VMware Horizon or VNC to access the VM.
Finally, install the graphics driver, such as the Nvidia vGPU software graphics driver, in the VM so that the VM can interact with the GPU. Use the graphics driver intended for the particular guest OS.
Assign and enable GPU pass-through in VMs
VMware vSphere enables vDGA, which provides direct access to an entire GPU. The general process to configure a VM to use a GPU in pass-through mode includes the following steps:
- Power off the VM.
- Open the vCenter web interface.
- Select the ESXi host and select Settings.
- Locate the Hardware menu, choose PCI Devices and select Edit.
- Select all Nvidia GPUs and click OK.
- Reboot the ESXi host.
- Return to the vCenter web interface, right-click the desired VM and select Edit Settings.
- In the New Device menu, choose PCI Device and select Add.
- Select the GPU from the New Device drop-down list.
- Opt to reserve all memory and click OK.
- Restart the VM.
Once the VM is configured with a GPU in pass-through or vDGA mode, install the graphics driver -- such as the Nvidia vGPU software graphics driver -- in the VM's guest OS.
Measure GPU performance
GPUs are expensive and have limited use. Administrators might need to evaluate or justify the allocation of GPU resources to ensure that a VM -- and its workload -- gets the intended benefits from the GPU. If not, IT admins might reallocate the GPU to another VM. Fortunately, IT teams have their pick of several tools to gauge the performance of physical GPUs and vGPUs both from the hypervisor and within individual guest VMs.
For example, Nvidia provides the nvidia-smi utility that monitors GPU performance from any supported hypervisor or guest VM running 64-bit Windows or Linux. A tool such as nvidia-smi provides information including GPU ID and name data, GPU type, graphics driver versions, frame rate limits, framebuffer memory usage and GPU use details, which typically denote the percent of GPU capacity the VM uses.
Administrators can also use Citrix XenCenter for Citrix XenServer, or other common tools such as Windows Performance Monitor or Windows Management Instrumentation for guest VMs that run Windows. However, IT teams can only monitor GPU performance in pass-through mode from within the guest VM using the GPU, not from the hypervisor level.