
Getty Images
Follow these steps to decommission Exchange Server
An Exchange Server migration includes a lot of moving parts but it's important to cover the training aspect to make sure your users aren't left behind.

After you've prepared for an Exchange Server to Exchange Online migration, it's time to move the mailboxes and ultimately decommission your old Exchange Server.
Every Exchange Server environment is unique. But there are several fundamental migration pre-requisites to follow that will avoid disrupting users and make the change from a legacy version of Exchange Server to Exchange Online as smooth as possible.
Audit your environment
Examine your infrastructure to plan the migration by reviewing the areas related to updates and backups:
- Updates. Apply the latest patches to the Exchange Server if they are available. If you are moving from Exchange Server 2010, then Exchange Service Pack 3 must be installed. Go to the Exchange Management Console, and select Server Configuration to check the version. The version and build number next to your Exchange Server should read Version 14.3 (Build 123.4) for Service Pack 3.
- Backups. Check for up-to-date backups of user mailboxes and disable circular logging on Exchange Server databases to replay logs for database recovery if required.
- Other areas to consider. Look for mailbox quotas or retention policies in the Exchange environment to recreate in the new email platform. Any email archives or public folders will require a strategy to carry over these features from the on-premises Exchange platform. If applications or services use SMTP mail relay, then consider how they will relay mail after you decommission the Exchange Server environment.
Select and assign the user licenses
Purchase the required licenses for Exchange Online, which is licensed via a standalone User Subscription License or as part of a Microsoft 365 business plan. Assign the licenses in the Users administration area of the admin center.
Configure a hybrid Exchange deployment
Maintaining a connection between your on-premises Exchange environment and Exchange Online will require a hybrid deployment, which involves setting up the Hybrid Configuration Wizard and configuring DNS records.
The Active Directory domain will also require some modifications before the mailbox migration to Exchange Online. Run the Azure Active Directory Connect tool to synchronize user accounts and passwords, and group and directory data between the on-premises Active Directory environment and the Azure AD tenant. This procedure ensures that user and group information stays consistent across both environments. Your users can then sign into Microsoft 365 and other Azure AD-integrated services with their on-premises Active Directory credentials. To install Azure AD Connect, download it from the Microsoft Download Center and run the installation machine on a server in your infrastructure.
Another key to this process is to install a hybrid Exchange Management Server, which controls the hybrid configuration and the synchronization of objects between the on-premises Exchange environment and Exchange Online. The hybrid management server is an on-premises Exchange Server dedicated to governing hybrid deployment, and it must meet specific requirements to function properly. This server performs several important functions, such as managing the hybrid configuration, authenticating administrators, and synchronizing objects between the on-premises Exchange organization and Exchange Online.
The highest version of Exchange compatible with Exchange 2010 is Exchange 2016, so use this for the hybrid Exchange Management Server. You can upgrade to Exchange 2019 after decommissioning Exchange Server 2010.
Set the User Principal Name (UPN), which is the unique logon name for Azure AD to identify each user in the format with the username followed by @ and ending with the fully qualified domain name, such as techtarget.com. Typically, this is the user's email address, but you can also use a different value. You can bulk edit AD to set the UPN via PowerShell or use the Active Directory Users and Computers console. The UPN is the user login name in the account tab.
Validate the state of user mailboxes
Before the user mailboxes migrate to Exchange Online, you should verify the health of the mailboxes in your legacy Exchange environment. Use tools such as the Exchange Mailbox Server Role Requirements Calculator to check mailbox capacity and performance.
Plan the mailbox migration
Decide which migration method you will use to move mailboxes to Exchange Online, such as cutover migration, staged migration or hybrid migration. Plan the migration carefully to avoid data loss, downtime, and other issues that could stymie the operation and make.
Perform a migration test run
Put in the extra effort to make sure to avoid possible issues and create more work for the project. Verify the migration process thoroughly before you begin the actual move to Exchange Online with test mailboxes and test users to ensure that the method you selected works as expected.
Change the DNS settings to route email properly
Routing Exchange Server email to Exchange Online requires a change to the organization's DNS records to direct email traffic to Exchange Online instead of the on-premises Exchange 2010 environment.
To start, add your organization domain to Exchange Online and verify it. You will need to update the domain's DNS records to point to Exchange Online. This typically involves modifying the Mail Exchange record and the Autodiscover record for the domain to point to Microsoft 365. Once you make the DNS changes, verify that they have propagated and that email is appearing in Exchange Online.
The next step is to migrate the mailboxes and, when complete, verify you can configure your mail flow connectors in the Exchange Admin Center.
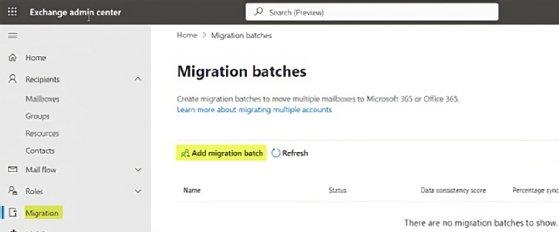
How to perform the Exchange mailbox migration
When you are ready to migrate mailboxes, use the Exchange Admin Center (EAC) or the Exchange Online PowerShell to create a migration batch and select the mailboxes to be migrated.
Start the migration process and the service will copy the contents of the mailbox to Exchange Online.
Monitor the migration status using the EAC or Exchange Online PowerShell to troubleshoot any issues that arise.
After the migration, verify that the mailbox has been successfully migrated and begin using it in Exchange Online.
Continue to migrate batches of users until complete.
Plot the public folders migrations
If you have public folders in Exchange Server, then you may want to migrate these to Microsoft 365 public folders. However, if these public folders are solely for shared email use, then consider using shared mailboxes instead. In addition to advantages in security and compliance, shared mailboxes can be accessed on mobile devices without an additional license.
The easiest way to migrate public folders is through a third-party application. The general steps are as follows:
- Set your on-premises public folders to use local mode.
- Create and enable the public folders in Exchange Online.
- Migrate the public folder data to the Exchange Online public folders.
- Use EAC to verify data has migrated and public folders are showing.
- Add the public folder to Outlook Web Access and check the contents.
- Configure the public folder permissions.
- Decommission the on-premises public folders.
Adjust email security settings in Exchange Online
If you already route email through a third-party spam filtering service, then you can continue to do this and point this service at Exchange Online for mail flow. You can also directly point email to flow through Exchange Online Protection (EOP), which is Microsoft's cloud-based email filtering service provided as part of its Office 365 suite of productivity tools. Microsoft designed EOP to protect organizations from spam, malware and other email-based threats with advanced email filtering and security features.
Set additional security on your domain's email. Sender Policy Framework (SPF) and Domain-based Message Authentication, Reporting and Conformance (DMARC) records to prevent email spoofing and phishing attacks. SPF records define which email servers are authorized to send email for a particular domain, while DMARC records provide additional email authentication and policy controls to prevent email-based scams and threats. Both records are important tools to ensure the security and integrity of email communications.
DomainKeys Identified Mail (DKIM) is an email authentication protocol that ensures emails come from an authorized sender and are not altered in transit. DKIM is one of several email authentication protocols built to stop email fraud, phishing and other email-based attacks. By verifying the authenticity of email, DKIM bolsters the security and trustworthiness of communications from the Exchange platform.
Plan out proper training for the users
Training users for an Exchange Online migration is an important part of the process. Preparing your users in advance will help them be more comfortable with the new system, which can minimize disruptions and maximize the benefits of the migration to Exchange Online. Start communicating with users about the migration as early as possible. Keep them informed of the timeline, what to expect during the migration and how it will affect them.
Provide users with clear and concise instructions on how to access their mailbox in Exchange Online, use new features and functionality, and get assistance.
One way to make this transition easier is to offer training resources, such as videos, webinars and user guides. These resources can help users get up to speed quickly and become comfortable with the new system.
People learn in several ways, so consider running training sessions for users, either in person or online, to provide hands-on training and answer any questions. Be prepared to address common concerns users might have, such as how to access archived email or how to use shared mailboxes.
After the migration is complete, follow up with users to make sure they can access their mailbox and they understand how to use the new system. Provide additional training or support as needed.
How to decommission the Exchange Server
After migrating to Exchange Online, you will need to decommission the Exchange Server. However, you will continue using an Exchange administration server because not all management tasks are available through the EAC. It's useful to keep the server you set up as the hybrid Exchange Management Server.
Before decommissioning the server, all mailboxes must be moved to Exchange Online.
Decommissioning an Exchange Server involves several steps to ensure that the server is removed from the environment properly:
- Remove public folder replicas. If the server hosts public folder replicas, then they must be moved to another server or deleted.
- Uninstall Exchange Server. Use the Exchange setup program to remove the legacy Exchange Server role from the server.
- Remove the server from Active Directory. Use the Active Directory Users and Computers snap-in to remove the legacy Exchange Server object from Active Directory.
- Remove any server-specific DNS entries. Delete any server-specific DNS entries for the Exchange Server.
- Remove the server from any load balancer configurations. If the server was part of a load-balanced array, eliminate it from the configuration.
- Verify that the on-premises Exchange Server is fully decommissioned. Use the Exchange Management Shell to verify that the server has been retired with the Get-ExchangeServer command. Check for any remaining objects or configuration settings.
It is important to follow the decommissioning process carefully to ensure the Exchange Server is removed properly to avoid any negative effects on the remaining Exchange Servers or other systems in the environment.