
auris - Fotolia
Set rules with Office 365 message classification
Message classifications are some of the handiest tools Exchange Online admins can have in their toolkits.

Office 365 comes preconfigured with all components linked together, but not every admin is familiar with its capabilities. One hidden gem in Office 365 is message classifications. And when combined with other Exchange features -- such as transport rules -- message classifications are a handy addition to every Exchange Online administrator's toolkit.
Office 365 message classifications allow users to categorize messages while enabling administrators to implement business rules based on user selections. Message classifications give end users an interface that provides additional information about the message they're sending and allows admins to implement business logic, either on the server side or in Exchange Online.
After creating message classifications in Exchange Online, end users are exposed to the messages via Outlook Web App or a dropdown list in Outlook. Once a classification is selected and the message is sent, an attribute is stamped on the message that the transport rules -- the engine we'll use to implement our business logic -- can read.
Actions can include blocking the message, altering the content, and applying protection or encryption to the message. You can also perform more complex actions, such as forwarding a message for approval or evaluating messages against the data loss prevention engine.
Message classification in action
To understand message classification a little better, consider a scenario in which our organization has three key requirements:
- A user must select a category to determine if messages will be sent externally or be rejected.
- If the user selects "External Unrestricted," the message can be sent to an external sender.
- If the user selects "External Confidential," the message will be encrypted with Office 365 Message Encryption to external senders.
Create message classifications
Use Exchange Online PowerShell to create message classifications. We'll connect to Exchange Online using Remote PowerShell and execute the following commands to create the two classifications:
| New-MessageClassification -Name ExtUnrestricted -DisplayName "External Unrestricted" -SenderDescription "Contains no sensitive content and can be sent to external recipients" New-MessageClassification -Name ExtConfidential -DisplayName "External Confidential" -SenderDescription "Contains confidential content and will be encrypted using Office 365 Message Encryption when sent to external recipients" |
After creating both message classifications, you should see them automatically in Outlook Web App -- after a short wait (Figure 1).
For Outlook Clients, deploy an XML file. To export the message classifications, use the following command from an Exchange Online PowerShell session:
| $classifications = Get-MessageClassification $holder = "<?xml version=`"1.0`" ?>`n<Classifications>`n" if ($classifications) { foreach ($i in $classifications) { if ($i.RetainClassificationEnabled) { $retain = "`n`t`t<AutoClassifyReplies/>" } else { $retain = "" } $displayName = $i.DisplayName $description = $i.SenderDescription $id = $i.ClassificationID $holder += "`t<Classification>`n`t`t<Name>$displayName</Name>`n`t`t<Description>$description</Description>`n`t`t<Guid>$id</Guid>$retain`n`t</Classification>`n" } } $holder += "</Classifications>`n" $holder > MessageClassifications.xml |
It's easiest to deploy the resulting MessageClassifications.xml file to clients using Group Policy. You'll need to deploy the following registry entries to cover Outlook 2007, Outlook 2010 and Outlook 2013, as shown in the example registry File below:
| Windows Registry Editor Version 5.00 [HKEY_CURRENT_USER\Software\Microsoft\Office\12.0\Common\Policy] "AdminClassificationPath"="%PUBLIC%\\MessageClassifications.xml" "EnableClassifications"=dword:00000001 "TrustClassifications"=dword:00000001 [HKEY_CURRENT_USER\Software\Microsoft\Office\14.0\Common\Policy] "AdminClassificationPath"="%PUBLIC%\\MessageClassifications.xml" "EnableClassifications"=dword:00000001 "TrustClassifications"=dword:00000001 [HKEY_CURRENT_USER\Software\Microsoft\Office\15.0\Common\Policy] "AdminClassificationPath"="%PUBLIC%\\MessageClassifications.xml" "EnableClassifications"=dword:00000001 "TrustClassifications"=dword:00000001 |
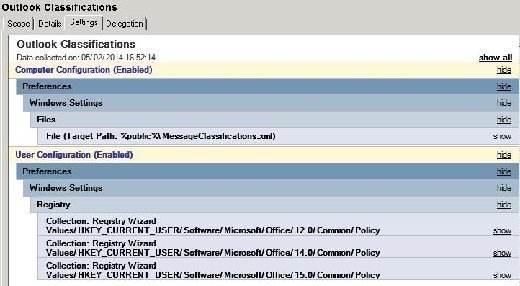
An example Group Policy is shown using Group Policy Preferences for deployment and pushing the MessageClassifications.xml file to the %public% directory (Figure 2).
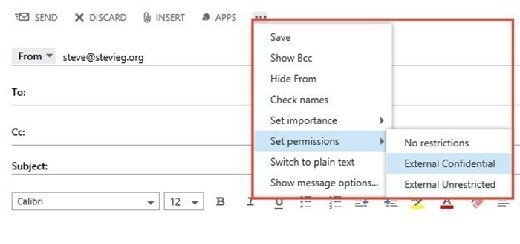
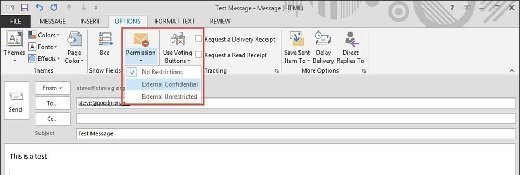
Once deployed to clients, the message classifications should show as a dropdown when creating a new message (Figure 3).
Create matching transport rules
After creating message classifications, the next step is to create two matching transport rules to apply the business logic. The first rule, Encrypt External Confidential Messages, checks for messages with the External Confidential message classification and to see whether the message is destined for an external recipient. If it is, it will encrypt the message.
The second rule, Block External Messages with no classification, looks for outbound messages without an applied classification and rejects them.
| Name | If … | Then … |
| Encrypt External Confidential Messages | Message Classification = External Confidential And Recipient is Located = Outside the Org |
Encrypt the message with Office 365 message encryption
|
| Block External Messages with no classification | The message properties don't include a classification and Recipient is Located = Outside the Org |
Reject the message with the reason: "A message classification must be chosen for messages with an external recipient." |
To create these rules in the Exchange Admin Center, navigate to Mail Flow and choose the Rules tab. Then, choose the Add button in the Rules section and select the base Create new rule option (Figure 4).

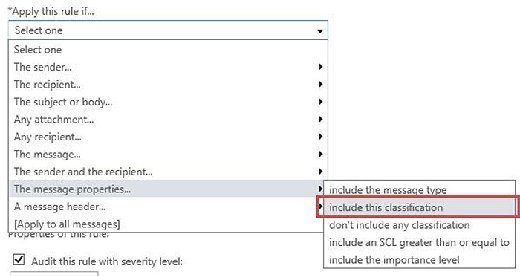
Select More Options to apply the full set of logic rather than just the basic options. With the full set of options available, we'll be able to select the condition for processing messages based on their message classification within the Apply this rule if > The message properties section (Figure 5).
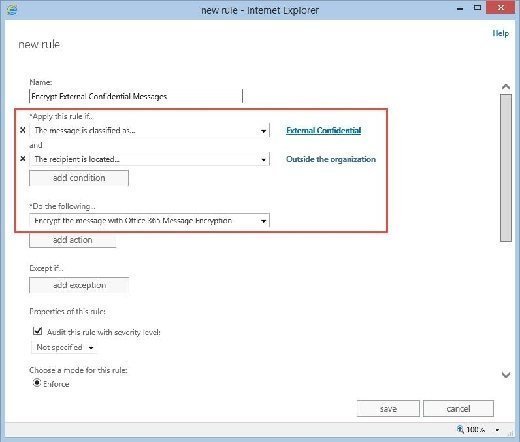
Next, select the message classification from a dropdown list and add additional conditions and actions per our business logic. These actions rely on the use of message classifications. In our example, we'll see the completed rule for encrypting outbound mail with Office 365 Message Encryption (Figure 6).
About the author:
Steve Goodman is an Exchange MVP and works as a technical architect for one of the U.K.'s leading Microsoft Gold partners. Goodman has worked extensively with Microsoft Exchange since version 5.5 and with Office 365 since its origins in Exchange Labs and Live@EDU.