
Getty Images/iStockphoto
Configure AD sites for optimized replication topology
AD sites configuration optimizes replication by mapping physical network topology -- locations, WAN links, subnets and domain controllers -- for efficient database synchronization.

Most AD administrators are comfortable managing users, groups and organizational units. However, fewer are familiar with managing AD topology.
Properly associating physical locations, WAN and LAN connections, and scheduling replication availability enables administrators to ensure the AD database reconciles efficiently and promptly.
This article provides a sample AD configuration based on a fictional network map. It covers two scenarios: new AD deployments and optimizing existing AD topologies.
Use these best practices to configure optimal AD replication.
Start with a network map
Begin with an accurate network map as a visual. Include the environment's physical locations, such as headquarters and branch offices.
You should also identify the WAN connections connecting locations and the logical IP subnets at each locale. Finally, identify the domain controller (DC) locations.
Figure 1 is a sample diagram of an AD sites configuration.
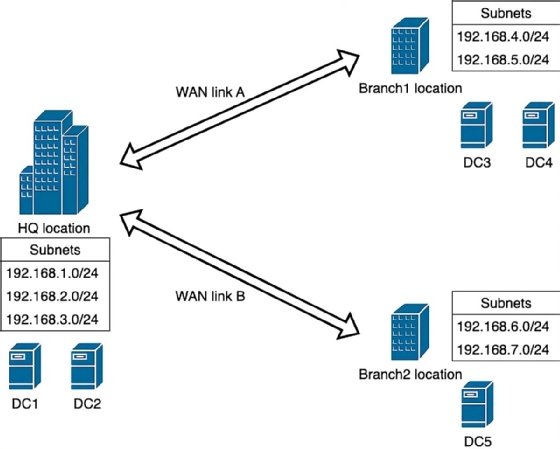
Pay careful attention to the following components:
- Physical locations. Headquarters, Branch1, Branch2.
- WAN links. WAN link A and WAN link B.
- Subnets. Seven subnets distributed among the three locations.
- DCs. Five DCs distributed among the three locations.
You'll create AD objects to represent these components. To avoid confusion, location will refer to the physical building, and site will refer to the AD object.
The following sections cover two likely scenarios:
- Deploying a new AD environment. You must create most objects and rename the default objects.
- Optimizing an existing AD environment. You rename existing objects and create any unrepresented objects.
New AD environments
Suppose the above network diagram represents an AD environment you intend to build. Once you deploy your first DC, you should create the AD sites infrastructure before promoting additional DCs. AD automatically places the DCs in the topology when you promote new DCs with existing sites and subnet objects. If you create the topology in AD Sites and Services after deploying the DCs, you must manually move them.
Remember, the goal is to create AD objects representing the components in the diagram.
Open the AD Sites and Services console on your existing DC. Then, expand the nodes. Identify the following:
- Sites node.
- Subnets node.
- Inter-Site Transports and its nested IP node.
- Servers node.
You will work with these nodes to configure AD sites.
Define AD sites
Begin by renaming the existing Default-First-Site-Name to Headquarters.
Next, create the site objects for Branch1 and Branch2. Right-click the Sites node and select New Site. Use descriptive names to identify the locations.
Create a site object for the Branch1 and Branch2 locations. You must associate new sites with a link. For now, select DEFAULTIPSITELINK. You can rename the link later.
The second site object is for Branch2.
AD Sites and Services now displays the three site objects representing your physical locations.
Define site links
Next, create objects to represent the two WAN connections. AD uses these connections for intersite replication. Expand the Inter-Site Transports node and select the IP node. Again, name the links something meaningful to your organization. For this example, the names are WAN-A and WAN-B. Rename the existing DEFAULTIPSITELINK to WAN-A, then create a new site link object for WAN-B.
Figure 2 shows how you can right-click the DEFAULTIPSITELINK object to rename it to WAN-A.
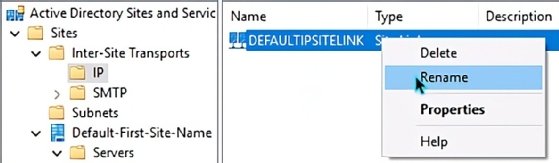
Create a second link for WAN-B.
When you create a new site link, give it a name and associate it with the locations the WAN connection accesses. In this case, WAN-B connects Headquarters and Branch2.
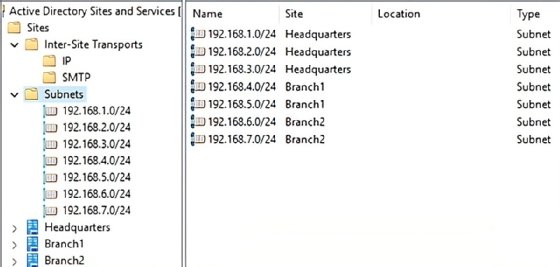
You now have two objects representing your WAN connections (Figure 3).

Per Figure 1, WAN-A connects Headquarters and Branch1, while WAN-B connects Headquarters and Branch2. Use the Add and Remove buttons in the Site Link properties menu to configure the associations.
Define subnets
Next, expand the Subnets node, right-click and select New Subnet. You must enter the subnet prefix using slash notation to represent the subnet mask, as seen in Figure 4. You must also choose the AD site where the subnet resides.
AD Sites and Services displays all seven subnet objects from the network diagram.
Place DC objects
The final step is creating computer accounts for the DCs you plan to promote. Open AD Users and Computers, select the DC organizational unit and create a computer object for each DC. Use the computer name that you'll assign to the systems. In this example, the names are DC2, DC3, DC4 and DC5. Remember, DC1 already exists; that's the system where you're building the sites infrastructure.
Return to the AD Sites and Services console. Expand each site node -- Headquarters, Branch1 and Branch2 -- and observe the Servers nodes. These nodes store DC objects. By default, the first DC is already displayed.
Promote the remaining four DCs. Note that DC3 and DC4 are in the Branch1 location. Assign these two DCs static IP addresses in one of the subnets for that location. DC5 is in Branch2, so assign it a static IP address in the 192.168.6.0/24 or 192.168.7.0/24 range.
When you finish promoting these DCs, AD notes their IP addresses and assigns them to the proper site.
Your AD replication infrastructure is now complete. However, you still need to configure the availability and replication schedule of the WAN links. Those steps are covered later in the article.
Existing AD environments
If you're optimizing an existing AD environment, you must have an accurate network diagram of existing resources. Identify each location, subnet, WAN connection and DC. Once the diagram is correct, you'll either rename existing objects or create new ones. The process is similar to the steps for a new environment.
Open the AD Sites and Services console from the Tools menu in Server Manager. Expand all nodes to clearly see what objects exist.
Define AD sites
Confirm you have site objects for Headquarters, Branch1 and Branch2. Rename any existing objects that aren't correct and create any that are missing.
Define site links
Next, check the site links. The demonstration environment has just two WAN connections. You might need to rename the DEFAULTIPSITELINK to WAN-A and create a new one for WAN-B.
Define subnets
Use the same process to confirm that all subnet objects exist. These objects help AD establish the most efficient replication topology for reconciling the AD database.
Place DC objects
Finally, confirm that all five DCs appear. Knowing which DCs are deployed at each location is essential, as you might need to move them to the proper site.
Once you create the objects, the AD Sites and Services console displays them in the original network diagram.
Configure replication
You can now optimize and configure AD replication by managing the relationships between the sites, site links and DC objects.
Set the link replication schedule
Managing replication is the purpose behind the correct configuration of AD sites. Once your AD Sites and Services console matches your environment's physical configuration, you can fine-tune replication settings.
Organizations with fast and unsaturated WAN connections might not need additional optimization. However, on limited-bandwidth WAN connections, you can schedule when the site link (connection) is available for AD replication.
Right-click a site link and select Properties. The General tab contains a cost value and a replication schedule setting. Cost lets you prioritize one link over another in a fault-tolerant mesh topology. The replication schedule defines the frequency of AD replication across the WAN link. The default is 180 minutes and shouldn't be set below 15 minutes. Consider other traffic that relies on the WAN connection when setting this value.
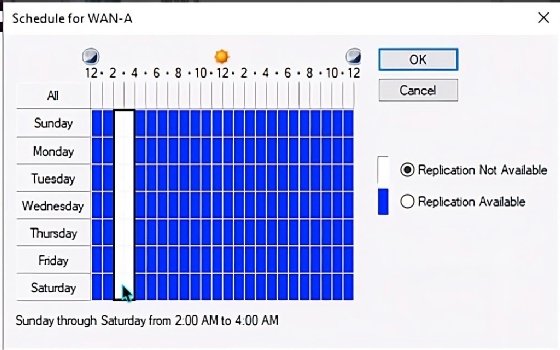
Select the Change Schedule button to choose times when replication can't use the WAN connection. For example, if you do nightly backups across the WAN, you might make the WAN unavailable to AD replication at that time. Figure 5 shows that the WAN-A connection is unavailable from 2 a.m. to 4 a.m.
Set DC partners
Right-click the NTDS Settings node under the DC objects to manually define replication partnerships. AD has a built-in topology generator that typically manages this for you. Microsoft recommends this automatic process, but the manual settings are there if needed.
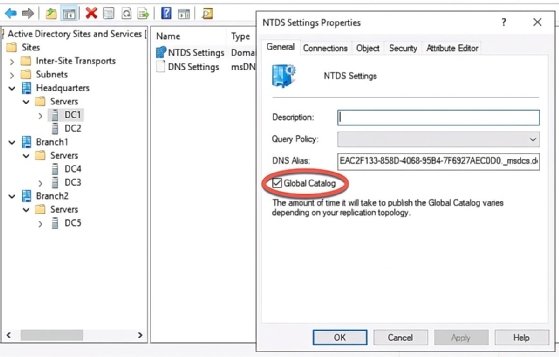
Configure Global Catalog Servers
Microsoft recommends at least one Global Catalog (GC) domain controller at each site so that catalog searches don't cross the WAN connections. Again, this can be fine with robust WAN connections, but keeping GCs near client systems is helpful for less efficient links.
To configure a DC as a GC, expand the Servers node under the chosen site. Select the DC, then right-click the NTDS Settings node and select Properties. The checkbox is on the General tab (Figure 6).
Monitor replication
Now that your AD infrastructure reflects your physical network, it's time to consider replication monitoring. Microsoft provides two tools for managing AD replication beyond using the AD Sites and Services console: repadmin.exe and PowerShell.
Use the repadmin tool
The repadmin.exe utility replaces the retired replmon.exe tool. Repadmin.exe is best used as a monitoring utility, though you can make configuration changes to the replication topology if necessary. Manual changes to AD replication aren't common or recommended; let AD manage this for you.
Repadmin.exe displays the following essential information:
- Replication health.
- Replication statistics.
- Replication partners.
Repadmin.exe is your go-to AD replication monitoring tool, especially in small and medium-sized environments. For larger environments, consider using PowerShell to manage replication.
Use Windows PowerShell
The PowerShell AD module provides various AD replication cmdlets to gather information and configure settings (Figure 7). AD replication automation is straightforward, as the cmdlets can import data from CSV files.
Here are a few example cmdlets to report information:
- Get-ADReplicationSite.
- Get-ADDomainController.
- Get-ADReplicationSiteLink.
- Get-ADReplicationFailure.
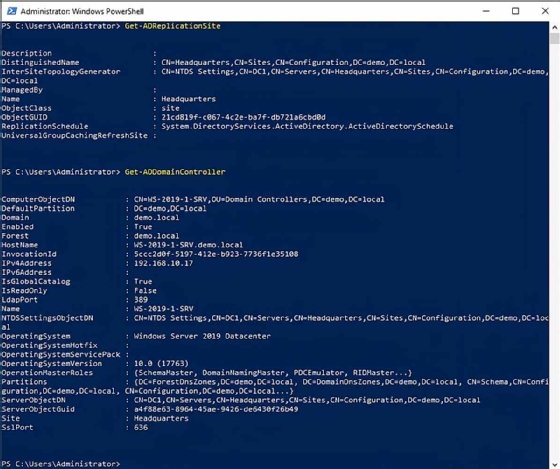
Use the Set cmdlet verb with these PowerShell nouns to manage settings.
Conclusion
AD manages its replication topology automatically -- but only if you provide information about your physical environment. AD needs to know the locations of DCs and available WAN connections to determine the best way to configure same-site and cross-site replication. You can also link Group Policy Objects to AD sites, enabling location-specific configurations.
Use the AD Sites and Services console to create objects representing your organization's locations, WAN connections, subnets and DCs. Be sure to start with an accurate network diagram; in fact, this project is the perfect excuse to review the physical topology, too.
Take a few minutes to review AD Sites and Services. Is it current? If not, you might be sacrificing WAN bandwidth, timely replication and optimal DC configurations.
Damon Garn owns Cogspinner Coaction and provides freelance IT writing and editing services. He has written multiple CompTIA study guides, including the Linux+, Cloud Essentials+ and Server+ guides, and contributes extensively to Informa TechTarget, The New Stack and CompTIA Blogs.