
Gorodenkoff - stock.adobe.com
How to use Windows Check Disk to maintain disk health
Using built-in Windows tools such as Check Disk and SMART helps organizations reduce risks associated with disk errors, extend hardware life and maintain operational continuity.

Unexpected disk failures aren't just technical issues. They represent business risk, downtime and unnecessary recovery costs. Depending on the type of failure, an error on a disk can indicate a condition that could cause irretrievable loss of any stored data.
Backups can mitigate the fallout, but restoring data can be time-consuming and expensive for organizations. Instead, an organization can reduce the risk of a disk failure by ensuring that users and IT keep an eye out for key indicators and know how to use built-in utilities such as Windows Check Disk (CHKDSK).
Signs of disk failure
Disk failure can occur for several reasons. These can be catastrophic, such as dropping the computer and damaging the drive, or something as simple as firmware that can no longer detect the drive. Disks wear out like most physical entities, so they can also fail gradually as sectors on the disk become unreadable to the read/write mechanism. Other indications of impending disk failure include poor performance while opening or saving files, computer boot failure or errors accessing data.
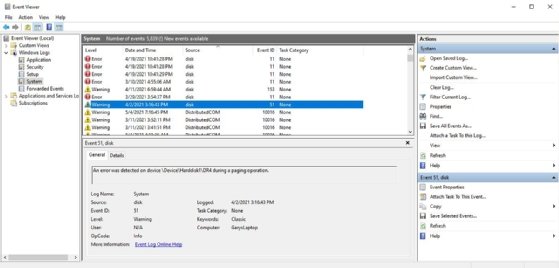
These signs are usually easily detected through errors and warnings in the Windows event log. Included in all versions of Windows, the event log records warnings and error events associated with the hard disk. Open the log by either searching for "event viewer" or entering Eventvwr.msc in the command line.
Once opened, expand the Windows logs and click on System in the Event Viewer (Figure 1). This shows informational events, warnings and critical errors for all system components such as the CPU, controllers, memory, network and disk.
Diagnosing disk errors
Most OEMs include a hardware diagnostic tool, available in the BIOS or UEFI, that is useful for checking the health of the disk. These tools typically don't repair errors, though a few models include limited repair or reallocation capabilities. In any case, running these checks across all devices helps identify failing drives early and avoid service interruptions.
The BIOS/UEFI utility functions vary by manufacturer but should be the first step to resolving disk issues. Each manufacturer has a unique way of opening the utility on boot. Pressing the F10, F2 or Escape key immediately after pressing the power button usually works. Look for a text line on the screen that indicates what to do.
There are also Windows internal tools and third-party tools that can assist in this diagnostic warning of failure.
What is CHKDSK?
The Windows CHKDSK command-line utility is reliable for finding and addressing file system errors by scanning the disk looking for bad sectors. A disk is divided into a sort of grid with concentric tracks and sectors, and the read/write head reads data in these sectors. If the disk is physically damaged and Windows has difficulty reading it, the system logs the error or warning. CHKDSK can find those bad sectors, write the data to a new sector and mark the old one so the disk won't use it again.
CHKDSK has been a Windows core utility since the earliest disk operating system and Windows versions, and it's gone through several changes both in operation and fundamental functionality. While it doesn't repair disk failure, it's a useful tool for identifying file system errors that could be a result of impending disk failure. This enables the user to back up the data and restore it to a new drive, preventing data loss.
On Windows 10 and 11, Check Disk includes the following features:
- /spotfix. This command skips the whole disk scan, which can be lengthy with large disks, and applies a targeted file system fix during a reboot.
- /forceofflinefix. This command scans the disk online but does not perform repairs immediately. Instead, it queues the repairs to happen offline during the next reboot.
Common CHKDSK switches
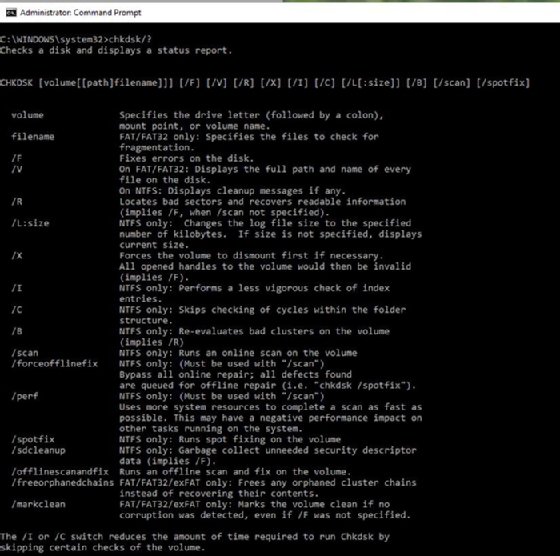
The CHKDSK utility has several switches that perform various tasks indicated by the CHKDSK /? command, as shown in Figure 2. The most common switches include the following:
- CHKDSK /? displays the help file.
- CHKDSK /F fixes logical file system errors.
- CHKDSK /R locates bad sectors and attempts to recover readable information. This process also fixes logical file system errors in the same way as /f. On solid-state drives (SSDs), this command still checks for unreadable sectors, but it does not perform physical surface scans the way it does on hard disk drives (HDDs).
- CHKDSK (no switches) runs an analysis utility on the System drive (C:), which checks the file system, security descriptors, file name linkage and file system structure.
- CHKDSK (volume/file path) runs against a specific volume, file or directory. This command quickly tests if a file or directory can't be accessed or has other performance issues.
Other switches might shorten the execution time by using more system resources or limiting the operations. These include the following:
- /perf allocates more system resources for faster execution at the cost of active applications.
- /scan /forceofflinefix provides an online scan and queues the repair for offline work.
- /i does a faster, but not thorough, check.
How to use CHKDSK
A user can run the CHKDSK command from a command prompt. First, search for "Command Prompt" in the Windows search bar. After it opens, select the Run as Administrator option on the right. At that point, the user can enter CHKDSK and any switches they wish to execute. If needed, the command CHKDSK /? generates a list of switches.
Additionally, Windows 10 and 11 include File Explorer integration. This feature provides access to the CHKDSK utility through the File Explorer UI rather than through the command line.
Right-click on the C: drive in File Explorer and choose Properties. Then, select the Tools tab and click on the Check button.
Running CHKDSK before Windows boots
CHKDSK can run without starting Windows. If Windows doesn't boot, try running CHKDSK before Windows loads to check the disk and hopefully resolve the problem.
Boot the computer from a Windows installation USB or OEM-supplied recovery disk. Alternatively, engage the recovery environment by holding the Shift key and clicking Restart. Then, take the following steps:
- On the "Install Windows" screen, click Repair Your Computer.
- Select Troubleshoot > Advanced Options > Command Prompt.
- Run CHKDSK C: /r to check the system drive.
Considerations when using CHKDSK
While CHKDSK is intuitive and easy to use, it's important to keep the following points in mind:
- CHKDSK typically runs from the command-line utility (CMD) or from File Explorer.
- CHKDSK will not damage a healthy computer or disk. However, it's possible for the /f and /r to burden a failing drive and risk data loss on a damaged drive. Before running either command on a suspected failing drive, consider creating a backup first or using disk imaging tools instead.
- CHKDSK can run against any physical hard disk.
- CHKDSK requires the target volume to be offline when using the /f or /r options. If the target is the C: drive, CHKDSK queues the scan request and runs it automatically on the next restart. This can be helpful, as scheduling scans during maintenance windows reduces disruption and limits unplanned support tickets.
- CHKDSK can run on other volumes live.
- CHKDSK supports offline use through boot media such as USBs or recovery disks.
Additional disk scan and repair processes
In addition to CHKDSK, IT teams should be familiar with other Windows options for diagnosing disk errors. And in the event of disk failure, they should know what their options are for system repair.
Performing self-monitoring, analysis and reporting technology (SMART) checks and using image files to restore the system are also important processes for scanning and repairing disks.
Diagnosing disk errors with SMART
SMART is a built-in monitoring system on HDDs and SSDs that detects and reports signs of hardware failure. Some of the metrics it reports on include read/write error rates, spin-up time for HDDs, bad sector blocks, remaining lifespan, wear-leveling count and temperature. SMART's job is to try to predict imminent hard disk failure so users can back it up and restore it before the drive becomes unusable.
Just like CHKDSK, SMART can't repair but warns of impending failure. For IT leaders, this data provides early-warning signals that support predictive maintenance.
HP's UEFI system test performs a SMART check on a hard drive. Users can also access SMART through PowerShell or the Windows Management Instrumentation Command-line (WMIC) utility. Use one of the following methods:
- Execute the PowerShell command Get-PhysicalDisk. This shows the status of each drive.
- Execute the WMIC command wmic diskdrive get status. This is a legacy command, but it still works on Windows 10. It might not be available on Windows 11, as the WMIC utility is deprecated and has been removed by default from Windows 11 installations.
Third-party tools also provide SMART diagnostics. These include tools from Seagate, Western Digital, Hard Disk Sentinel and CrystalDiskInfo.
Using image files for system repair
When restoring systems and system files after a disk has been replaced, it's critical to get them to a usable state as quickly as possible. This includes user settings, applications, data and the OS, with options as configured and customized by the organization. The use of a full disk or system image file -- either from a physical device such as a USB drive, CD/DVD or a network-accessible file -- has been a standard procedure for system restoration for many years.
Organizations build a golden image to use for restoration. This image has corporate-approved security configurations, applications, settings and even corporate logo wallpaper. There might be multiple images to accommodate the needs of different departments, with some images more secure than others. From a business continuity standpoint, maintaining standardized image files shortens recovery time and helps meet compliance targets.
There are also several ways image files can be used in system recovery. Each method corresponds to different recovery requirements.
Problems such as hard disk failure or OS corruption might require a full system recovery. However, it's also possible to do a partial system recovery from a type of image file called a snapshot or restore point. A user can take a snapshot of the system state, then restore the system as if going back in time. Note that this doesn't back up documents or user data -- it just protects system files, drivers, registry settings and configurations.
For instance, a user can save a snapshot of the system as an image file on disk. An app installation or security update could then take place. If that update or installation caused the system to fail or exhibit poor performance, the user can apply the snapshot to restore the system to the previous state. Users can take multiple snapshots and choose which one they want to restore the system to.
To create a snapshot and restore the system to it on Windows 10 and 11, take the following steps:
- From the Windows Search bar, search for and select Create a restore point. This opens the System Properties screen.
- Under Protection Settings, select the drive the snapshot should be saved onto. Then, click on the Configure… button.
- A pop-up screen should then show basic configuration parameters such as limiting the amount of disk space to store snapshots. On this screen, make sure Turn on system protection is selected, and configure any desired disk space usage settings. Once the settings look correct, click Apply and OK.
- On the System Properties screen, select the Create… button. This prompts another pop-up, where the user should type in a description for the restore point and then click Create.
- Once the system is done creating the restore point, select Close.
- To restore the system, click on the System Restore… button. The user can then choose to revert the system to one of the available restore points.
It's also possible to script this process in PowerShell for Windows 10 and 11.
Managing disk health in a corporate environment
In the enterprise, disk health management directly affects data integrity, compliance, uptime and costs. Beyond individual repairs, it plays a key role in risk mitigation and lifecycle planning. It's crucial for organizations to monitor disk health on a consistent basis, and to use the right tools and strategies to do it.
Windows CHKDSK is a fundamental tool that performs a quick check on disk read/write errors. It's often the initial step in resolving disk-related performance problems and errors listed in event logs. However, it's better used for general maintenance instead of repairing a known issue, as it's impractical to run it on every computer in an organization.
For enterprise environments, advanced tools using SMART monitoring and logging to a centralized location are more effective and practical. These tools include Windows Admin Center, System Center Operations Manager and third-party applications.
Many third-party programs enable an administrator to manage event logs, including the system event log, and identify computers that need attention. Some of the more popular options are Manage Engine EventLog Analyzer, Sematext Logs, Graylog and Datadog Log Management. These tools provide advanced features such as compliance analysis, real-time monitoring, scalability and custom dashboards.
IT staff should use the following best practices to prevent and handle issues like disk failure:
- Monitor SMART data with tools such as PowerShell, Windows and third-party programs to detect early signs of disk failure.
- Monitor event logs for disk warning events. Use centralized log management tools to collect and analyze enterprise-wide data.
- Prepare system images for use in restoring failed systems quickly and reducing downtime.
- Create images for various system requirements in the enterprise, such as kiosks, test and development, general users, power users and executives.
- Provide full disk or system image files on backed-up, readily available network locations.
- Protect computers with system restore points. This is especially useful for testing and development, and prior to installing software on specific machines.
- Educate end users on disk failure warning signs and how to contact IT support for resolution.
Additionally, executives and managers should adopt the following practices to ensure proper disk management in their organizations:
- Ask administrators what percentage of endpoints have had CHKDSK or SMART scans in the past quarter.
- Include disk health metrics in quarterly IT risk reviews.
- Make sure staff are trained in proactive maintenance and image-based recovery.
- Budget for preventive diagnostics instead of emergency replacements.
Editor's note: Gary Olsen originally wrote this article in December 2021. He updated and expanded it in December 2025 to reflect changes in Windows management processes and improve the reader experience.
Gary Olsen has worked in the IT industry since 1983 and holds a Master of Science in computer-aided manufacturing from Brigham Young University. He was on Microsoft's Windows 2000 beta support team for Active Directory from 1998 to 2000 and has written two books on Active Directory and numerous technical articles for magazines and websites.