Windows 10 disk management terms and tasks IT should know
Windows 10 disk management is a crucial function that system admins should perform. To manage Windows disks, IT must know the difference between volumes and partitions.
Windows 10 disk management ensures users have an optimal desktop configuration that allows applications and data to operate successfully.
Admins may encounter challenges with Windows disk management because the terminology can be confusing, and the Windows 10 Disk Management tool can be difficult to understand.
Windows 10 disk management terms defined
Windows admins should familiarize themselves with these Windows 10 disk terms to ensure they can navigate the Windows 10 Disk Management tool or any third-party disk management tool.
Hard disk. A disk that is a physical device for data storage. A hard disk could be a hard disk drive, a solid-state drive (SSD), USB storage or other removable drives, or an audio CD or DVD. "Disk" in the context of the following definitions is just a storage term and not a physical device.
Basic disk. A storage type that contains partitions and logical drives formatted with a file system for data storage. Basic disks include clustered disks and USB removable drives, and support master boot record (MBR) and GUID Partition Table partitions. Windows 10 desktops partition a drive as a basic disk by default.
Dynamic disk. These differ from basic disks because they span multiple disks and create fault-tolerant volumes such as a mirrored and a redundant array of inexpensive or independent disks (RAID). They are more flexible and manageable than basic disks, and IT can create them in Windows disk. IT can convert basic disks to dynamic disks and dynamic disks to basic.
Windows 10 desktops partition a drive as a basic disk by default.
Volumes and partitions. Some people use these terms interchangeably and can cause a bit of confusion for IT. Both terms are logical structures or divisions of a disk that appear as individual disks to the OS. IT can create a volume on a dynamic disk that spans multiple disks -- often a RAID configuration -- where a partition is created on a basic disk. A simple volume is a volume on a single drive. IT must format partitions with a file system to store data, including Windows and applications.
Boot disk or partition. This is a recovery CD, DVD or floppy disk that IT can use to start Windows for troubleshooting if the computer doesn't boot. A boot partition holds the files for Windows and is accessed during the Windows boot-up process. IT must have Windows installed on a basic disk that contains at least one active MBR partition.
Windows 10 disk management tasks
There are several key Windows 10 disk management tasks that an administrator should be familiar with for day-to-day operations. While it is possible to perform these tasks via Diskpart, a partition manager that performs the operations from a command line, it is often simpler to use the Disk Management snap-in. The snap-in tasks to know include the following:
partitioning
formatting
volume manipulation
advanced tasks
The Windows 10 Disk Management tool
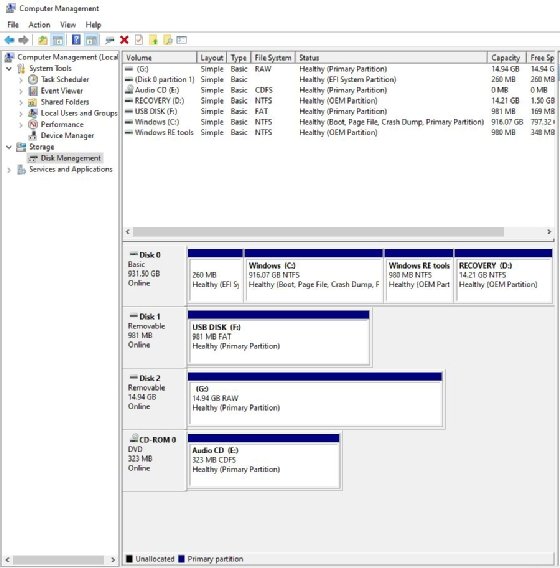
IT can find the Windows 10 disk management tool by going to the Windows Search bar and entering "Disk Management." This tool displays several disks and partitions on a Windows 10 PC (Figure 1). Note that physical disks -- including USB -- are numbered starting with zero. In this example, the PC has one internal hard disk (Disk 0), two USB drives (Disk 1 and 2) and a CD ROM drive. Disk 0 is the "system disk" where Windows is.
Figure 1. The Windows 10 Disk Management tool displays each disk and partition on a PC.
Note the following features shown for these partitions:
drive letter (recognized by Windows);
volume label (user supplied);
size and formatting (i.e., FAT, NTFS);
disk type (basic, dynamic, removable, etc.); and
partition type (primary, boot, OEM).
Partitioning a disk
Partitioning a disk refers to dividing a Basic or Dynamic disk into logical sections and is relatively easy to do. It is a common task required to make a newly purchased disk appear in Windows for data storage or for repurposing an existing disk by changing the partition structure.
The trick is to make good decisions on how many partitions to make and their size. If a device has multiple hard disks, typically, one is used for the operating system and the other for data for better performance. Windows installation creates a boot partition and formats it before installing Windows, leaving the rest up to the admin.
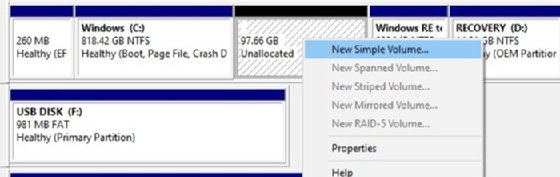
Create a partition. To create a partition, right-click in the Unallocated space shown in the Windows 10 Disk Management display and select the type of volume (Figure 2). Selecting the simple volume initiates a new wizard, which allows specification of the volume size, the assignment of a drive letter or mount path, then brings up the Format Partition dialog. The created and formatted partition now appears in File Explorer as the E: drive and can be used as needed.
Figure 2. Right-click on unallocated space and select
Mark partition as active. This feature reactivates a partition if it has become inactive.
Formatting a partition
A partition needs to be formatted with a file system to be useful. Trying to perform any disk management operation on an unformatted drive, such as just clicking on it in File Explorer, results in a message indicating it is unformatted.
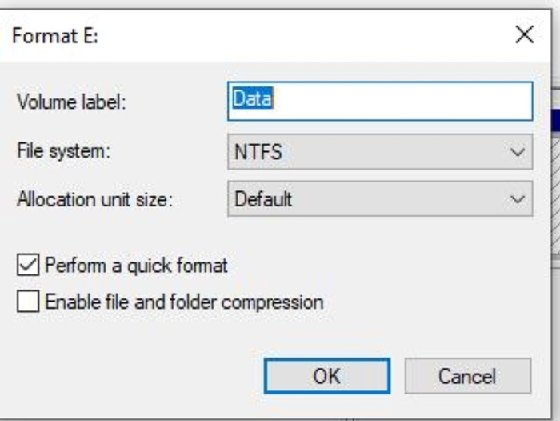
Right-click on the drive and select Format (Figure 3), which allows the user to name the volume. Select a file system between FAT32, NTFS and exFAT and perform a quick format and file compression if desired. The format tool also works on removable USB drives.
Figure 3. The format command allows the user to name the volume, select a file system between FAT32, NTFS and exFAT, and perform a quick format and file compression if desired.
Caution: Formatting a healthy partition with data will prompt a warning about destroying the data. It is best to avoid this altogether, but third-party data recovery operations can usually restore data after a reformat. Windows will not allow formatting the Windows drive.
Volume manipulation
The volume operations in the Windows 10 disk management tool adjust the size of the partition. These are very powerful operations that will enable the changing of partition space for better data organization and can happen without destroying data.
Delete Volume. Right-click and select Delete Volume. This action is very dangerous as the data is not recoverable. Make sure there is a good backup just in case you need it.
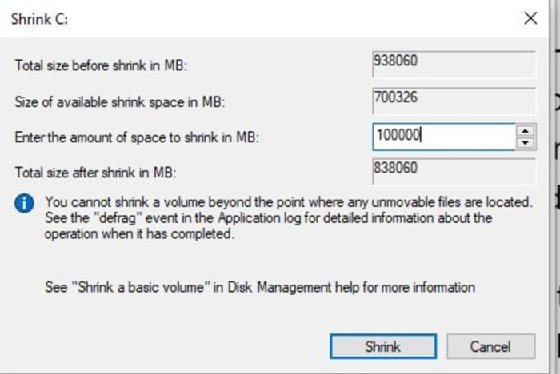
Shrink Volume. This reduces the space on a disk, even one with data, to create a new partition. In the example from Figure 1, the C: drive has a 916 GB partition and only one fixed hard drive, and we want to have a separate partition for backup. Shrink Volume decreases the unused space, creating "unallocated space" on the disk, which the new partition can use.
OEM-installed laptops and PCs only have one hard drive, so it helps to put applications and data on a separate partition from Windows. To do this, right-click on C: partition and select Shrink Volume, then indicate how much of the available space to move to a new partition (Figure 4). In this example, we selected 100 GB (100,000 MB). Due to overhead, Disk Manager will show this volume as 97.66 GB of unallocated space.
Note: If a volume can't shrink, it is likely due to insufficient free space or a file system error. Windows will not allow you to shrink past used space with data or unmovable files.
Figure 4. Shrink Volume decreases the unused space, creating
Extend Volume. This expands the size of a partition if you have unallocated space. Suppose that after adjusting the size to 100 GB, the E: partition should be 150 GB. Without unallocated space, this wouldn't be possible. Instead, do the following:
Backup the data and delete the E: partition.
Deleting the partition creates the 97.66 GB unallocated space again (Figure 2).
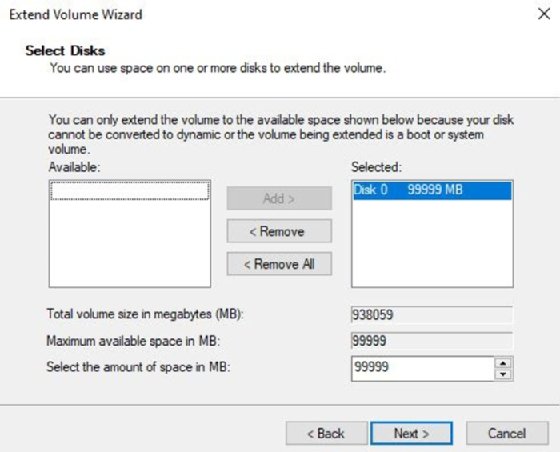
Right-click on C: partition and select Extend Volume, which initiates the Extend Volume Wizard (Figure 5). The Extend Volume screen is where the amount of space to extend the volume is specified. Because the extended volume is a boot or system volume, it cannot convert to a dynamic disk. The C: drive is now 916 GB again.
Perform the Shrink Volume operation and use the new desired size of the E: partition to shrink the C: drive and create the new E: partition.
Figure 5. The Extend Volume screen is where the amount of space to extend the volume is specified.
Advanced features
Other operations in the action list include the following:
Open and explore. This allows you to view the files via File Explorer.
Change drive letter and paths. These settings allow the user to change the drive letter or NTFS Mount Point. For example, to change the Audio drive to W, so it isn't confused with the data drives, right-click on the E: drive, select Change Drive Letter and Paths, select Change, then enter the desired drive letter and click OK. Caution: Some programs expect to run on a certain drive letter. Write these down before changing drive letters.
Add mirror. This option allows the creation of a mirrored drive set. For redundancy, an exact copy of the drive duplicates onto another drive.
The Windows 10 Disk Management tool can manipulate drive space to make existing hardware more efficient and adapt to changing data storage needs without purchasing additional hardware.
Desktop administrators need to learn how Windows OSes function to work most effectively, and the kernel at the center of the OS is a great place to ...
Continue Reading
Virtual desktops and the underlying virtual machines are a critical part of many organization's end-user technology stacks, so admins need to ...
Continue Reading
Apple Pay simplifies checkout for customers, but setup isn't always as straightforward. IT admins can review the costs to decide if Apple Pay makes ...
Continue Reading