
Getty Images
How to build an Azure AD user report with Microsoft Graph
Microsoft Graph will be the way forward to manage users and devices that connect to Office 365. Learn how to gather information and perform tasks, such as license assignments.

The impending retirement of certain functionality in the MSOnline and Azure AD PowerShell modules means it's a good time to start making the shift to Microsoft Graph.
Microsoft plans to shut down the licensing assignment APIs and PowerShell cmdlets in the Azure AD Graph and MSOnline modules by March 31, 2023. The transition from the Active Directory PowerShell module or the Azure AD PowerShell module to the Microsoft Graph PowerShell module can be a big undertaking. The good news is this is not a bad change but just a different way to work with the cloud-based identity and access management platform. To get started with this new management method, this article will explain how to build basic Azure Active Directory reporting tools and adjust license assignments with the Microsoft Graph PowerShell module.
How to set up Microsoft Graph
Before we create the Azure AD user report, we need to set up the PowerShell environment for Microsoft Graph. All the scripts in this tutorial depend on the Microsoft Graph PowerShell modules. You can install the entire library of Microsoft Graph modules with the following command:
Install-Module Microsoft.Graph
You might need to be patient because it can take several minutes to complete the installation. If you prefer to selectively install just the modules you need to follow along, run the following PowerShell script:
$modules = @(
    'Microsoft.Graph.Authentication'
    'Microsoft.Graph.Users'
    'Microsoft.Graph.Identity.DirectoryManagement'
)
Install-Module $modules
Next, connect to Microsoft Graph.
Connect-MgGraph
If this is the first time you have logged into the Microsoft Graph module, you will be prompted for an account with permissions to add the Microsoft Graph application to Azure AD. This requires an administrative account or access approval from an administrator for other accounts. You can find more information about authentication to Microsoft Graph in the documentation from Microsoft.
This tutorial will also cover exporting reports to Excel. Run the following PowerShell command to install the ImportExcel module:
Install-Module ImportExcel
How to generate an Azure AD user report with Microsoft Graph
It can be frustrating to get the status of users in Office 365 or Azure AD from the admin portal, especially if you have more than a single page of users. The Microsoft Graph modules make this type of task easy. For example, the following command will get a list of all users:
Get-MgUser -All
This only outputs a few properties of each user. To get more information for each user, use the -Property parameter. However, unlike the Active Directory Get-AdUser cmdlet, this property will restrict the properties returned instead of adding to the default set. This means if we want to include the default properties, we need to include them in the array that we pass to -Property.
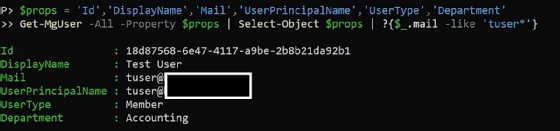
For example, the following command includes the department for the user on top of the default properties:
$props ='Id','DisplayName','Mail','UserPrincipalName','UserType','Department'
Get-MgUser -All -Property $props | Select-Object $props
Next, we can build a more comprehensive user report that returns the following data:
- basic metadata: name, email, user principal name (UPN), title and department;
- account status;
- password last set;
- last logon; and
- assigned licenses.
The last logon property, SignInActivity, is not currently retrievable in Microsoft Graph REST API v1.0. The following command will switch to the beta API which offers this property:
Select-MgProfile beta
Most of the desired properties are straightforward that we can build an array to retrieve.
$props = @(
    # Basic metadata
    'Id','DisplayName','Mail','UserPrincipalName','Department','JobTitle'
    # Account Status
    'AccountEnabled',
    # Password last set
    'LastPasswordChangeDateTime',
    # Last logon
    'SignInActivity',
    # Assigned Licenses
    'AssignedLicenses'
)
Get-MgUser -All -Property $props | Select-Object $props
Both the SignInActivity and AssignedLicenses are objects, which requires additional work to format them for a report.
For SignInActivity, there are two properties: interactive and noninteractive logons. This report will use the last interactive logon taken from LastSignInDateTime.
The AssignedLicenses property is an array of SKU IDs, which are globally unique identifiers (GUIDs).
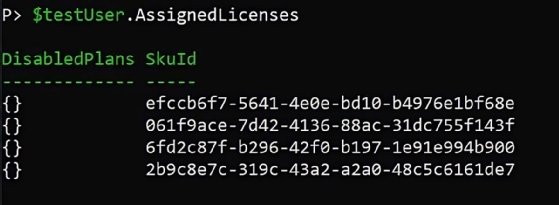
The SKU IDs are not useful in a report, but we can resolve each SKU ID to a license by first getting the licenses with the Get-MgSubscribedSku cmdlet and then filtering each AssignedLicense for the license name. The following code uses a hashtable to do lookups for faster performance than the Where-Object method:
# Get the SKUs
$skus = Get-MgSubscribedSku
# Build a hashtable for faster lookups
$skuHt = @{}
foreach ($sku in $skus) {
$skuHt[$sku.SkuId] = $sku
}
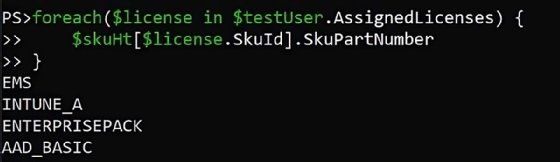
# Resolve the ID to license name
foreach($license in $testUser.AssignedLicenses) {
$skuHt[$license.SkuId].SkuPartNumber
}
The output for the test user will return the string IDs for the licensed products.
Combine all the commands in a single script with an extra line at the end to export the report to an Excel spreadsheet.
# Since we are getting SignInActivity
Select-MgProfile beta

# Build the props array
$props = @(
    # Basic metadata
    'Id','DisplayName','Mail','UserPrincipalName','Department','JobTitle'
    # Account Status
    'AccountEnabled',
    # Password last set
    'LastPasswordChangeDateTime',
    # Last logon
    'SignInActivity',
    # Assigned Licenses
    'AssignedLicenses'
)
$mgUsers = Get-MgUser -All -Property $props | Select-Object $props

# Get the SKUs
$skus = Get-MgSubscribedSku

# Build a hashtable for faster lookups
$skuHt = @{}
foreach ($sku in $skus) {
    $skuHt[$sku.SkuId] = $sku
}

$userOutput = foreach ($user in $mgUsers) {
    # Resolve the ID to license name
    $licenses = foreach($license in $user.AssignedLicenses) {
        $skuHt[$license.SkuId].SkuPartNumber
    }

    # Get the last logon date
    $lastLogon = $user.SignInActivity.LastSignInDateTime

    # Add the new properties
    $user | Add-Member -MemberType NoteProperty -Name LastLogonDateTime -Value $lastLogon
    $user | Add-Member -MemberType NoteProperty -Name Licenses -Value ($licenses -join ',')

    # Remove the unneeded ones
    $user | Select-Object -ExcludeProperty SignInActivity,AssignedLicenses
}

$userOutput | Export-Excel C:\tmp\Users.xlsx -TableName Users -AutoSize

How to generate a device report from Azure AD with Microsoft Graph
Getting device information is slightly different. Like retrieving users, it can be a frustrating exercise that requires using multiple admin tools to get all the information. But Microsoft Graph makes all the data available without any additional work.
The following command will list all registered devices:
Get-MgDevice
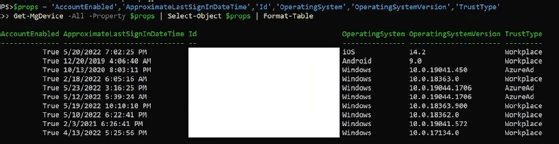
The -Property parameter lets us retrieve more detailed information about the device and its user.
$props = 'AccountEnabled','ApproximateLastSignInDateTime','Id','OperatingSystem','OperatingSystemVersion','TrustType'
Get-MgDevice -All -Property $props | Select-Object $props | Format-Table
If you use Microsoft Intune, it might also be useful to find out who the registered owner is. We can do that with a separate command to get the ID.
Get-MgDeviceRegisteredOwner -DeviceId <id>
To go further, we can pipe that information to the Get-MgUser cmdlet.
Get-MgDeviceRegisteredOwner -DeviceId <id> | %{Get-MgUser -UserId $_.Id}
The following script combines both the user and the device reports to create a single report:
# Build the props array
$props = 'AccountEnabled','ApproximateLastSignInDateTime','Id','OperatingSystem','OperatingSystemVersion','TrustType'

# Get all devices
$mgDevices = Get-MgDevice -All -Property $props | Select-Object $props

foreach ($mgDevice in $mgDevices) {
    # Get the registered owner and associate to a UPN
    $owner = Get-MgDeviceRegisteredOwner -DeviceId $mgDevice.Id | ForEach-Object {Get-MgUser -UserId $_.Id}

    # Add the UPN to the device report
    $mgDevice | Add-Member -MemberType NoteProperty -Name RegisterOwnerUPN -Value $owner.UserPrincipalName
}

$mgDevices | Export-Excel C:\tmp\Devices.xlsx -TableName Devices -AutoSize
This report can take a long time to produce for large enterprises because the script performs a lookup for each device. I suggest scheduling the script to run unattended. If you want to see the script's progress, you can add Write-Host lines to check its status.
How to provision users and licenses with Microsoft Graph
Another way to use Microsoft Graph involves the provisioning process for users, including license assignments. If you look at the help for New-MgUser cmdlet, you will see a wall of parameters. Rather than cover every aspect of the cmdlet, we will cover the basics to get started.
First, define the password in what Microsoft Graph considers a password profile. This is just a hashtable with the following properties:
$passwordProfile = @{
    ForceChangePasswordNextSignIn = $true
    ForceChangePasswordNextSignInWithMfa = $true
    Password = (ConvertTo-SecureString 'RandomPasswordsRule123!' -AsPlainText -Force)
}
Next, define the basic metadata about the user. It requires care to properly set the usage location to apply licenses in the next step.
$userSplat = @{
    # User metadata
    GivenName = 'Test'
    Surname = 'User'
    DisplayName = 'Test User'
    JobTitle = 'Minion of the First Class'
    Department = 'Accounting'

    # Mail and UPN
    MailNickname = 'tuser'
    Mail = '[email protected]'
    UserPrincipalName = '[email protected]'

    # For licensing
    UsageLocation = 'US'

    # Password
    PasswordProfile = $passwordProfile

    # Enable Account
    AccountEnabled = $true
}
$newUser = New-MgUser @userSplat
Next, assign the licenses with the Set-MgUserLicense cmdlet.
$license = Get-MgSubscribedSku | ?{$_.SkuPartNumber -eq 'ENTERPRISEPACK'}
Set-MgUserLicense -UserId $newUser.Id -AddLicenses @{SkuId = $license.SkuId}
This example assigns the Office 365 E3 license to this user by referencing the service plan string ID of ENTERPRISEPACK. This list from Microsoft shows the complete list of product names and service plan identifiers.
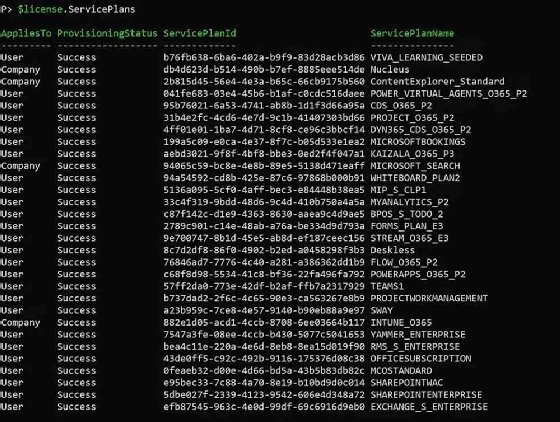
To create the user with some of the Office 365 E3 features disabled, we can do that by referencing the SKU IDs. To do this, look at the ServicePlans property on the output of the Get-MgSubscribedSku cmdlet.
$license.ServicePlans
In this example, to prevent users from accessing Microsoft Teams because your organization uses Slack, you can assign the Office 365 E3 license and disable Microsoft Teams with the following code:
# Get the E3 license
$license = Get-MgSubscribedSku | ?{$_.SkuPartNumber -eq 'ENTERPRISEPACK'}

# Disable Teams
$disableSps = 'TEAMS1'
$toDisable = ($license.ServicePlans | ?{$disableSps -contains $_.ServicePlanName}).ServicePlanId

# Assign the licenses
Set-MgUserLicense -UserId $newUser.Id -AddLicenses @{DisabledPlans = $toDisable;SkuId = $license.SkuId} -RemoveLicenses @()
The entire provisioning script will set the password and add the customized Microsoft licenses.
$passwordProfile = @{
    ForceChangePasswordNextSignIn = $true
    ForceChangePasswordNextSignInWithMfa = $true
    Password = (ConvertTo-SecureString 'RandomPasswordsRule123!' -AsPlainText -Force)
}

$userSplat = @{
    # User metadata
    GivenName = 'Test'
    Surname = 'User'
    DisplayName = 'Test User'
    JobTitle = 'Minion of the First Class'
    Department = 'Accounting'

    # Mail and UPN
    MailNickname = 'tuser'
    Mail = '[email protected]'
    UserPrincipalName = '[email protected]'

    # For licensing
    UsageLocation = 'US'

    # Password
    PasswordProfile = $passwordProfile

    # Enable Account
    AccountEnabled = $true
}
$newUser = New-MgUser @userSplat

# Get the E3 license
$license = Get-MgSubscribedSku | ?{$_.SkuPartNumber -eq 'ENTERPRISEPACK'}

# Disable Teams
$disableSps = 'TEAMS1'
$toDisable = ($license.ServicePlans | ?{$disableSps -contains $_.ServicePlanName}).ServicePlanId

# Assign the licenses
Set-MgUserLicense -UserId $newUser.Id -AddLicenses @{DisabledPlans = $toDisable;SkuId = $license.SkuId} -RemoveLicenses @()
To go even further with the script, convert it to a simple function called New-OrgUser by using each of the items from the userSplat as function parameters.
Function New-OrgUser {
    param (
        [string]$GivenName,
        [string]$Surname,
        [string]$JobTitle,
        [string]$Department,
        [string]$MailNickname,
        [string]$UsageLocation = 'US',
        [securestring]$Password
    )

    $passwordProfile = @{
        ForceChangePasswordNextSignIn        = $true
        ForceChangePasswordNextSignInWithMfa = $true
        Password                             = $Password
    }

    $userSplat = @{
        # User metadata
        GivenName         = $GivenName
        Surname           = $Surname
        DisplayName       = "$GivenName $Surname"
        JobTitle          = $JobTitle
        Department        = $Department

        # Mail and UPN
        MailNickname      = $MailNickname
        Mail              = "[email protected]"
        UserPrincipalName = "[email protected]"

        # For licensing
        UsageLocation     = $UsageLocation

        # Password
        PasswordProfile   = $passwordProfile

        # Enable Account
        AccountEnabled    = $true
    }
    $newUser = New-MgUser @userSplat

    # Get the E3 license
    $license = Get-MgSubscribedSku | Where-Object { $_.SkuPartNumber -eq 'ENTERPRISEPACK' }

    # Disable Teams
    $disableSps = 'TEAMS1'
    $toDisable = ($license.ServicePlans | Where-Object { $disableSps -contains $_.ServicePlanName }).ServicePlanId

    # Assign the licenses
    Set-MgUserLicense -UserId $newUser.Id -AddLicenses @{DisabledPlans = $toDisable; SkuId = $license.SkuId } -RemoveLicenses @()

    $newUser
}
Next, you can simplify the provisioning process by calling the newly defined cmdlet.
$splat = @{
    GivenName = 'Test'
    Surname = 'User'
    JobTitle = 'Minion of the First Class'
    Department = 'Accounting'
    MailNickname = 'tuser'
    UsageLocation = 'US'
    Password = (ConvertTo-SecureString 'RandomPasswordsRule123!' -AsPlainText -Force)
}
New-OrgUser @splat
Microsoft Graph offers a more integrated way to work with the cloud
Microsoft Graph is just a new way to approach management. It is powerful and continues to evolve as Microsoft expands its capabilities. Microsoft Graph offers a more streamlined approach to handle the various administrative tasks in Office 365 and Azure Active Directory. Now that the clock is ticking on certain functionality, it's well worth your time to learn how to work with Microsoft Graph, particularly with the beta release which has more functionality.