SSL encryption is a necessary component when building an IIS website that communicates with the outside world. Use this PowerShell tutorial to streamline the deployment process.
Creating an IIS website is relatively easy, but things can get complicated when setting up a certificate to encrypt traffic between clients and servers.
Secure Sockets Layer (SSL) is the de facto protocol used to secure communications between a web browser and a server. You must bind a certificate for SSL on IIS to create this encrypted connection between machines. With help from PowerShell, you can simplify the configuration process.
Get started with IIS websites
This tutorial is based on using Internet Information Services (IIS) 10.0 on Windows Server 2016 using cmdlets from the WebAdministration module that was installed with IIS by default; however, the commands may work in earlier versions of IIS and Windows Server, as well.
First, check that IIS exists on the server. Then, connect to the Windows Server 2016 machine using PowerShell remoting.
Enter-PSSession -ComputerName MYIISSERVER
Use the Get-Website command to see if there are any existing websites to make sure you can enumerate the existing sites later. The example below shows a website called Default Web Site. It's bound to all IP addresses designated by the asterisk and is listening on port 80.
Get-Website Name ID State Physical Path Bindings ---- -- ----- ------------- -------- Default Web Site 1 Stopped %SystemDrive%\inetpub\wwwroot http *:80:
It's helpful to get this confirmation so you can proceed with confidence to find the existing websites on the server.
Next, create a website named DemoSite with the -Website command. Below is a simple example of a command with just the name of the site and the file system path:
Name ID State Physical Path Bindings ---- -- ----- ------------- -------- DemoSite 3 Stopped C:\inetpub\wwwroot\ http *:80:
If you need to perform other configuration tasks, refer to the help section for the -Website command by running Get-Help -Website.
How to set IIS bindings
The DemoSite website is bound to all IP addresses and listens on port 80 by default. You will need to force the website to listen on port 443 to support the HTTPS protocol by adding a binding.
First, run the following command to get a list of the bindings on the server:
This returns all bindings on servers across all websites. To return bindings on a particular site, run Get-Website and drill down into the Collection property on the bindings object.
Add a binding for port 443 to the DemoSite using the -WebBinding command. Provide the name of the website as the Name parameter on -WebBinding, and then specify the IP address to bind to and the port to listen on.
The binding information indicates that the website is listening on the default HTTPS port 443. To set up the encryption component, you must install a certificate for SSL on IIS and force the binding to use that certificate.
To set up the encryption component, you must install a certificate for SSL on IIS and force the binding to use that certificate.
Create a self-signed certificate on the server using the -SelfSignedCertificate command. Provide the folder for the certificate store location and the domain name system (DNS) name. The example below uses the domain demo.local:
IP Address Port Host Name Store Sites ---------- ---- --------- ----- ----- 0.0.0.0 443 My DemoSite
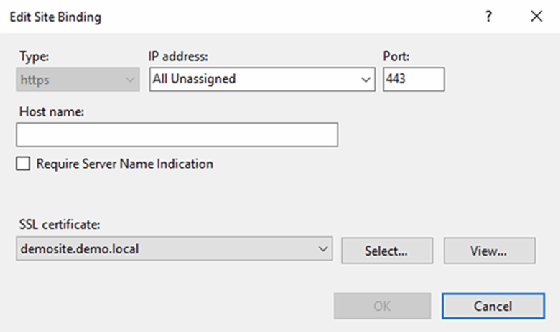
To confirm the certificate is on the HTTPS binding of the site, go into Internet Information Services manager, click on DemoSite, open the Bindings option, select the HTTPS binding and check the DNS name of the certificate.
In the Internet Information Services manager, confirm the certificate binding for the website.
You can also go a step further and build a function to add SSL on IIS websites to house all this functionality if you routinely need to create websites that require SSL encryption.