
Getty Images/iStockphoto
How to access Windows 11 BIOS configuration with hotkeys
Configuring Windows 11 firmware settings requires that admins access the Unified Extensible Firmware Interface. Using so-called 'BIOS keys' makes this process quick and easy.

As organizations move fully to Windows 11, consistent access to and control over firmware settings is becoming a governance and security concern, not just a troubleshooting task. Enterprise IT leaders and endpoint managers need clear, repeatable procedures for configuring and securing the Unified Extensible Firmware Interface (UEFI) across distributed device fleets.
When desktop administrators need to view or configure the firmware settings on their managed Windows 11 computers, they have two primary options for achieving this. The first is to use the features built into Windows 11 to get to the firmware settings, choosing from one of several alternatives. The second is to press a hotkey on startup, before the OS loads into memory. This approach is specific to the computer's manufacturer and its model.
Regardless of how you access a computer's firmware, you're typically presented with some type of interface that enables you to view and configure the firmware settings. Most of today's PCs conform to the UEFI specification for their firmware. Some PCs might still rely on Basic Input/Output System (BIOS) firmware, but these are quickly becoming the exception, especially in business settings.
What are the differences between BIOS and UEFI?
Even though today's desktops and laptops rely primarily on UEFI instead of BIOS, which once was the de facto firmware used for the majority of PCs, the terms BIOS and UEFI are often used interchangeably. In fact, many of today's firmware interfaces continue to use the term BIOS even though the firmware is based on UEFI. For the most part, BIOS is now considered a legacy technology.
One of the minimum system requirements for installing Windows 11 is UEFI support. Most organizations have already transitioned to Windows 11, or soon will, because Microsoft plans to stop supporting Windows 10 by the end of the year. Furthermore, many Windows 10 PCs already rely on UEFI, not BIOS.
The BIOS firmware is installed on a chip on the motherboard and acts as an intermediary between the hardware and OS. When the computer is turned on, the firmware performs a power-on self-test, which checks the hardware's validity. The firmware then enables the operating system's bootloader to run, making it possible to load the computer's OS into memory.
In 2017, Intel announced that it planned to replace BIOS with UEFI by 2020. Since then, UEFI has become the industry standard for PC firmware. UEFI defines how a computer's firmware and OS will interface, while providing a standardized environment for running pre-boot applications, controlling the boot process and passing control to the OS.
The UEFI standard differs from and improves on BIOS in the following ways:
- UEFI can run in 32-bit or 64-bit mode, so the boot process is faster than that of BIOS, which can only operate in 16-bit mode. Unlike BIOS, UEFI also has more addressable space and can initialize hardware simultaneously.
- UEFI supports the GUID Partition Table (GPT) standard, while BIOS uses the Master Boot Record (MBR) partition scheme. Compared with MBR, GPT supports more partitions and larger disk drives, with a theoretical capacity of 9.4 zettabytes. The MBR partition scheme supports only a small number of partitions and is limited to 2.2 TB drives.
- UEFI includes built-in networking capabilities, making it possible to boot UEFI over the network and to troubleshoot boot issues remotely. UEFI supports standard network protocols such as SNMP, TCP, FTP and UDP. In comparison, BIOS has limited network capabilities.
- Unlike BIOS, UEFI supports Secure Boot, which prevents hackers from installing rootkits between bootup and OS handoff. Secure Boot also facilitates remote troubleshooting.
- Compared with BIOS, UEFI can provide a user interface that is easier to navigate and use, offering both mouse and keyboard support. That said, the computer's manufacturer ultimately determines how the UEFI interface will be implemented, so features and usability can vary substantially between systems.
- UEFI is more extensible than BIOS. It adopts a modular design that adheres to industry standards, so it can be customized more easily for specific hardware and OS environments.
Accessing the UEFI settings on a Windows 11 PC
Windows 11 computers provide multiple methods for accessing the system's firmware interface, where you can configure how UEFI is implemented on that system. There are four common approaches for accessing the interface.
Keep in mind that the computer's manufacturer determines how to present those settings and how they can be navigated and configured. Don't assume that what you can do on one computer can be done the same way on another, unless they're identical models. For any questions about accessing and configuring a system's firmware, refer to the manufacturer's documentation.
1. Access UEFI through Windows Settings
One method you can use to access the firmware interface on a Windows 11 computer is to open the Settings app and perform an advanced startup, which enables you to access the firmware settings. It's a bit of a roundabout method for getting there, but you can do it from within Windows, without having to guess at an access key.
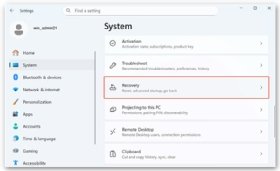
To use this method, launch the Settings app, go to the System tab and then click the Recovery listing (Figure 1).
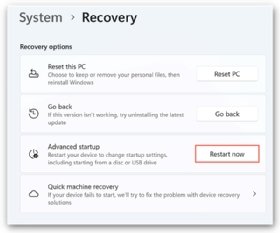
This will take you to the Recovery page, as shown in Figure 2. Here, you should click the Restart now button in the Advanced startup listing.
When you click Restart now, a message box appears that confirms you want to restart the computer. Click the Restart now button in this message box as well. The computer will then restart, but it won't load the OS like it normally does. Instead, it will load the Windows Recovery Environment, starting with the Choose an option screen, which presents you with a variety of troubleshooting options (Figure 3).
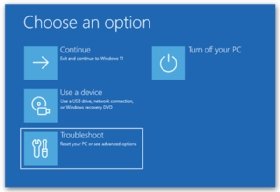
On the Choose an option screen, click the Troubleshoot option. This takes you to the Troubleshoot screen. Here, you should click Advanced options.
On the Advanced options screen, you'll find several recovery options, along with other types of options, including UEFI Firmware Settings (Figure 4).
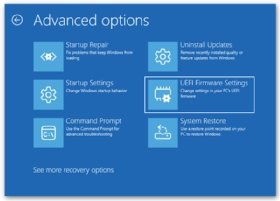
Click the UEFI Firmware Settings option. You'll then be presented with the UEFI Firmware Settings screen. On this screen, click the Restart button.
When you click the Restart button, the computer restarts again and takes you to the firmware interface, where you can configure the UEFI-related settings. The screen's layout, the available settings and how you navigate those settings will be specific to the computer's model and manufacturer.
Note that accessing the firmware interface is not the same as booting into Safe Mode. Safe Mode is a pared-down version of Windows that is typically used to diagnose issues and take steps to address those issues.
2. Use the Restart button to access the UEFI settings
Windows 11 offers a shortcut for getting to the Windows Recovery Environment. You'll still start within Windows, but you won't need to launch the Settings app. Instead, you need only press the Shift key while simultaneously clicking the Restart button in the Windows power menu (Figure 5).
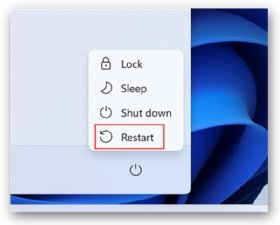
When you use this method, it will restart the system as expected, but it won't reload the OS as would normally be the case. Instead, it will take you to the same Choose an option screen you saw in the previous section. There, you can click through the same options as before:
Troubleshoot > Advanced options > UEFI Firmware Settings > Restart > Restart
When you click Restart, the computer will restart and take you to the firmware settings screen, where you can configure the UEFI-related settings.
3. Use the command prompt to restart the PC
Another way to access a system's firmware menu from within Windows 11 is to run a shutdown command in Command Prompt. The shutdown command enables you to shut down or restart a local or remote Windows computer. To this end, the command provides a set of parameters for controlling the operation's behavior. You can use several of these parameters to restart a Windows 11 computer and go directly to the firmware interface, where you can configure the UEFI settings.
To use a shutdown command to access a computer's firmware interface, launch Command Prompt as an administrator and run the following command:
shutdown /r /fw /t 0
The shutdown command takes the following three parameters:
- The /r parameter causes the system to shut down and then automatically restart.
- The /fw parameter instructs the system to go directly to the firmware interface after it's been restarted. The parameter is used in conjunction with a shutdown or restart parameter.
- The /t parameter sets the number of seconds to wait before shutting down the computer. In this case, the parameter takes 0 as its argument, indicating that there should be no delay before shutting down.
When you run this command, the system immediately shuts down and then restarts, going directly to the firmware interface where you can configure the UEFI settings. The nice thing about this approach is that it skips the Windows Recovery Environment altogether.
4. Press a hotkey when booting the computer
Many Windows 11 computers let you access the firmware settings menu by pressing a hotkey when you first boot up a computer. In this way, you can go directly to the firmware settings without needing to start the Windows OS or access the Windows Recovery Environment.
The exact key and approach depend on the computer's manufacturer and, in some cases, the computer model itself. Some resources might refer to the hotkeys as BIOS keys for Windows 11 or some variation of this, even though they access UEFI settings.
Common hotkeys used on many computers are Esc, Del, F2 and F10, although these are by no means the only ones. In addition, you sometimes need to press and hold the hotkey or press it multiple times, or you might need to press multiple keys simultaneously. Once again, it all depends on the manufacturer.
The following examples show some of the different ways in which manufacturers support hotkey access to the firmware on their computers:
- Acer. Turn on the computer. When the logo screen appears, press F2 for notebooks or Del for desktops.
- Asus. Press and hold F2, while simultaneously turning on the computer. For some older models, use Del instead.
- Dell. Turn on the computer. When the logo screen appears, press F2 several times. Some models require F12 instead of F2.
- HP. Turn on the computer. When the logo screen appears, press Esc or F10 repeatedly.
- Lenovo. Turn on the computer. When the logo screen appears, press F1 repeatedly. You might need to press the key five to ten times. Some models require that you continuously press Enter instead of F1. Other models might use different keys or key combinations altogether.
If you want to use the hotkey method to access a computer's UEFI settings, you'll need to check with the manufacturer if you're uncertain how to proceed. Keep in mind that different models from the same manufacturer might use different keys.
Establishing a standard process for accessing and configuring firmware settings helps reduce configuration drift, strengthen compliance with device-security baselines such as Secure Boot and Trusted Platform Module, and support broader governance efforts across enterprise endpoints.
Robert Sheldon is a freelance technology writer. He has written numerous books, articles and training materials on a wide range of topics, including big data, generative AI, 5D memory crystals, the dark web and the 11th dimension.