
Getty Images
Boost productivity with these PowerShell GUI examples
PowerShell scripts can be tedious to write and difficult to use. These easy-to-follow commands can help teams build GUIs for their PowerShell scripts to save time and effort.

Although PowerShell is a command-line environment, it is possible to create GUI-based PowerShell scripts. With examples ranging from simple to complex, GUI-based PowerShell scripts can be a great addition to any team's PowerShell strategies.
From an IT standpoint, there are two main reasons you might choose to build a GUI for a PowerShell script. First, if you find yourself regularly using a particular PowerShell cmdlet that requires multiple parameters, you can use a GUI as an alternative to tedious typing.
For example, a GUI can simplify the process of creating a Hyper-V VM. The process normally involves entering the New-VM cmdlet, followed by several parameters. However, the GUI can prompt the user for the required information and then supply that information to the New-VM cmdlet behind the scenes, thus automating the VM creation process.
GUI-based PowerShell scripts are also commonly employed when the IT department needs to create a script that someone outside of IT will use. Implementing a GUI enhances the script's usability, making it more accessible for non-IT personnel.
This tutorial covers two examples: creating simple PowerShell GUIs, and the more complex process of using a PowerShell GUI to create a Hyper-V VM. By following these steps and commands, teams can streamline the creation of PowerShell scripts, turning a time-consuming and complex process into one that's efficient and straightforward.
How to create a PowerShell GUI
Although GUI-based PowerShell scripts are often complex, it's relatively easy to create a simple GUI. Let's create a simple script that displays the words "Hello World" inside a text box within a GUI.
1. Load required assemblies
The first step when creating a GUI-based PowerShell script is to load the required assemblies. Load the System.Windows.Forms assembly and the System.Drawing assembly with the following commands.
Add-Type -AssemblyName System.Windows.Forms
Add-Type -AssemblyName System.Drawing
2. Create GUI interface elements
Next, create the individual interface elements that you will use within the GUI. This might include labels (text), text boxes, combo boxes (menus), buttons or other graphical elements.
Although the exact lines of code will vary based on the GUI element you create, the basic process is the same for most GUI elements. The following example code block highlights the basic process.
$OutputBox = New-Object System.Windows.Forms.textbox
$OutputBox.Text = "Hello World"
$OutputBox.Multiline = $False
$OutputBox.Size = New-Object System.Drawing.Size(100,100)
$OutputBox.Location = new-object System.Drawing.Size(20,80)
To define a GUI interface element, create a variable that will represent that element. In my example, the variable represents a textbox object because I call the variable $OutputBox and set it equal to New-Object System.Windows.Forms.textbox.
3. Define element attributes
Once you define a GUI interface element object, you must then pin various attributes to that object. These attributes might include things like the size, color, position or font the object uses.
Many of the available attributes are optional, but you almost always must define the object's size and location. The location is relative to the upper left corner of the GUI window. In my example code block, the object is located 20 pixels to the right of and 80 pixels below the window's upper-left corner. The size is set to 100 pixels wide by 100 pixels tall.
My example is a single line text box because $OutputBox.Multiline is set to False. As such, Windows will ignore the text box height and simply make the text box as tall as it needs to be to accommodate a single line of text.
4. Create a form object
Next, create a form object. The form is essentially the GUI; it's basically an empty canvas. You can see the form creation process in the following code block.
$Form = New-Object Windows.Forms.Form
$Form.Text = "Posey's Example GUI"
$Form.Width = 300
$Form.Height = 200
$Form.BackColor="LightBlue"
Here, I have created a form object and tied it to a variable named $Form. The form's size is 300 pixels wide by 200 pixels high. I have also opted to color the form light blue and give the window the name "Posey's Example GUI."
Now that you have defined the form, tell PowerShell to add your individual GUI elements to the form. In this case, I have a single GUI element called $OutputBox. You can add it to the form by using the following command.
$Form.Controls.add($OutputBox)PowerShell tip: Screen-clearing
Incidentally, there is no concept of clearing the screen with PowerShell forms. If you need to clear the screen, remove the GUI elements. You can add or remove GUI elements at any point in the script.
5. Activate the form
The last step in the process is to activate and display the form. You can do so using these lines of code.
$Form.Add_Shown({$Form.Activate()})
$Form.ShowDialog()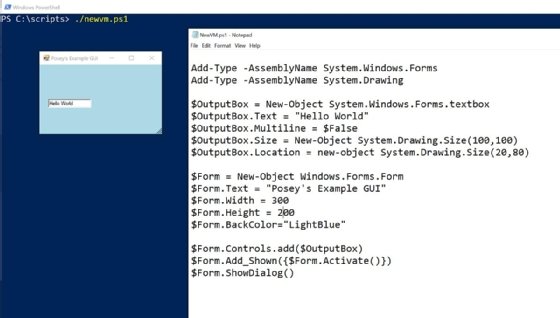
Use PowerShell GUI to create a Hyper-V virtual machine
After learning how to build a basic PowerShell GUI, you can practice more complex scripts, such as using a GUI to create a Hyper-V VM. While this example does not create a comprehensive interface that makes every Hyper-V option available, it illustrates how to use a GUI to simplify an administrative task.

As shown in Figure 2, the script prompts the user to enter a name for their new VM and to specify the amount of memory that the VM will use, along with the virtual hard disk size.
All the fields are prepopulated, but the user can enter different values. Once the user has entered their preferred values, they simply click the Submit button. At that point, the fields are cleared and the VM is created, as shown in Figure 3.
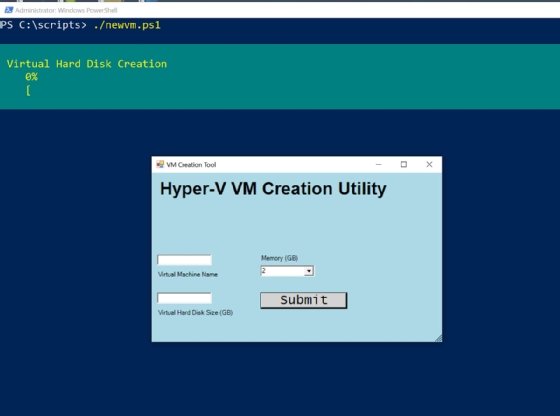
At a structural level, this script works very similarly to my "Hello World" example. The biggest difference is that I have defined many more GUI interface elements. All the text that appears within the GUI is controlled by label objects. There are also two text boxes for entering the VM name and virtual hard disk size. The GUI also contains a combo box used to select the memory amount and a Submit button.
When you create a button object, you generally need to associate a click action with the button as a way of telling PowerShell what to do when the button is clicked. In this case, the click action contains several lines of code that retrieve the values that have been entered into the GUI and puts those values into a normalized format.
From there, the script builds a string that mimics the command used to create the VM. You can then use the Invoke-Expression command to execute the string's contents.
You can review the full code below.
Add-Type -AssemblyName System.Windows.Forms
Add-Type -AssemblyName System.Drawing

$GreetingLabel = New-Object Windows.Forms.Label
$GreetingLabel.Text = "Hyper-V VM Creation Utility"
$GreetingLabel.Font = New-Object Drawing.Font("Arial", 24, [Drawing.FontStyle]::Bold)
$GreetingLabel.AutoSize = $true
$GreetingLabel.Location = New-Object Drawing.Point(10,10)
$GreetingLabel.ForeColor = [System.Drawing.Color]::Black

$VMNameBox = New-Object System.Windows.Forms.textbox
$VMNameBox.Text = "NewVM"
$VMNameBox.Multiline = $False
$VMNameBox.Size = New-Object System.Drawing.Size(100,100)
$VMNameBox.Location = new-object System.Drawing.Size(10,150)

$VMNameLabel = New-Object Windows.Forms.Label
$VMNameLabel.Text = "Virtual Machine Name"
$VMNameLabel.AutoSize = $true
$VMNameLabel.Location = New-Object Drawing.Point(10,180)
$VMNameLabel.ForeColor = [System.Drawing.Color]::Black

$MemoryComboBox = New-Object system.Windows.Forms.ComboBox
$MemoryComboBox.text = ""
$MemoryComboBox.width = 100
$MemoryComboBox.autosize = $true
$MemoryComboBox.location = New-Object System.Drawing.Point(200,170)
# Add the items in the dropdown list
@(2,4,6,8,10,12,14,16) | ForEach-Object {[void] $MemoryComboBox.Items.Add($_)}
# Select the default value
$MemoryComboBox.SelectedIndex = 0

$MemoryLabel = New-Object Windows.Forms.Label
$MemoryLabel.Text = "Memory (GB)"
$MemoryLabel.AutoSize = $true
$MemoryLabel.Location = New-Object Drawing.Point(200,150)
$MemoryLabel.ForeColor = [System.Drawing.Color]::Black

$VHDSizeBox = New-Object System.Windows.Forms.textbox
$VHDSizeBox.Text = 40
$VHDSizeBox.Multiline = $False
$VHDSizeBox.Size = New-Object System.Drawing.Size(100,100)
$VHDSizeBox.Location = new-object System.Drawing.Size(10,220)

$VHDSizeLabel = New-Object Windows.Forms.Label
$VHDSizeLabel.Text = "Virtual Hard Disk Size (GB)"
$VHDSizeLabel.AutoSize = $true
$VHDSizeLabel.Location = New-Object Drawing.Point(10,250)
$VHDSizeLabel.ForeColor = [System.Drawing.Color]::Black

$CreateButton = New-Object System.Windows.Forms.Button
$CreateButton.Location = New-Object System.Drawing.Size (200,220)
$CreateButton.Size = New-Object System.Drawing.Size(160,30)
$CreateButton.Font=New-Object System.Drawing.Font("Lucida Console",18,[System.Drawing.FontStyle]::Regular)
$CreateButton.BackColor = "LightGray"
$CreateButton.Text = "Submit"
$CreateButton.Add_Click({

	#Get VM Name
	$VMName=$VMNameBox.Text
	$VMNameBox.Text=""


	#Get VM Memory
	$Index=$MemoryComboBox.SelectedIndex
	[String]$VMMem=$MemoryComboBox.Items[$Index]
	$VMMem=$VMMem + "GB"
	$Index=$MemoryComboBox.SelectedIndex=0

	#Get Virtual Hard Disk Size
	[String]$VHDX = $VHDSizeBox.Text
	$VHDX = $VHDX + "GB"
	$VHDSizeBox.Text = ""

	#Create VHD Path
	$VHDPath="C:\temp\" + $VMName + ".VHDX"

	#Form VM Creation Command
	[String]$NewVMCommand = "New-VM -Name $VMName -MemoryStartupBytes $VMMem -NewVHDPath $VHDPath -NewVHDSizeBytes $VHDX"

	#Create Virtual Machine
	Invoke-Expression $NewVMCommand
	})

$Form = New-Object Windows.Forms.Form
$Form.Text = "VM Creation Tool"
$Form.Width = 550
$Form.Height = 350
$Form.BackColor="LightBlue"

$Form.Controls.add($GreetingLabel)
$Form.Controls.add($VMNameBox)
$Form.Controls.add($VMNameLabel)
$Form.Controls.add($VHDSizeBox)
$Form.Controls.add($VHDSizeLabel)
$Form.Controls.add($MemoryComboBox)
$Form.Controls.add($MemoryLabel)
$Form.Controls.add($CreateButton)
$Form.Add_Shown({$Form.Activate()})
$Form.ShowDialog()
Brien Posey is a 15-time Microsoft MVP with two decades of IT experience. He has served as a lead network engineer for the U.S. Department of Defense and as a network administrator for some of the largest insurance companies in America.