
Getty Images/iStockphoto
Getting started with Argo CD on Kubernetes
Argo CD can make managing Kubernetes clusters simpler and more efficient. Learn how to install Argo CD and set up an application to get started.

Managing Kubernetes infrastructure can be complex and time-consuming. Argo CD provides an option for developers looking for easy Kubernetes maintenance.
Developers have created many projects to support maintaining and running applications on Kubernetes. Argo CD is one popular tool because it expresses applications in a declarative state. Argo CD constantly monitors and reconciles these applications by comparing the application's state in Kubernetes and the declared state from version control. Developers can set up Argo CD on Kubernetes easily -- all it requires is a few commands.
What is Argo CD and what is it used for?
Software company Intuit created Argo CD as a prerequisite to adopting Kubernetes. Instead of giving developers direct access to Kubernetes, Argo CD provides a set of tools and an environment where developers can work with Kubernetes without having to be Kubernetes experts.
After finding success as an internal tool, Intuit made Argo CD open source in 2018, giving others the opportunity to use and improve it beyond what Intuit was capable of. Argo CD is free, and it's quick to set up. It requires only a Kubernetes cluster running CoreDNS.
You can implement Argo CD as a Kubernetes controller, which is a type of Kubernetes resource that runs constantly to monitor and modify other resources according to a requested state. In Argo CD's case, the controller interacts with the cluster API server to create and modify resources. Argo CD provides a visual representation of deployed resources, which exist in code in a Git repository. When you make updates to resources in the Git repository, Argo CD makes updates to the live resources on the Kubernetes cluster to align them with the target state.
Argo CD was built in accordance with a set of DevOps practices called GitOps, where a Git repository maintains a single source of truth for an application's state. Storing all infrastructure configuration changes in a Git repository makes it easy to create, observe and roll back changes to the configured infrastructure. As an addition to GitOps, Argo CD takes changes in the Git repository and brings them into existence in a reliable and debuggable way.
Argo CD keeps resources in a cluster up to date with resources defined in a Git repository, but your resources should already be stored in code and in version control. Adding Argo CD can then reduce the configuration overhead needed to maintain the state of those resources in a cluster.
Deploy Argo CD on Kubernetes
In practice, Argo CD can run on the same Kubernetes cluster as your application or on its own cluster. Here is how to set up Argo CD and a demo application on the same cluster. First, to deploy Argo CD on the cluster, run the following kubectl commands:
kubectl create namespace argocd

kubectl apply -n argocd -f https://raw.githubusercontent.com/argoproj/argo-cd/stable/manifests/install/yaml
The first command creates a namespace in the cluster called argocd, which the next command uses to install the Argo CD resources from a YAML file hosted in the Argo CD project's repository. After Argo CD is installed, you can interact with it by visiting the UI or by using the Argo CD CLI. The CLI tool is my preferred way to interact with Argo CD because you can use the same commands in your CI/CD pipeline. Install the Argo CD CLI with the following command:
brew install argocdTo check that everything is working, log in to Argo CD. Run the following two commands to reach the Argo CD server and log in:
kubectl patch svc argocd-server -n argocd -p \
'{"spec": {"type": "LoadBalancer"}}'

kubectl port-forward svc/argocd-server -n argocd 8080:443
The first command modifies the argocd-server service from type ClusterIP to the LoadBalancer type. The next command forwards that service to localhost on port 8080. Now, visiting https://localhost:8080/ takes you to Argo CD where you can log in. To get the password to log in, run the following command:
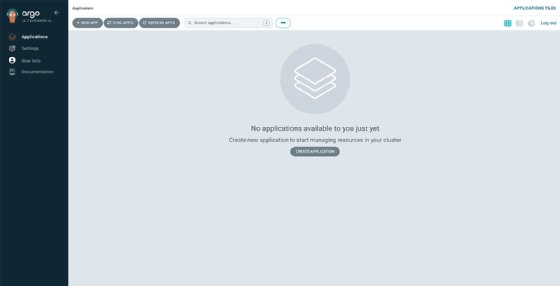
argocd admin initial-password -n argocdUsing the username admin and the password in the result of the above command, log in to Argo CD. If everything is working properly, you should see the screen in Figure 1.
Install an application with Argo CD
Next, here is how to install an application with the Argo CD CLI. Run the following command to authenticate Argo CD CLI to the Argo CD server:
argocd login localhost:8080After logging in and authenticating the CLI to Argo CD, run the next two commands to set the current kubectl context to the argocd namespace and create a new application in Argo CD:
kubectl config set-context --current --namespace=argocd
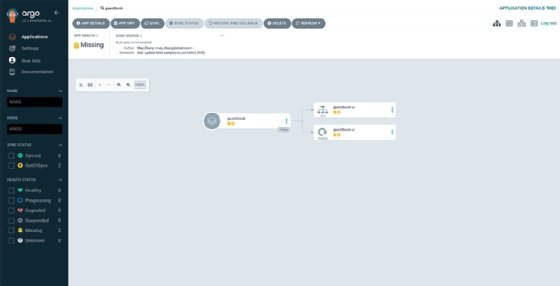
argocd app create guestbook –repo https://github.com/argoproj/argocd-example-apps.git \ --path guestbook --dest-server https://kubernetes.default.svc --dest-namespace defaultTo create the application in this example, the argocd command takes a Git repository and a path where the YAML files containing the Kubernetes resource definitions exist. Argo CD reads the YAML files, showing the resources to create in the UI.
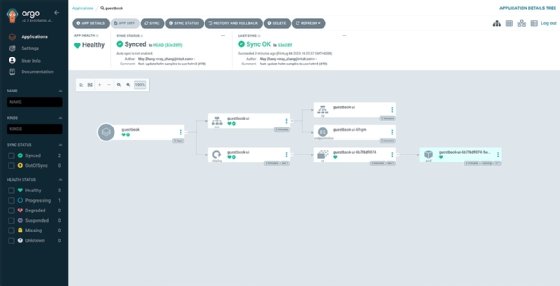
Clicking on SYNC in the UI or running the command argocd app sync guestbook then applies the changes to the cluster to create the specified resources. The resulting state should look like Figure 3.
To reach the guestbook application, forward a port from the service to your local machine with the following command:
kubectl port-forward svc/guestbook-ui -n default 8081:80The guestbook service is now reachable at http://localhost:8081/.
Matthew Grasberger is a DevOps engineer. He has experience in test automation, DevOps engineering, security automation and open source mobile testing frameworks.