
Sashkin - Fotolia
Get started with this Nutanix Community Edition installation guide
Install Nutanix Community Edition to test its features in your infrastructure for free. Learn about the download, installation, configuration and VM creation processes.

Nutanix Community Edition -- a free version of the company's enterprise cloud software -- doesn't require that you purchase an appliance from Nutanix or Dell, but it still includes a full array of features. This Nutanix Community Edition installation guide will help you get started with the software so you can test some of its features and capabilities in your infrastructure.
The Community Edition allows you to cluster up to four nodes, but it's strictly for non-production.
In this Nutanix Community Edition installation guide, the example involves installation on a physical host that meets the minimum required specification. A Nutanix host needs at least 24 GB of RAM, a 500 GB hard disk drive for cold storage and a 200 GB solid-state drive for hot storage. To get more information on the required specifications, join the community forum and browse the available documentation.
You must join the community and use the Nutanix portal to download license keys. Your installation must also connect to the internet for licensing.
The Community Edition boots from a USB disk where the boot media and hypervisor components are stored. It requires a minimum of 8 GB. The fully fledged Nutanix is a different affair and has redundancy built in using real disks.
Download and install the latest image
Download the latest image and extract the GZ file to your desktop, but don't extract the files within the GZ file -- write this to a USB disk. A popular piece of software called Win32 Disk Imager can do this.
Once installed, open Win32 Disk Imager and make sure the USB disk is inserted. It should display in the window. Navigate to the file and write it out. This operation might take a long time.
Plug the USB boot disk into the physical host and configure your BIOS to boot from the USB media, if necessary. It should start to load the Nutanix system. Once you get to the login screen, type Install and it will begin the configuration process.
Most of the screens are obvious, but on the networking screen, check Create single-node cluster?, then scroll down to the bottom of the text or you will get an error on the next page.
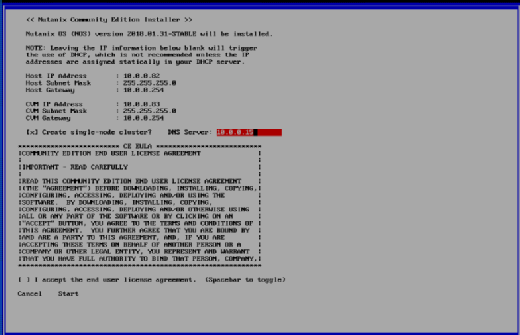
Once all these items are updated and set up, the configuration can continue. As part of that configuration, the Nutanix installer will set up a Nutanix management server called controller VM (CVM). The CVM is where all the management functions are performed.
Log in to the CVM using a correct IP/fully qualified domain name and the appropriate port -- it's https://10.0.0.83:9440 in this example. The initial login is admin/admin. Once logged in, the CVM will force you to change the password.
Configure the VM network
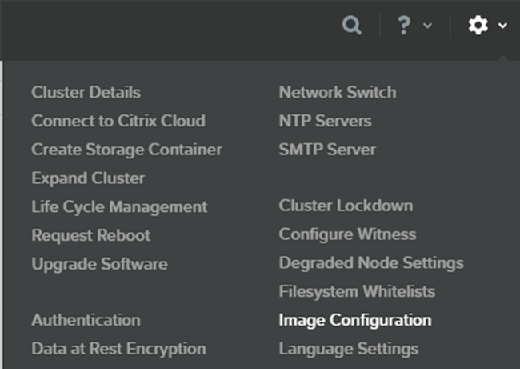
From here, set up the VM network and upload the appropriate VM images.
Navigate to the drop-down menu and select the Image Configuration option.
This opens a page that enables you to upload images. Name the VM and, optionally, the annotation field. For the image type, select ISO.
Next, upload the ISO. Click Save.
To configure networking for the VM, go back to the configuration drop-down menu and select Network Configuration, which will open a new window. Notice the tabbed interface with the options Controller VM Interfaces and User VM Interfaces. Select User VM Interfaces.
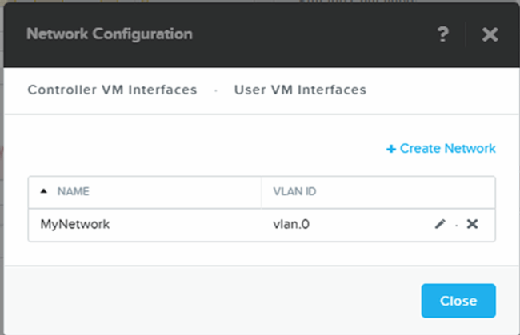
To create a network, select the Create Network option. Give the network a name and set the virtual LAN ID to 0. Make sure that Enable IP address management isn't checked for this example. Once you've done this, click Save.
Create a VM
Select VM from the drop-down menu. The Create VM option will appear in green on the right.
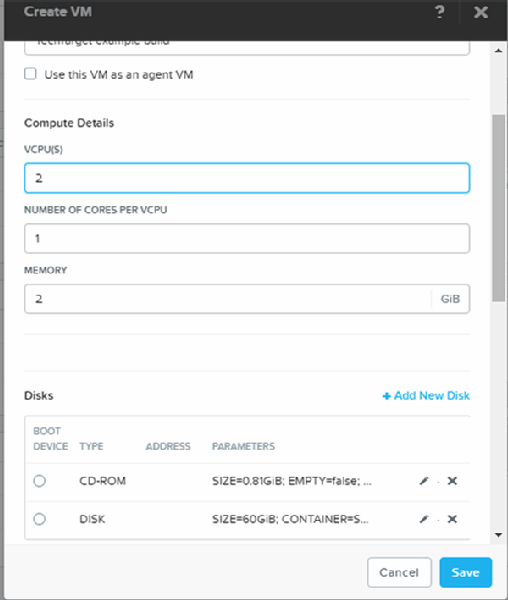
Choose Create VM to open a new dialog box. Give the VM a name, a description and denote the number of vCPUs for the VM. In this example, the number will be two for both the VM and the memory.
The only disk attached will be a CD-ROM, so you must add the ISO from which to boot, as well as add disk storage for the VM. Click the pencil icon to edit the CD-ROM. Change the operation field to Clone from Image Service. When you click on the Image field, it will show the CDs that you uploaded before. Select the one you wish to install and click update. In this example, it's Ubuntu server 16 LTS.
Select the Add Disk option. You can leave all the settings as they are. Just enter the size; in this example, it's 60 GB. Finally, click Add. Make sure that Boot Device is selected for the CD-ROM.
Configure the network
The last step in this Nutanix Community Edition installation guide is to configure the network.
Scroll down to the network adapters section and click Add new NIC. It will ask you to select the appropriate network, but because you only created one earlier, it should default to it. Click Save. Exit out to the VM and click Save on the VM creation page.
At this point, you can start the installation. Change the view by selecting Table.
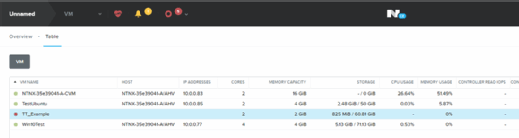
Highlight the VM and use the listed tools to manage its interactions. Click the Power on option and Launch Console will become available. You can now use the console and install Ubuntu.
The knowledge you gain from implementing this software with this Nutanix Community Edition installation guide can be a useful asset if you want to know more about the technology or plan to implement other versions. There's a lot more to Nutanix, but the Community Edition offers a useful, free entry point.