
Sergey Nivens - Fotolia
Use this Kubernetes and Helm tutorial to simplify app deployments
Helm charts are a helpful tool to deploy applications onto Kubernetes clusters. Follow this tutorial, which also features Windows and Chocolatey, to get started with the package manager.

Helm is a package manager, similar to yum or apt-get, for Kubernetes. It is managed and maintained by the Cloud Native Computing Foundation, an organization that supports a wealth of open source projects, many of which slot into the Kubernetes ecosystem.
Helm organizes Kubernetes objects into packaged applications called "charts," which admins deploy or release. Helm makes it easy to package, configure and deploy applications onto Kubernetes clusters, and maintains a historical record of releases and deployments, in case organizations need to roll back any given change.
Helm concepts and architecture
Before we jump into this Helm tutorial, let's review some key concepts of the package manager:
- Chart: package of pre-configured Kubernetes applications and services in the form of scaffolded folder and manifest files written in YAML.
- Release: instance of a chart deployed to a Kubernetes cluster with Helm; it helps maintain deployment history and enable roll back as necessary.
- Repository: shared list of published Helm charts for MySQL, Jenkins, Apache Kafka, WordPress and more.
Helm consists of two main components:
- Helm Client (Helm CLI). This is the command-line interface that enables developers to create charts, manage repositories and perform other tasks.
- Helm Library. This component communicates with the Kubernetes API server, and drives core Helm operations, such as chart installations or combining a chart with configurations to create a release.
Editor's note: Another core component of Helm used to be the Tiller server, which was part of the package manager's client-server architecture. In an effort to simplify security, however, Tiller was removed from Helm as of version 3 of the software, which now communicates directly with the Kubernetes API server.
Install Helm and prebuilt charts
To start this Kubernetes and Helm tutorial, install Helm on Windows.
There are multiple ways to install Helm, which can run in various environments. The easiest way to install the software on Windows is via Chocolatey, a Windows package manager. Once you have Chocolatey installed on your machine, run the choco install kubernetes-helm command to install the Helm client on your local system.
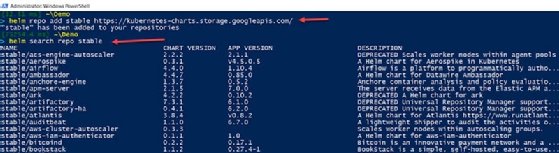
To initialize the Helm repository, add any popular chart repository with the helm repo add command. You can then search all preconfigured charts that you install using the command helm search repo, as shown in Figure 1 below, which features the Helm stable repository as an example:
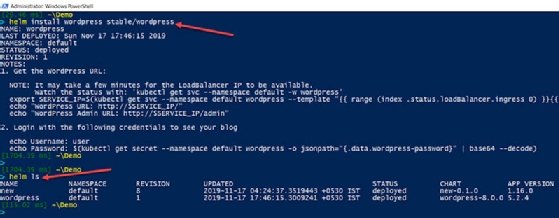
To install a chart -- in this Helm tutorial, we use a WordPress chart as an example -- use the helm install command, and then list the releases using the helm ls command. Ensure your Kubernetes cluster is running with kubectl cluster-info before running the helm install wordpress stable/wordpress and helm ls commands, as shown below in Figure 2:
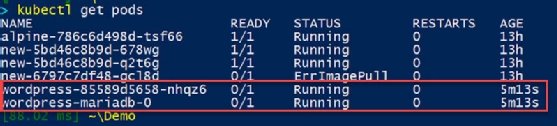
Use the command kubectl get pods to check Kubernetes pods and confirm an application deployment on Kubernetes, as shown in Figure 3:
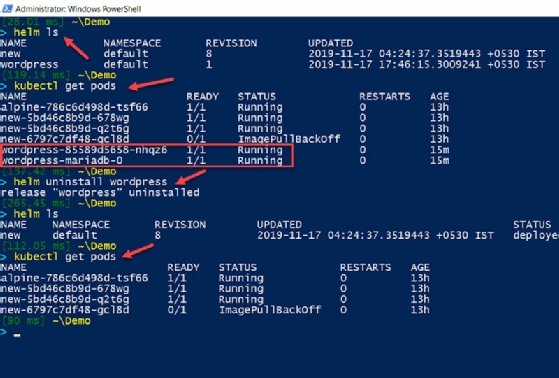
If you want to uninstall this release, use the helm uninstall command to remove the deployment from Kubernetes pods, as shown in Figure 4:
Create and install a Helm chart locally
To create your first local Helm chart, start with the name "mychart." Then, run the helm create mychart command, which will scaffold a directory structure as highlighted inside the box in Figure 5 below:

The importance and meaning of each of these files and folders inside a Helm chart are:
- .helmignore, which is similar in concept to .gitignore, defines patterns to ignore when creating the package.
- Chart.yaml contains metadata such as name, description of a given chart and application version, which are incremented with each deployment or modification.
- values.yaml contains default value for the charts that are replaced in runtime.
- charts contains sub-charts or any chart dependencies.
- templates contains template files that are combined and rendered into a Kubernetes manifest.
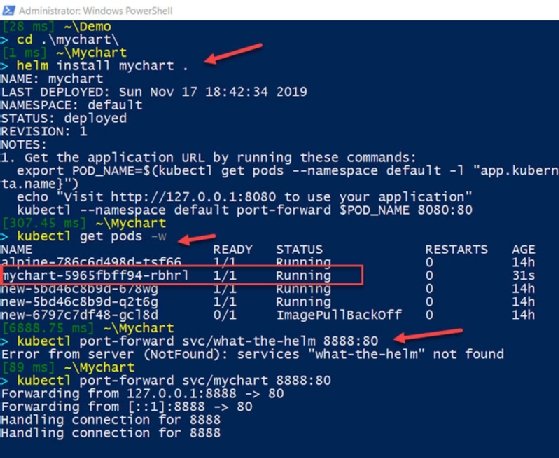
Deploy this local Helm chart, but ensure you change the directory to the charts folder and then install it using the following command:
cd .\mychart\
helm install mychart .
Validate that it has been deployed to the Kubernetes pod:
kubectl get pods -w
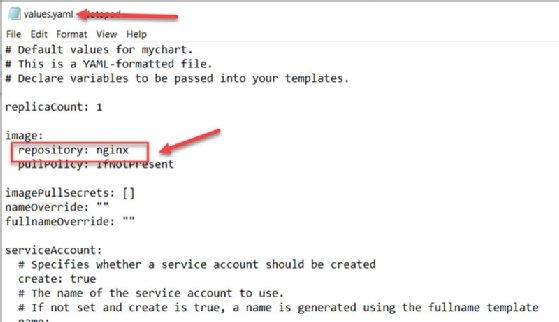
By default, Helm creates a chart for the Nginx web server, which listens on port 80, as confirmed from the values.yaml file, as shown in Figure 6:
Once the installation is successful, run the command kubectl port-forward svc/mychart 8888:80 to establish port forwarding and connect local port 8888 to the service deployed in Kubernetes, as shown in Figure 7 below:
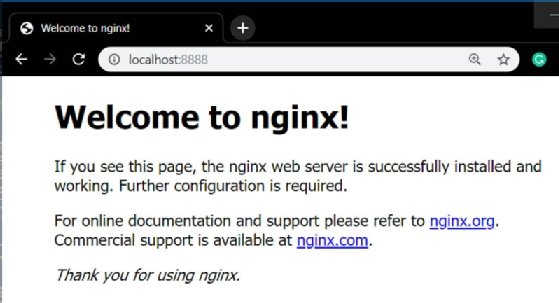
Next in this Helm tutorial, enter http://localhost:8888 on a web browser, which will take us to the Nginx server welcome page deployed in the Kubernetes cluster using Helm.
If you want to update your deployment packages using Helm charts, edit the charts with the helm upgrade command to revise the deployment, as shown in Figure 9 below. Use the following commands to ensure changes are trackable through revision ids, with a history of releases:
helm upgrade mychart .
helm history mychart