Running GPU passthrough for a virtual desktop with Hyper-V
IT needs to deliver quality to UX for desktops users, and sometimes edge cases arise. For example, they might need to configure GPU passthrough for power user virtual desktops.
As a virtual desktop administrator, you can ensure the VM or virtual desktop makes direct use of your server's physical graphics card.
The exact method for mapping a physical GPU to a virtual desktop varies, depending on the type of virtualization host that you are using. One consistent method you can use for virtual desktops is running a GPU passthrough on top of Microsoft's Hyper-V.
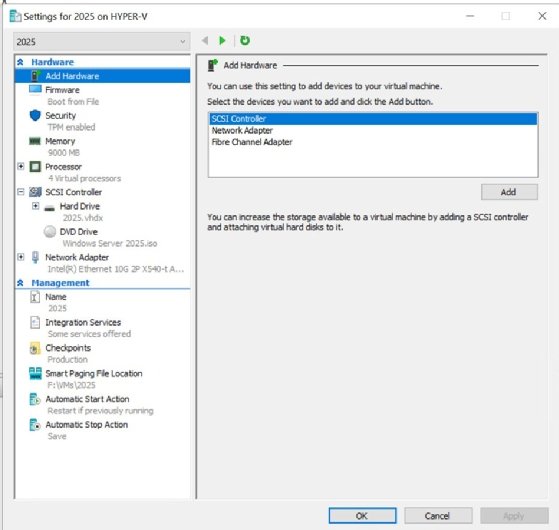
At one point, the preferred method for tying a GPU to a Hyper-V virtual desktop involved RemoteFX. Starting with Microsoft Windows Server 2016, however, Microsoft removed the ability to assign a RemoteFX 3D video adapter to a newly created VM (Figure 1).
The new method of assigning a GPU to a Hyper-V virtual desktop -- also known as GPU passthrough -- relies on Discrete Device Assignment (DDA). DDA enables PCIe hardware -- particularly graphics adapters and non-volatile memory express storage devices -- to be directly accessible with a virtual desktop.
Not every GPU supports DDA. As such, it is important to confirm your GPU's DDA support before installing the GPU into your virtual desktop host.
Assigning a SCSI Controller to a Hyper-V virtual desktop is no longer an option.
How to perform a GPU passthrough with Hyper-V
The first step in GPU passthrough for Hyper-V is to set the virtual desktop's automatic stop action to Turn Off. One approach you could take is to map the VM name to a variable named VM$ because assigning a GPU is a per-VM operation and GPU passthrough will reference the VM name several times. If you wanted to set the VM name to Demo, for example, you could open an elevated PowerShell session and use this command:
$VM='Demo'
While you are at it, you will need to enable write combining for the CPU. Here is the command that you will need to use:
Set-VM $VM -GuestControlledCacheTypes $true
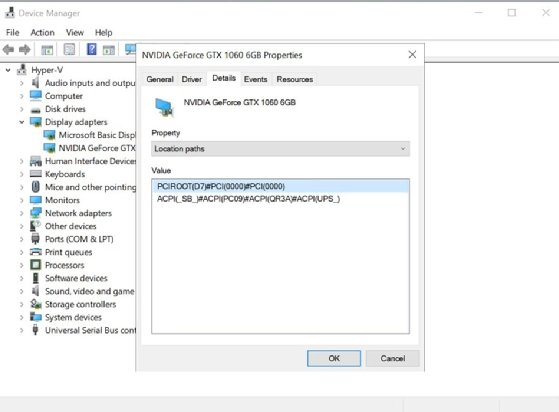
Next, you will need to determine the GPU's location. The easiest way to do this is to open Device Manager on the Hyper-V server and then locate the specific GPU that you plan to allocate. Normally, the GPU will be listed within the Device Manager's Display Adapters section. If you are unable to locate the GPU, make sure that you have installed the GPU's device drivers onto the host operating system.
Next, you will need to right-click on the device and choose the Properties command from the shortcut menu. When the resulting Properties sheet opens, go to the Details tab, and select the Location Paths option from the Property drop-down. Now, right-click on the value that begins with PCIROOT, and then choose the Copy command from the shortcut menu (Figure 2).
Finding the desired GPU for passthrough in Device Manager.
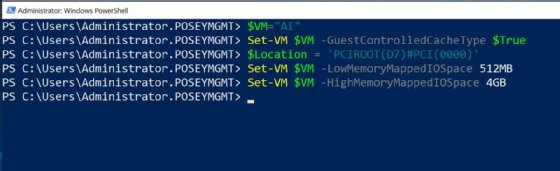
Once you have copied the device location to the Windows clipboard, open an elevated PowerShell session. You will want to map the location to a variable. The command should look something like this, with your GPU location following the = sign:
$Location = 'PCIROOT(D7)#PCI(0000)'
You will notice in the command above that the location specified is shorter than the actual PCIROOT location. Oftentimes, you will need to shorten the location to use only the first two values, as shown in the command above.
The next step in the process is to configure threshold values for memory-mapped I/O (MMIO). This is memory that will allow the device to be accessible. You will need to configure this threshold on a per-virtual desktop basis.
The Windows OS already reserves some MMIO space by default. It sets the low value to 128 MB and the high value to 512 MB. Depending on the GPU that your virtual desktop will use, this might be sufficient. However, higher-end GPUs -- such as some of the Nvidia models -- require you to assign additional MMIO. Microsoft provides a Machine Profile Script that you can download and run to determine how much MMIO your GPU will require. Once you know how much MMIO is needed, it's time to assign the MMIO to the virtual desktop that will be using the GPU. For example, say that you need to set the low range of the MMIO to 512 MB and the high range MMIO to 1 GB (Figure 3). The commands for doing so would look like the following:
Set-VM $VM -LowMemoryMappedIoSpace 512MB

Set-VM $VM -HighMemoryMappedIoSpace 1GB
Setting the MMIO low range and high range for GPU passthrough in Hyper-V.
The last steps in the process are to disassociate the device from the host OS and then associate it with the VM. The first step is to return to the Device Manager, right-click on the device, and then choose the Disable Device command from the shortcut menu.
Now that you have disabled the GPU, it's time to dismount it using the following command:
Now that the device has been dismounted, you can verify that Windows considers the GPU to be assignable by using this command:
Get-VMHostAssignableDevice
This command should return a device summary. You will need to make note of the instance ID that is returned by this command. Now, enter this command, replacing <Instance ID> with your actual instance ID:
Now, you will need to run the Get-VMHostAssignableDevice command once again. This time, you will pipe the command's output into the Add-VMAssignableDevice command. Here is the command:
When prompted, you will need to enter your virtual desktop name. If you receive a prompt for an additional virtual desktop name, just press Enter.
If your virtual desktop is running graphically intensive applications, such as CAD software or photo or video editing software, then assigning a GPU to the virtual desktop will likely improve the end-user experience.
At this point, the configuration process should be complete. Boot your virtual desktop and make sure that the GPU is listed within the virtual desktop's Device Manager. Upon doing so, you can proceed with installing the GPU device drivers onto your virtual desktop.
As you can see, GPU passthrough for a Hyper-V VM can be a tedious process. If you need some extra help, check out this script provided by Microsoft, which can help automate the process. The script is geared toward a virtual server environment, but it is easy for IT admins to adapt it for use with virtual desktops.
When should IT administrators run a GPU passthrough?
In most cases, you can probably get by without having to use GPU passthrough to make a GPU available to your virtual desktops. However, if your virtual desktop is running graphically intensive applications, such as CAD software or photo or video editing software, then assigning a GPU to the virtual desktop will likely improve the end-user experience.
Similarly, if the virtual desktop will be running an AI application, it will typically require GPU resources to support the application.
Editor's note:This article was originally written by Brien Posey in November 2020. He updated this article in May 2025 to include more information on hotspot devices and improve readability.
Brien Posey is a former 22-time Microsoft MVP and a commercial astronaut candidate. In his more than 30 years in IT, he has served as a lead network engineer for the U.S. Department of Defense and a network administrator for some of the largest insurance companies in America.
Dig Deeper on Virtual and remote desktop strategies