
Getty Images
Deploy WebJEA to empower your users with PowerShell
Give your automation scripts a GUI that makes it easier for end users to get the information they need with a more streamlined approach.

If your team has struggled to deploy PowerShell scripts to your end users, then you're not alone.
PowerShell is a fantastic option to use automation to eliminate redundant tasks and speed up the delivery of common requests. But many teams struggle to find an easy way for their end users to take advantage of this resource. Everyday users will have to face a steep learning curve to use PowerShell automation. A self-service web portal, such as WebJEA, can solve the challenge to make automation tools available to the masses.
Previously I wrote about the advantages of a web-based automation portal to give end users a simple way to run scripts for common tasks. WebJEA is an open source toolkit that builds an IIS website for your end users to run PowerShell scripts via a point-and-click interface.
What are the WebJEA pre-requisites?
WebJEA is an open source project by automation expert Mark Domansky. The GitHub repository covers everything you need to know to deploy and use WebJEA.
The installation process takes about 15 minutes, but it's more realistic to budget an afternoon's worth of time to cover all the bases. When finished, you will have a fully functioning website to host your scripts that your teammates and end users can use to run automation without knowing anything about PowerShell.
The pre-requisites for WebJEA are small. To start, you need Windows Server running at least Server 2016 or newer. You can run the full GUI or Server Core, but the server needs to be domain joined. WebJEA doesn't have any hard requirements for CPU and RAM, but one CPU core and 4 GB RAM should be the minimum. Virtual servers work great for WebJEA. I run my production instance on a VM with 2 vCPU and 8 GB of RAM without any slowdowns.
You will also need a service account to run the IIS app pool. The project's website recommends using a group-managed service account as a best practice, but traditional service accounts work just as well. You should consider using an SSL certificate, but it's not a requirement.
How to install WebJEA
PowerShell Desired State Configuration (DSC) is the automation engine WebJEA uses to build the server. Even if you have never used DSC, you don't need to know anything about it to install WebJEA. DSC handles the entire build process. You only have to input a few configuration parameters.
The install process is deceptively simple. To start, go to the WebJEA releases page, then download and extract the latest release.
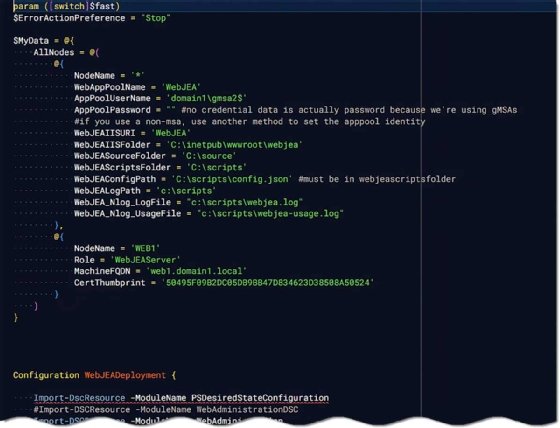
Next configure the deploy.ps1 file, which performs the WebJEA install process. Specify the machine name, service account or managed service account username, and the path to the install folders. You can also include the certificate thumbprint if you have a certificate installed on your web server.
The script will download the DSC modules and latest packages to run WebJEA, then start the installation.
If you did everything properly in the configuration file, the entire install process should not take long. The WebJEA project documentation is great, but you might not be successful on the first try. I had some problems with the installation because I didn't use the default folder locations. Once I fixed the folder paths, the install completed without issue.
When things go wrong WebJEA will generate succinct error messages. Just correct the issue and re-run the script, which will skip any previously completed downloads. The screenshot shows the successful configuration I used. After the install finishes, reboot the machine and you should be ready to try your new WebJEA instance.

How to connect to the WebJEA instance
After the WebJEA installation completes, launch the console going to the servername.domainname/WebJEA/ URL. For example, webjea1.mk.lab/WebJEA is the URL for my test lab instance.
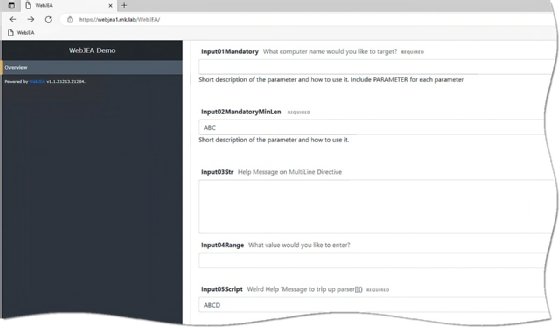
The WebJEA URL should load a page with one script listed on the left-hand side named Overview. This sample script highlights how different PowerShell output will look and shows how to customize the WebJEA portal with HTML and CSS.
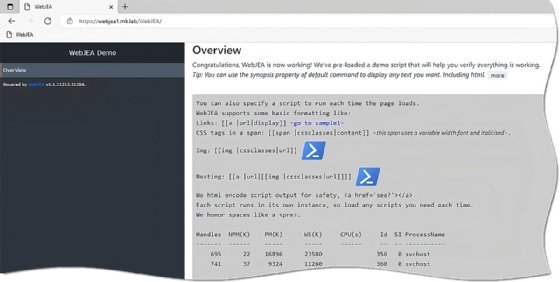
The overview script also includes examples of the 20 input types WebJEA supports.
You can disable the overview script after you get comfortable with WebJEA or hide it from the end users. That way the script will be available for team members to use as a reference for their scripts.
How to set up your first script in WebJEA
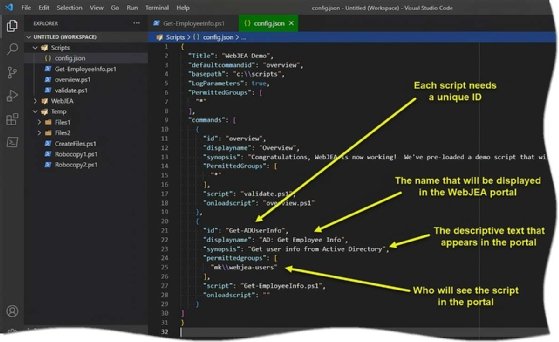
WebJEA removes the difficulty of creating web pages for your scripts. To display your first script, place it into the folder set as the WebJEAScriptsFolder in the WebJEA configuration file. In my lab, the scripts folder is C:\Scripts. After placing the file in the folder, you will configure the config.json file.

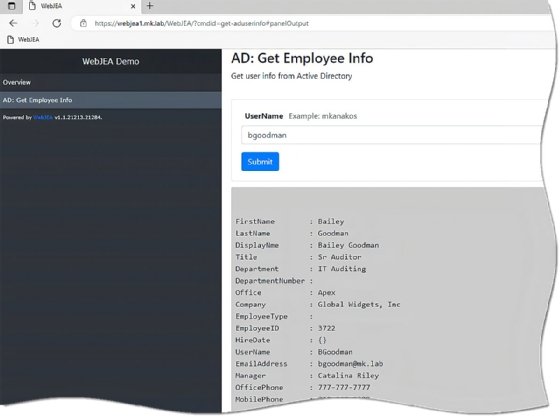
The screenshot shows a script named Get-EmployeeInfo.ps1 in the C:\Scripts folder. The config.json file contains the information to display in the portal and the path to the file. At first glance, working with the JSON file might seem daunting. But it grows easier once you know the meaning of each value.
For each script, populate four required data fields. These fields control how the portal displays the script, who can access the script and the path to the script. The first value is the ID field, which is the unique ID that WebJEA uses to identify each script in the JSON. I give a descriptive name that refers to the script's purpose. End users do not see this ID value.
Next add a value for the DISPLAYNAME field, which is the name that shows in the left-hand column of the WebJEA portal. The SYNOPSIS field is the script description that end users see when they click on the script name. The PERMITTEDGROUPS field controls the security on the script.
How do you manage script access in WebJEA?
WebJEA controls who can run scripts by displaying or hiding a script. When a user visits the web portal, WebJEA dynamically calculates the list of scripts to display based on group membership and compares that list against the entries in the JSON file. WebJEA then generates a web page for that end user. WebJEA produces a new list of files when the page reloads.
WebJEA can use local groups from your web server or Active Directory groups to determine script access. In my example, I use a local group.
WebJEA offers three scenarios to control script access: default access (all users), admin access and access to a specific script. For default access, I created a local group named webjea-users which controls which scripts everyone sees. Another group named webjea-admins limits script access to the admin staff.
What about assigning certain scripts to specific users? There are a few ways to do this, but the easiest is to make a group for each script that requires special access. For example, if I have a script only meant for a few people or for a specific team, then I create a group and assign certain users to that group.
There are two ways to update the config.json file. The easiest method is to use the WebJEAConfig module, which takes input values and applies the changes to the config.json file. The module is available from the PowerShell Gallery.
Run the following command to install the WebJEAConfig module:
Install-Module WebJEAConfig
Run the following code to add a script to the config.json file with PowerShell:
#Config.Json location and other inputs will depend on your specific configuration.

Open-WebJEAFile -Path "c:\webjea\config.json"
New-WebJEACommand -CommandId 'id' -DisplayName 'DisplayName' -Script 'script.ps1' -PermittedGroups @('*')
Save-WebJEAFile
Here's the code -- using splatting to make it easier to read -- to update config.json for the script in the previous screenshot.
$ConfigParams = @(
    CommandID        = 'Get-AduserInfo'
    DisplayName      = 'AD: Get Employee Info'
    Synopsis         = 'Get user info from Active Directory'
    PermitttedGroups = @('mk\\webjea-users')
)

Open-WebJEAFile -Path "c:\scripts\config.json"
New-WebJEACommand @ConfigParams
Save-WebJEAFile
The other update option is to do it manually, which is my preferred method. It is easier to make changes with the WebJEAConfig module, but it places new scripts to the end of the file. When users visit the portal, they see the scripts in the order they appear in the config file. You will most likely want scripts in a particular order, which will require manual changes to the JSON file.
No matter your preferred method, they accomplish the same goal. The new script will appear in the WebJEA portal once you update config.json and refresh the web page.
Many scripts need an input value to query data. The great thing about WebJEA is it reads your scripts and turns any input parameters into web input boxes.
What are good tasks for a WebJEA portal?
I have been using WebJEA for more than a year, which has helped me understand what automation works well with this self-service portal and what doesn't.
First let's talk about the good.
WebJEA is great for common tasks, queries and reporting for Office 365, Exchange Server, Active Directory and Azure Active Directory. For example, the one constant I've seen at every job is daily requests for information from Active Directory. WebJEA excels at handling queries for users and groups in Active Directory and for scripts related to account provisioning, group ownership, group membership lists and change requests.
WebJEA also works well to replace tools with outdated GUI interfaces, such as MMC consoles. For example, my team designed a simple script to replace the web-enroll feature for certificate requests.
What jobs are not suitable for WebJEA?
Not every PowerShell script will work as expected in the WebJEA portal. Functions are not supported in WebJEA. Why? Functions need to be loaded into memory before they can be executed, and WebJEA does not preload the scripts prior to displaying the portal. Functions will run but will not display any output.
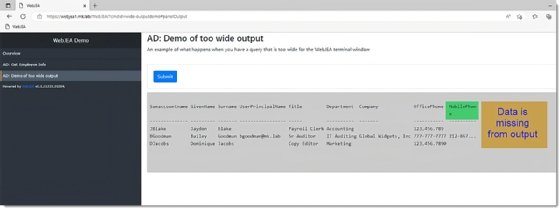
You must also avoid queries and reports with too wide of an output. The pages generated by WebJEA have a fixed width, which I believe is 65 characters based on my limited testing. Anything wider than the fixed limit will not be shown in the output.
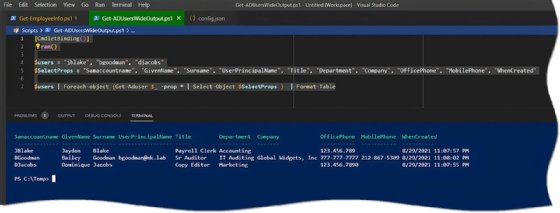
Here's an example to illustrate the output width issue. This simple Active Directory query below uses Format-Table to force the output to be in a table format, which would look like an Excel spreadsheet view.
$users = "jblake", "bgoodman", "djacobs"
$SelectProps = "Samaccountname", "GivenName", "Surname", "UserPrincipalName", "Title", "Department", "Company", "OfficePhone", "MobilePhone", "WhenCreated"

$users | Foreach-object {Get-Aduser $_ -prop * | Select-Object $SelectProps }  | Format-Table
The screenshot in Visual Studio Code shows the full output. Notice that the last field in the display output is named WhenCreated.
When I add this script to WebJEA and execute it, the output is incomplete because it is too wide for the WebJEA portal. The WhenCreated field does not show, and the MobilePhone field wraps around to fit.
Why WebJEA is a good choice for automation
WebJEA is a great way to automate scripts for people who are not familiar with PowerShell. It has its strengths and weaknesses, but the benefits of this open-source project far outweigh the few negatives. After a few hours of configuration, you can have a fully functioning web portal you can deploy in your organization.