Maksim Kabakou - Fotolia
Ease migrations with Windows Server Migration Tools cmdlets
An in-place Windows Server upgrade is easier than a server migration. When an upgrade isn't possible, admins can ease the transition with a Microsoft snap-in.
IT teams have several tool choices for moving workloads to newer versions of Windows Server. One method is to use Windows Server Migration Tools, a set of PowerShell cmdlets.
The Windows Server Migration Tools snap-in transfers features from one server to another. The utility, which is built into the Windows Server OS, works with Windows Server 2003 and newer OS versions. Admins can install the Windows Server Migration Tools snap-in with Server Manager's Add Roles and Features wizard or through PowerShell using the following command:
Install-WindowsFeature Migration
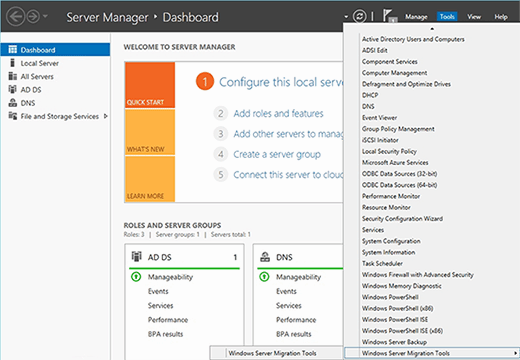
After the installation, Windows Server Migration Tools will appear on Server Manager's Tools menu, as shown in Figure 1. Admins can also access the tools through PowerShell and the Administrative Tools section on the Start screen.

When the Windows Server Migration Tools snap-in launches, a PowerShell window will open. The difference between this PowerShell window and other PowerShell windows is that the Migration Tools snap-in has been loaded.
Server migrations come with less baggage
It is often easier to perform an in-place upgrade than to perform a migration. However, migrations tend to be more flexible than upgrades. For example, Microsoft requires a very strict upgrade path. The new operating system's edition and architecture must match the existing OS. An in-place upgrade often transfers bloat that has accumulated over the years to the new OS.
Migrations, on the other hand, transfer individual OS features to a new server, instead of transferring every aspect from the existing OS configuration. This, for example, enables administrators to move a feature from a 32-bit version of Windows to a 64-bit version. A migration also allows an administrator to move features across Windows Server editions or take the features from a multi-role server and migrate them to a series of single-role servers.
Third-party migration tools
Many third-party vendors provide Windows Server migration tools. Zinstall WinServ, for example, moves physical and virtual servers to a new OS. It works across a variety of Windows Server versions and migrates applications, configurations, databases, profiles, shares and data. The tool's most unique capability is its ability to migrate from a 32-bit OS to a 64-bit OS.
AZ-Migrate from AppZero is another third-party tool admins can use for Windows Server migrations. This tool moves Windows-based apps from older OSes to current Windows Server versions running on premises or in the cloud.
The Windows Server Migration Tools cmdlets work with most of the Windows Server features. Open the Windows Server Migration Tools snap-in and enter the following command to see which server features can migrate:
Get-SmigServerFeature
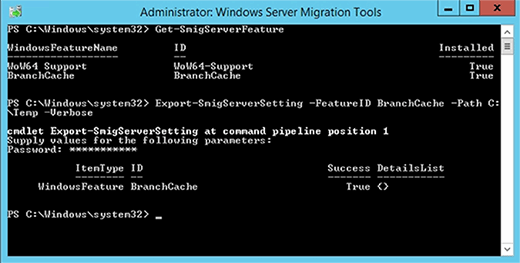
Figure 2 shows this server contains the WoW64 Support and BranchCache features.

Migrating a Windows Server feature requires that the administrator exports the feature and then imports it into the new server. The feature-export option uses the Export-SmigServerSetting cmdlet; the command syntax is:
Export-SmigServerSetting -FeatureID <feature ID> -Path <export path> -Verbose
For example, the command to export the BranchCache feature is:
Export-SmigServerSetting -FeatureID BranchCache C:\Temp -Verbose
Figure 3 shows the output for the command. Notice that PowerShell asks for a password. Because the output file contains sensitive information, Windows protects it with a password.

Importing features into a new OS is a relatively straightforward process. Manually install any required roles or features before the import. For example, importing DHCP settings requires admins to install the DHCP role. Depending on the roles and features being used, an admin may need to stop related services before importing the settings.
The Import-SmigServerSetting cmdlet imports the settings. Its full syntax is:
Import-SmigServerSetting -FeatureID <feature ID> -Path <the path to the import file>
This syntax is nearly identical to the command used to export the feature. The import process requires the password that was assigned to the export file. Administrators may have to append the -Force switch to the Import-SmigServerSetting cmdlet to get the import process to work.


