
Getty Images
These Azure Logic Apps examples assist with your admin needs
Admins can get some automated assistance with provisioning and monitoring by learning how to work with triggers in Microsoft's integration platform as a service.

Learning how to manage expectations is a skill for handling people -- and when it relates to IT processes.
One of the useful features to automate processes with Azure Logic Apps is the trigger functionality in many of the connectors. A trigger defines an event to automatically kick off a workflow. In the previous article, we looked at tutorials that, while still quite useful, required you to trigger the workflow via a script. The following Azure Logic Apps examples show how to automate processes by responding to events we expect to happen. This tutorial explains how to create a workflow to provision access in Microsoft Teams and SharePoint Online, then how to build another workflow that monitors a group for Azure Active Directory membership changes and sends a notification when a user is added or removed.
How to provision access with Azure Logic Apps
Typically, a team and department is tracked via groups in Azure Active Directory, possibly synced from an on-premises Active Directory. Groups can also be used for a multitude of IT-managed scenarios, such as giving access to file shares, shared mailboxes or resource groups in Azure.
Azure Logic Apps can extend this further to provision access to a team in Microsoft Teams or to a folder in SharePoint.
How to use triggers in Azure Logic Apps
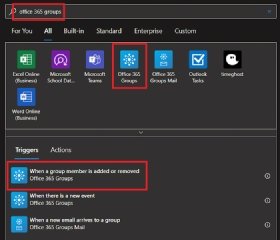
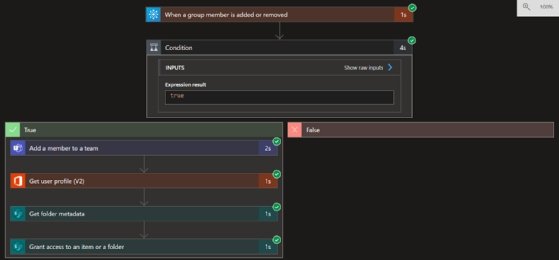
The following Azure Logic Apps examples use a trigger when a user is added to or removed from a group in Azure Active Directory. To start, create a blank Azure Logic App and, for the trigger, search for Office 365 Groups. Select the trigger called When a group member is added or removed.
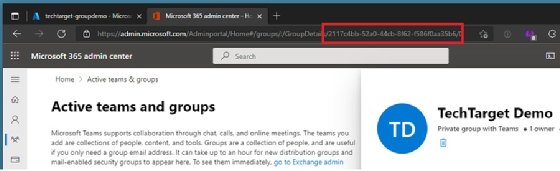
Next, select the group. Once you have authenticated to Office 365 in the Azure Logic App, you don't need to know the group ID. Just click in the Group ID dropdown to load the groups. If you have many groups in your Office 365 tenant to sort through, you can use a faster method by clicking on the group in the admin center to show the Group ID in the URL.
After you select the group, set the polling period. Each time the Azure Logic App polls the group, you will get charged for a run if you are on a Consumption plan. If there are no changes, then the charge is only for a single action, which is minimal.
How to determine group changes
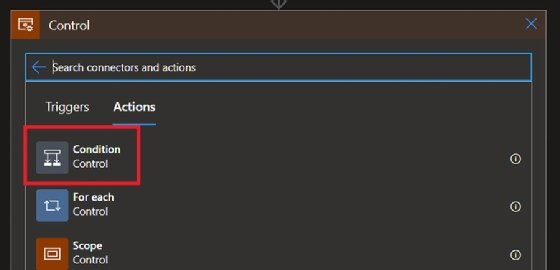
A trigger happens when members are added or removed. To adjust this setting so it works only when members are added, add a condition statement. Condition statements are part of the Control actions.
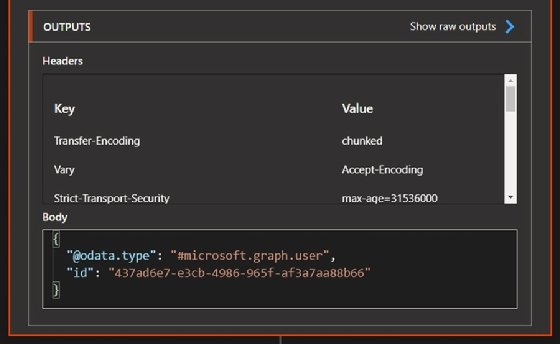
To understand how to filter only for member additions, find what the output of When a group member is added or removed looks like. You can check the documentation for that trigger, but it's not clear what the data will look like. Instead, you can execute a test run of the workflow and collect data from the run history. To start, remove a user from that group and then trigger the workflow with the Run Trigger > Run selection.
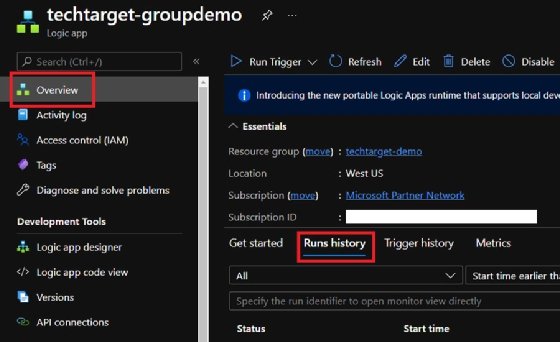
Go back to the Overview page of the Azure Logic App and open the Runs history.
Click on the top item in the list, which should take you to a new page with indicators for each action's run status. Click on the When a group member is added or removed trigger. Scroll down for the Outputs section and look for an area labeled Body.
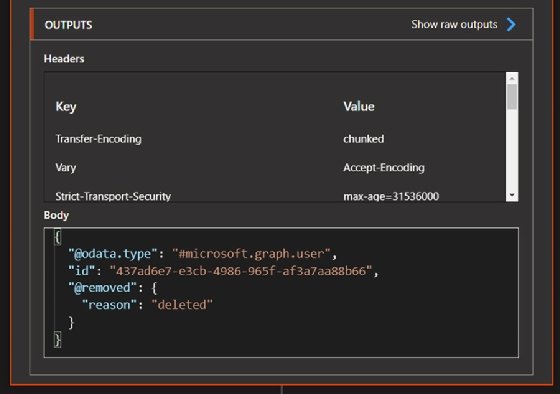
Perform the same process again after adding a user to the group to see the difference in the Body section.
This investigative work shows us that if the @removed property exists and is not empty, then the user was removed.
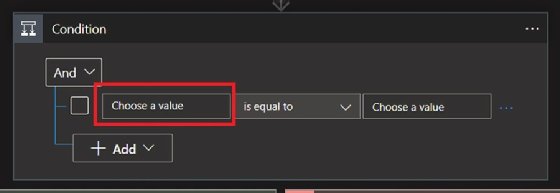
Go back to the Azure Logic App and convert it to a conditional statement.
Open the Condition action in the workflow and click on Choose a value, then click on the Expression tab in the pop-up.
In the Expression box, paste the following:
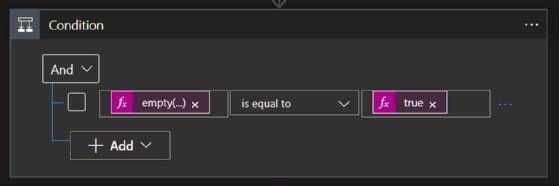
empty(triggerBody()?['@removed'])
This refers to the @removed property found earlier in the trigger body. Use the empty() expression to return true if it is empty or false if it isn't. Next, select Choose a value on the Condition action at the right.
Navigate to the Expression tab again and type true and hit OK. The full condition statement should look like the screenshot in Figure 8.
Now, any time the trigger runs and finds a user was added to the group, the expression will return true and any actions placed in the True section will run.
How to add the user to a team in Microsoft Teams
In the True section of the condition statement, add in the Microsoft Teams Add a member to a team action.
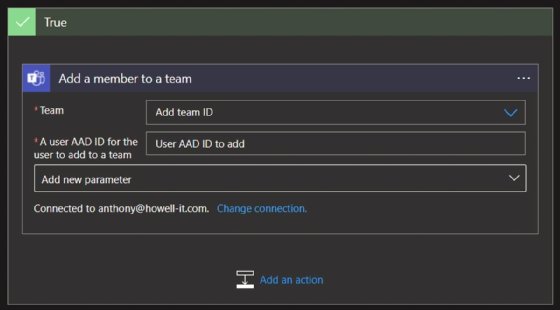
For the team, click in the box and find the team to add the user. In the A user AAD ID for the user to add to the team area, reference the user ID from the trigger.
Now when a user is added to the group, they will be added to that team in Microsoft Teams.
Provisioning access to a folder in SharePoint Online
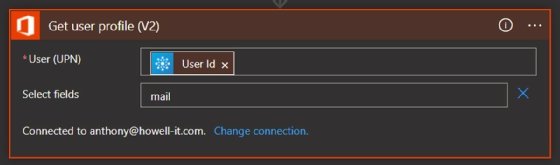
To add the user to a folder in SharePoint, you need two things: the user's email address and the ID of the folder in SharePoint. Use the SharePoint connector to build the workflow.
To get the user's email address, use the Get user profile (V2) action and look up the user based on the user ID from the trigger. Add mail to the Select fields parameter.
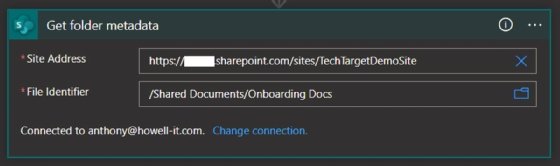
Next, use the SharePoint>Get folder metadata option to look up the ID of the folder; you need two items: the site address for the SharePoint site in the format https://domain.sharepoint.com/sites/sitename and the path to the folder in the format /Folder/Folder. The example shown in Figure 11 uses the Onboarding Docs folder in the Shared Documents library.
If you don't know the path to the folder, click on the folder icon and browse for the folder to find it.
Next, use the SharePoint>Grant access to an item or a folder action with the same site address. With that information in the action, you can then look up the List or Library Name by clicking on the dropdown.
Next, we need the ID of the folder. Select ItemId from the Get folder metadata action.
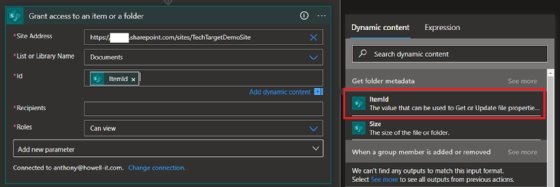
Then for the Recipients, select Mail from Get user profile (V2).
Click Save to complete the workflow building process.
How to test the SharePoint Online automated workflow
To test the workflow, add a user to the group and either wait for the time set in the trigger or start the workflow with the Run Trigger button. You can either wait on the same page for a few seconds or check the run history to see the status of the workflow. If successful, the run should have green checkmarks by each step in the Azure Logic App.
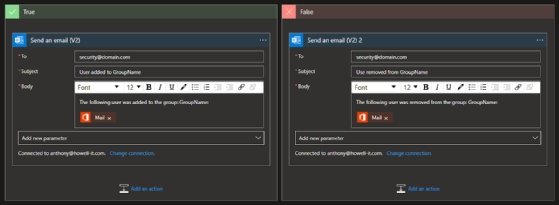
How to set up automated notifications with Azure Logic Apps
In addition to provisioning access with a group change, you can also send out a notification in email whenever a group change occurs. This is useful to track membership changes to important groups, such as a group used to assign the Global Administrator role.
Using the same trigger and condition created earlier, add one action to each side of the condition and move the Get user profile (V2) above the condition. For this tutorial, use Office 365 Outlook>Send an Email (V2).
In the True and False blocks, add the notification action and fill in the parameters. This example sends an email to [email protected] with information about whether the user was added or removed.
The completed Azure Logic Apps workflow now automatically audits group changes.
Azure Logic Apps open the way to further automation possibilities
These Azure Logic Apps examples should get you started with how to fill out the steps and triggers to build an automated workflow tailored to your organization. For further inspiration, it's helpful to see the full list of connectors from Microsoft's site to look through the triggers and actions for each platform.