
ltstudiooo - Fotolia
Use PnP PowerShell commands to fortify SharePoint management
A new PowerShell module pares down the work required to handle administrative tasks on several Office 365 services, such as SharePoint Online and Microsoft Teams.

It's easy to get lost in the clouds, especially when you manage Office 365, but a new PowerShell module is helping administrators find a more efficient way to handle Microsoft's cloud productivity suite.
Office 365/Microsoft 365 administration is a complicated business: Microsoft separates the management of security and compliance into distinct portals, and most services have their own admin portal, adding up to more than 30 at last count. For services such as SharePoint Online, Microsoft offers a PowerShell module for basic site administration. To supplement this module's default functionality, community members worked with Microsoft to release the Patterns and Practices (PnP) PowerShell module for more control than the administration modules with fewer complications.
What is the PnP PowerShell module?
The original version of the PnP PowerShell module -- named SharePoint PnP PowerShell Online -- only managed SharePoint Online and SharePoint on-premises products and required Windows PowerShell to operate.
Microsoft developed the PnP PowerShell module to work with cross-platform PowerShell and expanded its capabilities beyond SharePoint. The new module has more than 500 cmdlets to manage SharePoint Online, Microsoft Teams, Microsoft Planner and Microsoft Flow. This consolidation effort attempts to further simplify the work involved with installing and working with separate PowerShell administration modules Microsoft provides to manage each service.
Why use the PnP PowerShell module?
The Microsoft SharePoint Online Services module remains the de facto management tool for that service with basic commands to connect, add, update and remove items such as site collections, sites and libraries.
PnP PowerShell contains most of the cmdlets in the SharePoint administration module but also features many new commands. PnP PowerShell does not supersede the SharePoint Online Services module but offers some improvements when using PowerShell to manage SharePoint Online.
For example, to connect to a SharePoint site collection and iterate all sites using PowerShell, you need to connect to SharePoint Online and then retrieve all site collections. Before PnP Powershell, you needed to use client-side object model (CSOM) references and libraries in PowerShell scripts to iterate through subsites. Using CSOM is often involved and requires extensive commands, creation of new connections and credential objects, and loading each level from the site collection to the subsites. The code is prone to connection issues and often returns 403 forbidden errors.
The PnP PowerShell module aims to resolve these issues by creating new, enhancing existing or combining functions and CSOM code for a more streamlined approach to PowerShell scripting to manage SharePoint Online.
Download and set up the PnP PowerShell module
You get the latest release of the PnP PowerShell module with the following command:
Install-Module -Name PnP.PowerShell
To use the nightly build versions, add the -AllowPrerelease parameter to the command. You will get the latest features, but there is some risk involved as the features will not be as thoroughly vetted as the latest release.
Connecting PowerShell to Microsoft 365 is available either through Azure AD or via the MSOnline PowerShell module. The first time you try to execute a command from PnP PowerShell, it will fail. The module requires you to set up access. Part of this process creates an Azure AD application, which subsequent requests will use for the connection and access process.
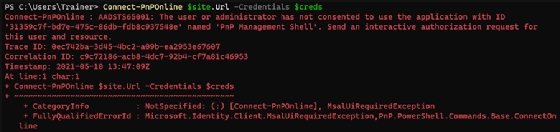
To resolve this, log in to Azure AD as a Global Administrator or an account that has the correct permissions, and execute the command:
Register-PnPManagementShellAccess
When prompted, grant the permission required to use the module.
How to use the PnP PowerShell module
For a basic example of how to use the PnP PowerShell module, we can use commands to retrieve all sites -- formerly called site collections -- from SharePoint Online:
Connect-PnPOnline "https://{Tenant}-admin.sharepoint.com"
$sitecollections = Get-PnPTenantSite
To go further and iterate all subsites, use the additional commands:
foreach ($sitecollection in $sitecollections)
{
   Connect-PnPOnline -Url $sitecollection.Url -Credentials $creds
   Get-PnPSubWebs
}
The benefit of the PnP PowerShell module is cleaner code to run a variety of actions without the additional work of multiple command types, such as PowerShell combined with CSOM.
Managing files and folders in SharePoint Online
Common file and folder administration jobs in SharePoint Online include creating new folders and deleting, uploading or moving content. It can be labor-intensive to perform these tasks through the UI. Through PowerShell automation, you can save time and ensure consistency.
To iterate all folders within a specific site, first connect to the site, and then utilize a new command named Get-PnPFolderItem:
Connect-PnPOnline "https://{Tenant}.sharepoint.com/sites/Demo/DemoSubsite" -Credentials $creds
$folder="/Shared Documents"
$folders = Get-PnPFolderItem -FolderSiteRelativeUrl $path -ItemType Folder
foreach($folder in $folders)
{
     Write-Host "$($folder.Name) - $($path)/$($folder.Name)" -ForegroundColor Green
}
If the folders contained files, you can iterate all items with these commands:
$web = Get-PnPWeb
Get-PnPListItem -List $path -FolderServerRelativeUrl "$($web.ServerRelativeUrl)" -Query "<View><Query><Where><IsNotNull><FieldRef Name='Title' /></IsNotNull></Where></Query></View>"
The PnP PowerShell commands work together to ensure items such as connections, context and even the current sites get reused.
Uploading files to SharePoint Online
Moving content from existing file shares, or local storage platforms, to an Office 365 service, such as SharePoint Online, often involves purchasing migration tools and applications. Though those products tend to work well, the PnP PowerShell module gives you a free option to migrate the files.
For this example, we have a local folder with different types of Microsoft Office files, such as PowerPoint, Word and Excel files, that we want to upload to a specific location in SharePoint Online.
The following script connects to the required SharePoint Online site and then adds the files to the location we specify:
Connect-PnPOnline "https://{Tenant}.sharepoint.com/sites/Demo/DemoSubsite" -Credentials $creds
$folder = "/Shared Documents"
$localpath = "D:\Documents"
$files = Get-ChildItem -Path $localpath –Recurse

foreach($file in $files)
{
  Add-PnPFile -Path "$($localpath)\$($file.Name)" -Folder "$($web.ServerRelativeUrl)$($folder)"
}
After the upload completes, you will notice only the Name field is updated, and the Title field is empty. It is not ideal to leave them this way. Use PowerShell to update the Title field with the following code:
Connect-PnPOnline "https://{Tenant}.sharepoint.com/sites/Demo/DemoSubsite" -Credentials $creds
$folder = "/Shared Documents"
$localpath = "D:\Documents"
$files = Get-ChildItem -Path $localpath –Recurse

foreach($file in $files)
{
  $up = Add-PnPFile -Path "$($localpath)\$($file.Name)" -Folder "$($web.ServerRelativeUrl)$($folder)"
  $item = Get-PnPListItem -List "$($folder)" -UniqueId $up.UniqueId
  Set-PnPListItem -List "$($folder)" -Identity $item.Id -Values @{"Title" = "$($up.Name)"}
}
It is not uncommon to remove and reupload files during a migration process. PnP PowerShell gives you a way to do this with the following code:
Connect-PnPOnline "https://{Tenant}.sharepoint.com/sites/Demo/DemoSubsite" -Credentials $creds
$folder = "/Shared Documents"

$files = Get-PnPListItem -List $folder -FolderServerRelativeUrl "$($web.ServerRelativeUrl)" -Query "<View><Query><Where><IsNotNull><FieldRef Name='Title' /></IsNotNull></Where></Query></View>"

foreach($file in $files)
{
     Remove-PnPListItem -List "$($folder)" -Identity $file.Id -Force
}
As you can see from these examples, the PnP PowerShell module gives you a way to use the same code structure to perform all file and folder actions, such as adding, updating and removing content, without a complicated PowerShell script. With all the complex logic managed within the cmdlets, it makes their use easy and straightforward.
For more information about how to use the PnP PowerShell module cmdlets, Microsoft provides documentation on the project's GitHub site.