
Olivier Le Moal - stock.adobe.co
How to perform Azure AD bulk operations with PowerShell
Microsoft offers multiple ways to manage users and groups in Azure Active Directory. PowerShell is one option, but it requires knowing which module to use to handle coverage gaps.

While the Azure portal is fine for simple user and group management in Azure Active Directory, PowerShell is the optimal choice when you need to make large-scale changes. But there are caveats to consider before you can reap the automation benefits.
The Azure portal provides a GUI to manage users and groups in Azure Active Directory (Azure AD), but it's not the most efficient method, especially when you have a task that involves hundreds or thousands of users. PowerShell's automation capabilities are ideal for Azure AD bulk operations, such as adding or removing a significant number of users from a group. It requires some effort to understand the best method, because different PowerShell versions will require different modules. This tutorial will explain how to perform bulk operations with two PowerShell modules: the AzureAD module and the Azure Az module.
What is Azure Active Directory?
Azure AD is Microsoft's cloud-based identity and access management service. Like Active Directory, Azure AD contains users and groups, but that's where the similarities end. Users and groups authenticate and grant access to internal domain services, such as applications, files, servers and printers.
Azure AD manages authentication and sign-ins for external and cloud-based resources such as Office 365, Microsoft 365, Azure resources and thousands of other SaaS applications.
How to manage Azure AD with PowerShell: Let's count the ways
Microsoft provides four PowerShell modules, the Azure Cloud Shell, the Azure portal and the Microsoft Graph API as Azure AD management options. But the choices don't end there.
Because Azure AD is an identify platform -- and those identities can also exist in Microsoft 365 -- other choices include the legacy Exchange Online PowerShell module and newer Exchange Online v2 (aka EXOv2) PowerShell module. This multitude of management avenues can confuse admins who are new to the cloud.
The AzureAD module and the Azure Az module cover most of the tasks related to Azure AD user and group management. This tutorial focuses on these two modules because they support administrators who use either the Windows-only PowerShell 5 or PowerShell 7 -- formerly PowerShell Core -- which runs on Windows, macOS and Linux. To manage Azure AD with PowerShell 5, you would use the AzureAD module. To manage Azure AD with the newer PowerShell 7, you would use the Azure Az module.
The AzureAD and Azure Az modules are not equal in functionality. The AzureAD module only manages Azure AD and only runs in PowerShell 5. The Azure Az module can manage all of Azure, but it only runs in PowerShell 7.
The Azure Az module is modular, meaning you can install the portion required to start and add others as needed. To manage Azure AD with PowerShell 7 only requires the Az.Accounts and Az.Resources submodules. Installing Az.Accounts also automatically adds Az.Resources. These two modules are equal in scope to the AzureAD module for PowerShell 5.
Why bother with PowerShell instead of the Azure portal?
With all this confusion, why use PowerShell? There are a few reasons. The Azure portal cannot perform every Azure AD administrative task. Also, while some tasks, such as bulk user management, can be done from the portal, PowerShell makes this process easier. Lastly, because the concepts of PowerShell -- common verb-noun syntax, pipeline support, variables and functions -- work the same in on-premises environments and the cloud, it's a valuable addition to your management arsenal.
In my machine, you can see the different environments I use to manage Azure AD with PowerShell 5 and PowerShell 7. The first example shows the PowerShell 5 or Windows PowerShell environment:
> $PSVersiontable.PSVersion
Major  Minor  Build  Revision
-----  -----  -----  --------
5      1      19041  1320
> Get-Module | Select-Object Name, Version | Where Name -like "AZ*"
Name    Version
----    -------
AzureAD 2.0.2.140
The setup for PowerShell 7 is:
> $PSVersionTable | Select-Object PSversion, PSEdition
PSVersion PSEdition
--------- ---------
7.2.0     Core
> Get-Module | Select-Object Name, Version | Where Name -like AZ*
Name         Version
----         -------
Az.Accounts  2.6.2
Az.Resources 4.4.1
How to manage Azure AD users and groups with PowerShell
The AzureAD module and the Azure Az module use different naming conventions for their cmdlets. The AzureAD module cmdlets usually contain AzureAD, such as Get-AzureADUser. In the Azure Az module, most cmdlets have Az in the cmdlet name, such as Get-AzADUser.
There are other key differences. For example, cmdlets in the AzureAD module rely heavily on the ObjectID parameter, but in the Az module, the cmdlets can use ObjectID or DisplayName. Occasionally, you'll find that the Azure Az module cannot perform a certain task, requiring you to use either the AzureAD module or another one from Microsoft. The modules don't follow a universal standard for parameter names; parameters in one module may not match the parameters in another.
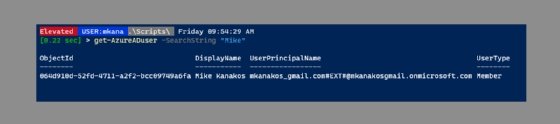
To get user or group information with PowerShell 5, use the AzureAD module and the Get-AzureADUser and Get-AzureADGroup cmdlets.
> get-AzureADuser -SearchString "Mike"
> get-AzureADGroup -SearchString "test"

The following examples show how to execute the same tasks in PowerShell 7 with the Azure Az module. First, to search for a user:
get-azaduser -StartsWith "mike" | ft

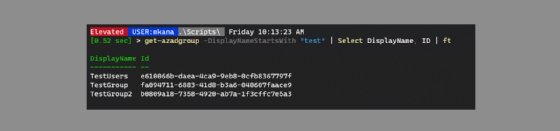
To search for an Azure AD group with PowerShell 7 and the Azure Az module:
> get-azadgroup -DisplayNameStartsWith "test" | Select DisplayName, ID | ft
The syntax to retrieve multiple users depends on your search syntax. The following example finds five users and saves them to a variable named $PS5Users with the AzureAD module and PowerShell 5:
> Get-AzureADUser -top 5 -OutVariable PS5Users

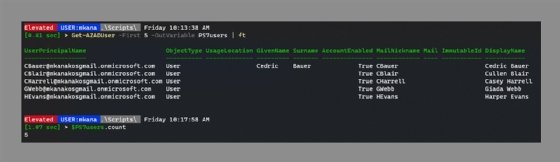
The PowerShell 7 and Azure Az module example uses nearly identical syntax:
> Get-AZADUser -First 5 -OutVariable PS7users | ft
Making bulk user changes to a group with the AzureAD module
Adding users in bulk to a group is not as straightforward because the Azure AD cmdlets don't always support names; they rely on object IDs. All objects have a unique object ID that identifies them in the Azure cloud. The object ID is a global unique identifier (GUID) similar in concept to a security identifier (SID) in Active Directory. Look at this example using the AzureAD module:
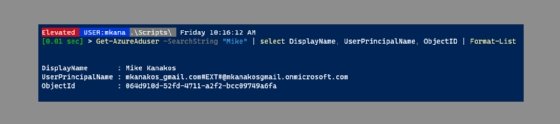
# Let's get some user info about Mike
> Get-AzureAduser -SearchString "Mike" | select DisplayName, UserPrincipalName, ObjectID | Format-List
# Get information about the group named "TestGroup2"
> get-azureadgroup -SearchString Testgroup2
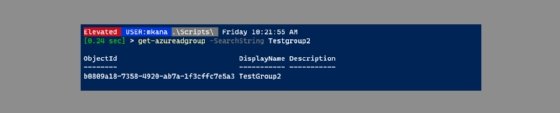
The object ID and the group are required to add a user to the group.
# Adding a user to the testgroup using AzureAD module
> Add-AzureADGroupMember -ObjectId b0809a18-7358-4920-ab7a-1f3cffc7e5a3 - RefObjectId 064d910d-52fd-4711-a2f2-bcc09749a6fa
Working with object IDs can be confusing and difficult because it's hard to track down when errors occur, but using variables can reduce these complications and make code more readable. Here's the same exercise but with variables.
#let's find our user and save to a variable named $Mike
>$Mike  = Get-AzureADUser -SearchString Mike

#let's look up our group and save to a variable
>$Group = Get-AzureADGroup -SearchString Testgroup2

#now let's add our user to the group using variables

> Add-AzureADGroupMember -ObjectId $Group.ObjectId -RefObjectId $Mike.ObjectId
We get the same result, but this syntax is easier to read and troubleshoot. Note that these cmdlets do not generate output; you'll need to write extra code to get verbose results.
How to make bulk changes to a group with the Azure Az module
The following example adds a user to a group using PowerShell 7 and the Azure Az module, which is a little more forgiving and doesn't require object IDs.
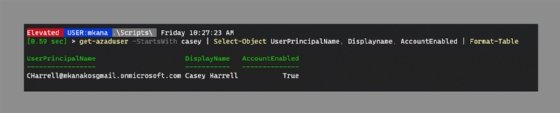
> Get-AzADUser -StartsWith casey | Select-Object UserPrincipalName, Displayname, AccountEnabled | Format-Table
The following example shows how to add a single user to an Azure AD group with PowerShell 7 and the Azure Az module.
> Add-AzADGroupMember -MemberUserPrincipalName "[email protected]" -TargetGroupDisplayName "testgroup"
But what about adding more than one user to a group? The AzureAD module doesn't allow you to add multiple users at once, so use a loop to bulk-add the users:
# Get the group info
> Get-AzureADGroup -SearchString psv5testgroup -OutVariable testgroup

ObjectId                               DisplayName  Description
--------                            -----------  -----------
49e17acf-792c-4ac1-bf0e-562e22418012 PSv5TestGroup Test Group for PSv5

# How many are in the group now?
> (Get-AzureADGroupMember -ObjectId $testgroup.objectid).count
0
# let's get some users to add to a group
 >$users = Get-AzureADUser -top 10

# now let's add them to the group! PowerShell pipeline support saves the day!
> $users | ForEach-Object {Add-AzureADGroupMember -ObjectId $testgroup.object
id -RefObjectId $_.objectid}

# How many users are in that group now?
  > (Get-AzureADGroupMember -ObjectId $testgroup.objectid).count
10
The one line of code that added users to a group starts by saving users to a variable called $Users. Next, the PowerShell pipeline passed the $Users variable to the Foreach-Object cmdlet, which then iterated through the list of users and performed the task outlined between the { } brackets.
The process using the Azure Az module is similar but easier:
#Get the group info
>(Get-AzADGroup -DisplayName "psv7testgroup" -OutVariable testgroup2 | Select DisplayName, ID

DisplayName   Id
-----------  --
psv7testgroup 8d4984b7-6ebd-4622-9464-25273a982076


# How many are in the group now?
>(Get-AzADGroupMember -GroupDisplayName $testgroup2.DisplayName).count
0

# get a list of users
$users = Get-AzAduser -First 6

# Let's add them to the group
> Add-AzADGroupMember -TargetGroupDisplayName $testgroup2.DisplayName-
MemberUserPrincipalName $users.UserPrincipalName

# How many are in the group now?
>Get-AzADGroupMember -GroupDisplayName $testgroup2.DisplayName).count
6
The following example shows how to remove a user from a group with PowerShell 5 and the AzureAD module.
#how many people are in the group?
>Get-AzureADGroupMember -ObjectId $testgroup.objectid).count
10

# Remove user from the group
>Remove-AzureADGroupMember -ObjectId $testgroup.objectid -MemberId
$Casey.objectID

#Group member count after user removal
>(Get-AzureADGroupMember -ObjectId $testgroup.objectid).count
9
Here's the same task using PowerShell 7 and the Azure Az module:
# get our user info
>$CaseyV7 =  Get-AzAdUser -StartsWith "casey"

#Get group count
>(Get-AzADGroupMember -GroupDisplayName $testgroup2.DisplayName).count
6

# Remove Casey from group
Remove-AzADGroupMember -GroupDisplayName $testgroup2.DisplayName -
MemberUserPrincipalName $caseyv7.UserPrincipalName

>(Get-AzADGroupMember -GroupDisplayName $testgroup2.DisplayName).count
5
How to remove users from a group in bulk
Removing users in bulk uses a similar process to the previous examples. The following code uses the AzureAD module:
# Users currently in group
> Get-AzureADGroupMember -ObjectId $testgroup.objectid | Select-Object DisplayName
DisplayName
-----------
Jeremy Brown
Giada Webb
Hailey Serrano
Harper Evans
Mercedes Beck
Casey Harrell
Cullen Blair
Ivan Pineda
Itzel Riley
Cedric Bauer
#PowerShell 5 doesn't allow us to pass in more than one group member at a time. So we use the Foreach-Object cmdlet to help us out.
> $users | Remove-AzureADGroupMember -ObjectId -MemberId $_.objectid

# verify no one is in the group
> (Get-AzureADGroupMember -ObjectId $testgroup.objectid).count
0
To remove users in bulk with the Azure Az module:
# get a list of users to remove
> $Usersv7 = Get-AzADGroupMember -GroupDisplayName $testgroup2.DisplayName
> $userv7.count
5

# Remove the users!
> Remove-AzADGroupMember -GroupDisplayName $testgroup2.DisplayName -
MemberObjectId $Usersv7.Id

> (Get-AzADGroupMember -GroupDisplayName $testgroup2.DisplayName.count
0
How to get group memberships for a user in Azure AD
You can get group memberships for a user as well. The next two examples will highlight why PowerShell and Azure can befuddle admins from time to time.
First, let's get the group membership for a user with the AzureAD module:
# Not sure what the cmdlet is? Use Get-Command!
>Get-Command -name *membership* -Module azureAD

CommandType    Name                                                Version
Source
-----------                ----                                                     -------
------
Cmdlet         Add-AzureADMSScopedRoleMembership                  2.0.2.140
AzureAD
Cmdlet         Get-AzureADContactMembership                        2.0.2.140
AzureAD
Cmdlet         Get-AzureADMSScopedRoleMembership                 2.0.2.140
AzureAD
Cmdlet         Get-AzureADServicePrincipalMembership              2.0.2.140
AzureAD
Cmdlet         Get-AzureADUserMembership                          2.0.2.140
AzureAD
Cmdlet         Remove-AzureADMSScopedRoleMembership                2.0.2.140
AzureAD

# Get Casey's group membership
> Get-AzureADUserMembership -ObjectId $casey.ObjectId
ObjectId                            DisplayName Description
--------                            ----------- -----------
e610066b-daea-4ca9-9eb8-0cfb8367797f TestUsers   Testusers
fa094711-6883-41d8-b3a6-040607faace9 TestGroup
Next, here's how to get the group membership for a user with the Azure Az module.
# Let's find the cmdlet using Get-Command
> Get-Command -Name  *member* -Module  Az.Accounts
The results will show no cmdlet, so try checking the other Azure Az module (Az.Resources):
# Search for cmdlets with the phrase "member" in the name
> Get-Command-Name *member* -Module Az.Resources
CommandType    Name                                            Version
Source
-------------------      --------                                             ---------
---------
Cmdlet                  Add-AzADGroupMember               4.4.1
Az.Resources
Cmdlet                  Get-AzADGroupMember                4.4.1
Az.Resources
Cmdlet                  Remove-AzADGroupMember             4.4.1
Az.Resources
The results will show there is no cmdlet in the Azure Az module to look up the group membership for a user. Even though the Azure Az module is easier to use, it doesn't have a cmdlet to do every type of task.
If you want to use PowerShell 7, then you need to install multiple modules or switch the AzureAD module, which only works on PowerShell 5 when you find a gap in management coverage.
How to make bulk changes from the Azure portal
Microsoft recently added an option to perform these Azure AD bulk operations through the Azure portal. For administrators who are not familiar with PowerShell, this is the next best option.
The following screenshot shows the bulk operation menu item at the top of the window. After you click the menu item, four options appear. This menu item is available for users and for groups.
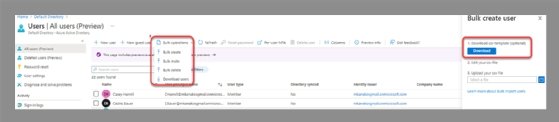
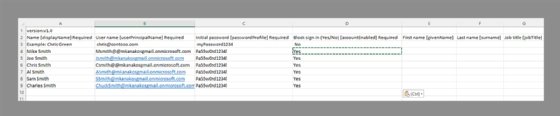
Once you select an option, a new panel opens on the right-hand side. From this panel, you can download a template CSV file to populate with the information you want to import into Azure AD. After you complete the CSV and upload the file, Azure runs a background job to ingest the data from the CSV file and create the accounts.
Final thoughts on the bulk operations process
Whether you prefer a GUI interface or you are comfortable with a more complex option such as PowerShell, there are many ways to perform bulk operations in Azure.
Microsoft offers several PowerShell modules to help you get your work done efficiently, but you need to make sure you use the correct one and understand the syntax that is specific to each module. Once you become comfortable with how to work with each module, there is nothing you can't automate to help you speed through bulk operations for Azure AD.