Petya Petrova - Fotolia
How to set up Windows Server 2019 virtual network encryption
Microsoft tightens the security on its virtualization platform, even if a breach occurs, to prevent intruders from eavesdropping on traffic between VMs.
Microsoft addressed a potential security issue with its Hyper-V virtualization platform in the newest Windows Server release to stop data leaks, even if a breach occurs.
On Hyper-V, it's easy enough to use a network traffic monitor, such as Wireshark, on the Windows hypervisor to sniff traffic between VMs. As part of its ongoing Windows Server hardening process, Microsoft closed this security risk with new functionality in Windows Server 2019. Dubbed virtual network encryption, this feature lets administrators set up encryption between two VMs.
How virtual network encryption in Windows Server 2019 works
Virtual network encryption masks traffic between VMs with Datagram Transport Layer Security (DTLS). The DTLS protocol provides security for datagram-based applications by utilizing User Datagram Protocol encryption to prevent eavesdropping, tampering and message forgery. DTLS preserves the underlying transport details to avoid any transmission delays from the application as a result of encryption.
You enable virtual network encryption by marking VMs within a subnet as encryption-enabled, installing an encryption certificate on each of the software-defined networking-enabled Hyper-V hosts, adding a credential object in the network controller that references the thumbprint of that certificate and configuring each of the subnets that requires encryption.
Once you enable virtual network encryption, all traffic within that subnet gets encrypted automatically in addition to any application-level encryption already in place. Traffic that crosses between subnets, even if marked as encrypted, is sent unencrypted automatically.
Creating and installing encryption certificates
The first step in the virtual network encryption process is to create the encryption certificate. The PowerShell script below, provided by Microsoft, will complete this task.
    $subjectName = "EncryptedVirtualNetworks"
   $cryptographicProviderName = "Microsoft Base Cryptographic Provider v1.0";
    [int] $privateKeyLength = 1024;
    $sslServerOidString = "1.3.6.1.5.5.7.3.1";
    $sslClientOidString = "1.3.6.1.5.5.7.3.2";
    [int] $validityPeriodInYear = 5;

    $name = new-object -com "X509Enrollment.CX500DistinguishedName.1"
    $name.Encode("CN=" + $SubjectName, 0)

    #Generate Key
    $key = new-object -com "X509Enrollment.CX509PrivateKey.1"
    $key.ProviderName = $cryptographicProviderName
    $key.KeySpec = 1 #X509KeySpec.XCN_AT_KEYEXCHANGE
    $key.Length = $privateKeyLength
    $key.MachineContext = 1
    $key.ExportPolicy = 0x2 #X509PrivateKeyExportFlags.XCN_NCRYPT_ALLOW_EXPORT_FLAG
    $key.Create()

    #Configure Eku
    $serverauthoid = new-object -com "X509Enrollment.CObjectId.1"
    $serverauthoid.InitializeFromValue($sslServerOidString)
    $clientauthoid = new-object -com "X509Enrollment.CObjectId.1"
    $clientauthoid.InitializeFromValue($sslClientOidString)
    $ekuoids = new-object -com "X509Enrollment.CObjectIds.1"
    $ekuoids.add($serverauthoid)
    $ekuoids.add($clientauthoid)
    $ekuext = new-object -com "X509Enrollment.CX509ExtensionEnhancedKeyUsage.1"
    $ekuext.InitializeEncode($ekuoids)

    # Set the hash algorithm to sha512 instead of the default sha1
    $hashAlgorithmObject = New-Object -ComObject X509Enrollment.CObjectId
    $hashAlgorithmObject.InitializeFromAlgorithmName( $ObjectIdGroupId.XCN_CRYPT_HASH_ALG_OID_GROUP_ID, $ObjectIdPublicKeyFlags.XCN_CRYPT_OID_INFO_PUBKEY_ANY, $AlgorithmFlags.AlgorithmFlagsNone, "SHA512")

    #Request Certificate
    $cert = new-object -com "X509Enrollment.CX509CertificateRequestCertificate.1"

    $cert.InitializeFromPrivateKey(2, $key, "")
    $cert.Subject = $name
    $cert.Issuer = $cert.Subject
    $cert.NotBefore = (get-date).ToUniversalTime()
    $cert.NotAfter = $cert.NotBefore.AddYears($validityPeriodInYear);
    $cert.X509Extensions.Add($ekuext)
    $cert.HashAlgorithm = $hashAlgorithmObject
    $cert.Encode()

    $enrollment = new-object -com "X509Enrollment.CX509Enrollment.1"
    $enrollment.InitializeFromRequest($cert)
    $certdata = $enrollment.CreateRequest(0)
    $enrollment.InstallResponse(2, $certdata, 0, "")
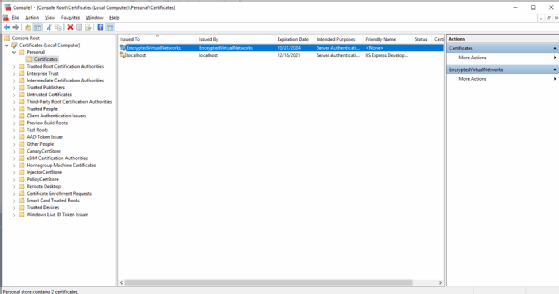
After running the script, the certificate appears in the certificate personal store. To view this, open Microsoft Management Console as an administrator. Add the certificate snap-in. Choose the local computer radio button when prompted. In the personal store, you should see a certificate as shown in Figure 1.

Export the certificate to a file. Make sure you export one certificate with the private key and a second one without. The files will have a .cer and a .pfx extension. Copy both files to each Hyper-V host. Finally, run the following PowerShell script to install the certificate files on the host:
   $server = "Server01"

   $subjectname = "EncryptedVirtualNetworks"
   copy c:\$SubjectName.* \\$server\c$
   invoke-command -computername $server -ArgumentList $subjectname,"secret" {
       param (
           [string] $SubjectName,
           [string] $Secret
       )
       $certFullPath = "c:\$SubjectName.cer"

       # create a representation of the certificate file
       $certificate = new-object System.Security.Cryptography.X509Certificates.X509Certificate2
       $certificate.import($certFullPath)

       # import into the store
       $store = new-object System.Security.Cryptography.X509Certificates.X509Store("Root", "LocalMachine")
       $store.open("MaxAllowed")
       $store.add($certificate)
       $store.close()

       $certFullPath = "c:\$SubjectName.pfx"
       $certificate = new-object System.Security.Cryptography.X509Certificates.X509Certificate2
       $certificate.import($certFullPath, $Secret, "MachineKeySet,PersistKeySet")

       # import into the store
       $store = new-object System.Security.Cryptography.X509Certificates.X509Store("My", "LocalMachine")
       $store.open("MaxAllowed")
       $store.add($certificate)
       $store.close()

       # Important: Remove the certificate files when finished
       remove-item C:\$SubjectName.cer
       remove-item C:\$SubjectName.pfx
   }
Repeat the steps for each Hyper-V host to install a certificate in the Root and My certificate stores. Verify the certificate installation by checking the contents of the My and Root certificate stores with the following command:
get-childitem cert://localmachine/my,cert://localmachine/root | ? {$_.Subject -eq "CN=EncryptedVirtualNetworks"}
You should see similar results to the following:
PSParentPath: Microsoft.PowerShell.Security\Certificate::localmachine\my

Thumbprint                                Subject
----------                                -------
5EFF2CE51EACA82408572A56AE1A9BCC7E0843C6  CN=EncryptedVirtualNetworks

PSParentPath: Microsoft.PowerShell.Security\Certificate::localmachine\root

Thumbprint                                Subject
----------                                -------
5EFF2CE51EACA82408572A56AE1A9BCC7E0843C6  CN=EncryptedVirtualNetworks
Make a note of the thumbprint for use in the next step.
Create the certificate credential
The next step is to configure the network controller. Each network controller must use the newly installed certificates. To tie the certificate to the network controller, create a credential object similar to the following script:
    # Replace with thumbprint from your certificate
    $thumbprint = "5EFF2CE51EACA82408572A56AE1A9BCC7E0843C6"

    # Replace with your Network Controller URI
    $uri = "https://nc.contoso.com"

    Import-module networkcontroller

    $credproperties = new-object Microsoft.Windows.NetworkController.CredentialProperties
    $credproperties.Type = "X509Certificate"
    $credproperties.Value = $thumbprint
    New-networkcontrollercredential -connectionuri $uri -resourceid "EncryptedNetworkCertificate" -properties $credproperties -force
Follow the same procedure on each VM.
Configure the virtual network
Finally, retrieve the virtual network and credential objects from the network controller with the PowerShell script below; modify it to add a reference to the certificate credential and all subnets you want to encrypt.
    $vnet = Get-NetworkControllerVirtualNetwork -ConnectionUri $uri -ResourceId "MyNetwork"
    $certcred = Get-NetworkControllerCredential -ConnectionUri $uri -ResourceId "EncryptedNetworkCertificate"

    $vnet.properties.EncryptionCredential = $certcred

    # Replace the Subnets index with the value corresponding to the subnet you want encrypted.
    # Repeat for each subnet where encryption is needed
    $vnet.properties.Subnets[0].properties.EncryptionEnabled = $true
Put the updated virtual network object into the network controller with the following command:
New-NetworkControllerVirtualNetwork -ConnectionUri $uri -ResourceId $vnet.ResourceId -Properties $vnet.Properties –force
Now, when a VM communicates with another VM on the same subnet -- whether it is currently connected or connected at a later time -- Windows Server will encrypt the traffic automatically.


