
Getty Images/iStockphoto
Learn how to set up Windows Server 2022 SMB compression
Microsoft added SMB compression to the new server OS to reduce bottlenecks when transferring files with Windows-based file shares.

Administrators who are under pressure to get the most out of their available resources can put the squeeze on files to free up network bandwidth thanks to a new Windows Server feature.
As part of its improvements to the new server OS storage features, Microsoft developed Windows Server 2022 SMB compression to shrink files during a transfer to or from a network file share. This compression not only decreases the bandwidth requirements, but also causes file transfers to complete more quickly because less data moves across the network.
System requirements and prerequisites for Windows Server 2022 SMB compression
SMB compression on a file server requires Windows Server 2022. Additionally, clients must run Windows 11. Administrators cannot use Server Manager to configure SMB compression and will have to deploy the feature with Windows Admin Center or PowerShell.
Use Windows Admin Center to configure Windows Server 2022 SMB compression
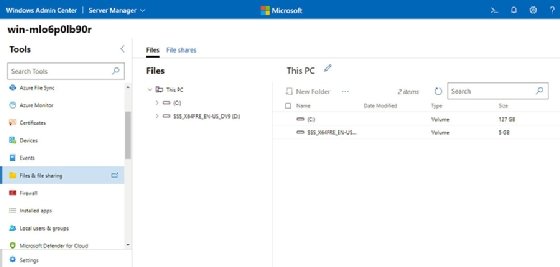
To set up Windows Server 2022 SMB compression, open the Windows Admin Center and connect to the file server. Next, select the Files & file sharing tab, shown in Figure 1.
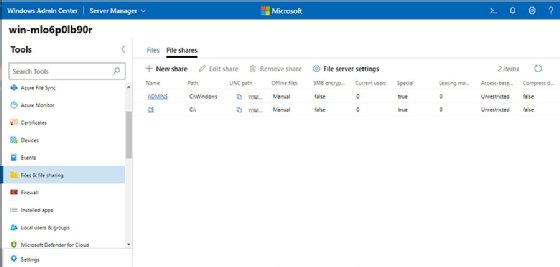
Select the File shares tab located near the top of the interface. This tab lists all the file shares that are on the server. If you want to enable SMB compression on an existing file share, then click on that share. Otherwise, click the New share button, shown in Figure 2, to create a new file share.
To create a new file share, select a folder to share then assign a name to the share.
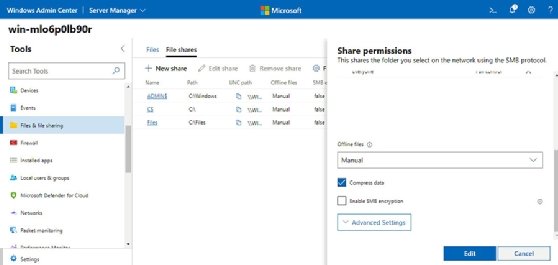
Click on the share to modify and the Share permissions pane will open. Scroll to the bottom of the pane and check the Compress data option as shown in Figure 3. Click the Edit button to complete the SMB compression configuration on the file share.
How to use PowerShell to set Windows Server 2022 SMB compression
For administrators who prefer to use PowerShell, you can use the automation tool to enable or disable SMB compression for a Windows Server 2022 file share. For example, to disable SMB compression for a share named Files use the following command:
Set-SMBShare -Name "Files" -CompressData $False
To adjust this setting and enable SMB compression for the same share, use the following PowerShell command:
Set-SMBShare -Name "Files" -CompressData $True
Client considerations when using SMB compression
To use SMB compression, the Windows 11 client must make a request. You can set this up one of two ways.
The first option is to create a registry value that tells the client to always request compression. As always, take care when modifying the registry to avoid issues.
To start, open the registry editor on the client and navigate to the HKEY_LOCAL_MACHINE\System\CurrentControlSet\Services\LanmanWorkstation\Parameters location. Create a new REG_DWORD value called EnableCompressedTraffic and assign it a value of 1.
The other option is to disconnect and then remap the client's network drives. If you are mapping the drive through PowerShell, then you can use the New-SMBMapping cmdlet along with the CompressNetworkTraffic parameter. For example, to map the X: drive to a share named Files on a server named FileServer.PoseyLab.com then you would run the following command:
New-SMBMapping -LocalPath "X:" -RemotePath \\FileServer.PoseyLab.com\Files -CompressNetworkTraffic $True
Some organizations might use old DOS batch-style commands in logon scripts for network drive mapping. In those instances, you can use the net use command with the required parameter, such as the following command:
net use X: \\FileServer.PoseyLab.com\Files /REQUESTCOMPRESSION:YES
How to monitor file compression in Windows Server 2022
To see how long it takes to transfer a large file across the network with SMB compression enabled, you check the results through the Windows Performance Monitor (perfmon).
From the Windows 11 client, run perfmon and go to the SMB Server Shares performance object then add the Compressed Requests/sec counter and the Compressed Responses/sec counters.
You can run tests with and without SMB compression to see the difference with how many times per second the Windows 11 client requests compressed data and how often the Windows Server 2022 file share grants those requests.
Incompatible clients will not reap the SMB compression benefits
The Windows Server 2022 SMB compression feature can help an organization that maintains on-premises file servers from taking a network hit when Windows 11 users move large files. SMB compression will not make files on the file share inaccessible to other clients, such as Windows 10 or Linux, but they will be unable to get the performance benefits as the Windows 11 machines.