Sergey Nivens - Fotolia
Use PowerShell printer management for quicker setups
Don't fiddle with printer configurations and tiresome upkeep work from the GUI when you can automate a lot of the tediousness with PowerShell.

Even the most high-tech organizations still need printers for users to do their jobs.
While the electronic transition of business documents has greatly reduced the need to print most documents, networked printers and print servers remain important pieces of the infrastructure. For a Windows shop, the simplest approach is to use Windows Server as the foundation for printing services. Armed with PowerShell printer management know-how, administrators have an automation tool to configure and manage these print servers.
Install print services
The first step to set up a Windows print server is to add the feature to the server. We can use the Server Manager GUI, but it's easily done with a PowerShell command:
Add-WindowsFeature -Name Print-Server
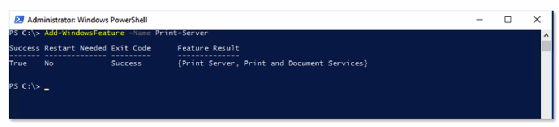
The True value under the Success Boolean indicates the feature installed and is ready for use without requiring a restart.
Add printer drivers
Starting with Windows 8 and Windows Server 2012, Microsoft added class printer drivers, also called v4 printer drivers, for various manufacturers. You can add these and other v3 print drivers to a print server with the Add-PrinterDriver cmdlet. Keep in mind to use the cmdlet requires the driver in the server's DriverStore folder; you can use the PnPUtil command-line tool to add any missing drivers.
The following command installs all drivers in INF files from a folder on a local drive for an HP LaserJet M607 M608 M609 PCL 6:
pnputil.exe -i -a C:\HP_LJM607-M608-M609\HP_LJM607-M608-M609_V3\*.inf

Microsoft PnP Utility


Processing inf :            hpat6b2a_x64.inf

Successfully installed the driver on a device on the system.

Driver package added successfully.

Published name :            oem10.inf


Processing inf :            hpat6b2a_x86.inf

Successfully installed the driver on a device on the system.

Driver package added successfully.

Published name :            oem12.inf


Total attempted:              2

Number successfully imported: 2
After a successful attempt, you can add the drivers to the print server with Add-PrinterDriver by specifying the name of the driver:
Add-PrinterDriver -Name 'HP LaserJet M607 M608 M609 PCL 6'
The command does not generate any output to let you know if it worked, but the Get-PrinterDriver will let you verify its availability:
Get-PrinterDriver -Name 'HP LaserJet M607 M608 M609 PCL 6'
Add a port for printers
Most organizations use networked printers on a Windows print server by adding a port that connects to the printer IP address. The following command adds a standard TCP/IP port for the IP address 172.16.26.8 with the port 9100 which uses the RAW printer protocol:
Add-PrinterPort -Name '172.16.26.8' -PrinterHostAddress '172.16.26.8' -PortNumber 9100
Add print queues
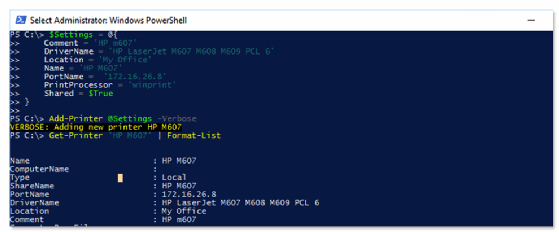
To combine all these commands, let's add a new print queue to the print server with PowerShell.
To make this tutorial easier to read, the settings are in a hashtable $Settings to use splatting with the Add-Printer cmdlet. This example limits the Add-Printer parameters to include a comment, driver name, location, name, port name, print processor and make sure it's a shared printer:
$Settings = @{

    Comment = 'HP m607'

    DriverName = 'HP LaserJet M607 M608 M609 PCL 6'

    Location = 'My Office'

    Name = 'HP M607'

    PortName =  '172.16.26.8'

    PrintProcessor = 'winprint'

    Shared = $True

}

Add-Printer @Settings -Verbose
Run the Get-Printer command with the name HP M 607 to see the printer's settings:
Get-Printer 'HP M607' | Format-List


Name                         : HP M607

ComputerName                 :

Type                         : Local

ShareName                    : HP M607

PortName                     : 172.16.26.8

DriverName                   : HP LaserJet M607 M608 M609 PCL 6

Location                     : My Office

Comment                      : HP m607

SeparatorPageFile            :

PrintProcessor               : winprint
Perform bulk changes with PowerShell printer management
One of the advantages of PowerShell scripting is speed and efficiency. When you need to make multiple changes across your infrastructure, PowerShell will save you time with these types of tasks. For example, you can use PowerShell to change the driver for many printers at once. The command below takes any printer whose name starts with HP M and changes the print driver to the HP universal print driver.
Get-printer "HP M*" | Set-Printer -DriverName 'HP Universal Printing PCL 6'
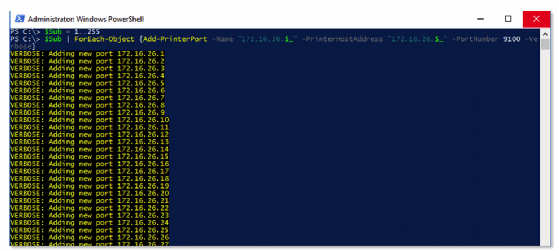
Next, to make a printer port for every IP address in a subnet, in this case 172.16.26.1/24, start by creating an array for the last octet:
$Sub = 1..255
Use the $Sub variable and perform a loop with Add-PrinterPort, changing the last octet each time:
$Sub | ForEach-Object {Add-PrinterPort -Name "172.16.26.$_" -PrinterHostAddress "172.16.26.$_" -PortNumber 9100}
PowerShell gives you a simpler way to handle printer configuration via the command line or with a script that you can save and modify for the next round of printer setups. While it's still valid to use the Windows Server GUI to work with printers, it's not as efficient as PowerShell.