
Getty Images/iStockphoto
Compare Azure Key Vault vs. Kubernetes Secrets
Secrets require a certain level of upkeep such as storage, delivery and management. Compare services in these criteria and learn how to use Key Vault for AKS.

Whether you're authenticating to an application, an application is authenticating to a platform or overall authorization is required, you need a way to manage and handle secrets. The last thing that you want to do is store a secret in plain text on GitHub.
To avoid a major mishap, let's look at what secrets are and how to handle them with Kubernetes, as well as a step-by-step tutorial on how to use Key Vault for Azure Kubernetes Service (AKS).
What are secrets?
Regardless of if it's sensitive or not, anything can be considered a secret. Typically, secrets include passwords or API keys. They can also be usernames and any other type of plain-text data such as a parameter, an environment variable and so on. Secrets are anything that you don't want to be seen by the naked eye or to appear in logs.
For example, say you're using a CI/CD pipeline, such as GitHub Actions. There's a way to store environment variables in the YAML pipeline itself, but doing so would mean anyone could go in and make changes. Instead, you decide to use a GitHub Secret to store a username; that way, you ensure that it'll always stay the same.
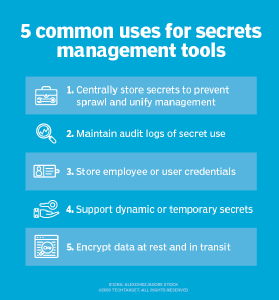
Secrets are stored in a variety of ways such as on a platform or system, in a specific product -- like HashiCorp Vault -- or anywhere else that has encryption at rest. If you use a password manager, that product stores passwords and encrypts them at rest. This method of storing secrets is typically called a secrets manager.
In a production environment, it's all about the data that's encrypted, what encryption the stored secret is using and if it's encrypted while in transit from the secrets manager to the desired location.
Deliver secrets to Kubernetes
Whether it's a product's direct focus or a feature inside of a product or platform, there are a lot of ways to store and manage secrets for both cloud and on-premises environments. There are two primary methods, standard Kubernetes Secrets and cloud specific products like Azure Key Vault.
Kubernetes Secrets
By default, Kubernetes has a way to create, store and deliver Secrets to Pods. The problem with Kubernetes Secrets is that it uses the OPAQUE Protocol, which, by default, stores secrets as plain text.
Also, there are two ways to create secrets: from the command line using kubectl or via Kubernetes manifests. With either option, you have to pass values to secrets in plain text. With Kubernetes manifests, the configurations are base64 format encoded, which means the secrets aren't encrypted in a Kubernetes manifest either.
Anywhere that you save Kubernetes manifest will be in plain text, which will end up being a security concern.
Azure Key Vault
A cloud-based tool, such as Azure Key Vault, is a more secure method to store secrets. All cloud providers have a secrets manager that foundationally does the same thing, such as AWS Secrets Manager and Google Cloud Secret Manager. With Azure Key Vault specifically, secrets are stored encrypted at rest and use the Secrets Store CSI Driver so Kubernetes can use Key Vault. Key Vault acts as the source of truth for the secrets and Pods can use those secrets in Kubernetes manifests.
How to use Key Vault for AKS
Now that you know about secrets and how you'd use them, consider how to use Key Vault in AKS. To proceed with the steps below, you'll need knowledge of Azure and a deployed AKS cluster.
Step 1. First, enable the add-on for Azure Key Vault. This will install the Secrets Store CSI Driver for Key Vault.
az aks enable-addons --addons azure-keyvault-secrets-provider --name name_of_your_aks_cluster --resource-group resource_group_name
Step 2. Verify that the Secrets Store CSI Driver is running by reviewing the Pods that are created for CSI.
kubectl get pods -n kube-system -l 'app in (secrets-store-csi-driver, secrets-store-provider-azure)'
You should see an output similar to the following:
NAME                                     READY   STATUS    RESTARTS   AGE
aks-secrets-store-csi-driver-hgmx9       3/3     Running   0          2m35s
aks-secrets-store-provider-azure-pk6cq   1/1     Running   0          2m35s
Step 3. Next, create a key vault to connect with the Kubernetes cluster.
az keyvault create -n kuberneteskeyvault -g your_resource_group -l eastus1
Step 4. Once a key vault is created, AKS needs a way to properly authenticate to Key Vault. In this example, we'll go with a system-assigned identity.
Ways to authenticate
There are three ways to authenticate.
- Azure AD pod identity
- User-assigned identity
- System-assigned identity
Pod identity requires a pod to stay alive, meaning it has steady network connectivity. If that pod goes down, or if it restarts at the time of a deployment that needs secrets for Key Vault, there's a higher likelihood of failure. User-assigned identity, meanwhile, creates yet another user and permissions for cloud admins to manage.
With system-assigned, the identity is tied to the lifecycle of the service -- the AKS cluster. When that service stops, the identity is automatically cleaned up and cannot be used for anything else. This mitigates some security risks compared to user-assigned identities.
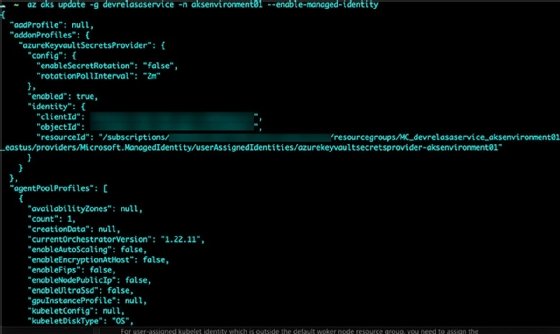
To accomplish this, you will need to enable the add-on. The following command will enable managed identity across your cluster, not just on a specific worker node/VM in the AKS cluster:
az aks update -g <RGName> -n <AKSName> --enable-managed-identity
You should see an output similar to the screenshot in Figure 2.
In the output, you'll see an identityProfile {} block. The identity profile block contains the clientId which you'll need for the next step.
Step 5. Next, grant permissions that provide read access from AKS to Azure Key Vault.
az keyvault set-policy -n <keyvault-name> --key-permissions get --spn <client-id>
az keyvault set-policy -n <keyvault-name> --secret-permissions get --spn <client-id>
az keyvault set-policy -n <keyvault-name> --certificate-permissions get --spn <client-id>
Step 6. The last step is to create a SecretProviderClass that uses a system-assigned identity to access Key Vault. Save the following YAML as secret.yaml:
apiVersion: secrets-store.csi.x-k8s.io/v1
kind: SecretProviderClass
metadata:
  name: azure-keyvault-system-identity
spec:
  provider: azure
  parameters:
    usePodIdentity: "false"
    useVMManagedIdentity: "true"
    userAssignedIdentityID: "" # defaults to use the system assigned identity on the AKS cluster
    keyvaultName: <key-vault-name>
    objects:  |
      array:
        - |
          objectName: secret1 # Name of the secret in your Key Vault that you want to use in AKS
          objectType: secret
    tenantId: <tenant-id> # Tenant ID of the Key Vault you created
To deploy the SecretProviderClass run the following:
kubectl apply -f secret.yaml
Dig Deeper on Cloud provider platforms and tools
-
![]()
Nvidia adopts OpenBao, open source fork of HashiCorp's Vault
By: Beth Pariseau
-
![]()
Automating domain joins for Azure VMs with Terraform
By: Anthony Howell
-
![]()
AZ-400 DevOps Engineer Expert Questions and Answers
By: Cameron McKenzie
-
![]()
HashiCorp Terraform leads IBM, Red Hat integration roadmap
By: Beth Pariseau