
Getty Images/iStockphoto
How to perform and automate key rotation in Azure Key Vault
To add another level of security, find out how to automatically rotate keys within Azure key vault with step-by-step instructions for Azure Portal, CLI and PowerShell.

Regularly rotating keys is a best practice and an industry standard for cryptographic management. Within Azure Key Vault, you can use a rotation policy to configure individual key rotations with specified frequencies.
This step-by-step tutorial shows how to create a key rotation policy and how to integrate Azure Key Vault with Event Grid to receive notifications.
What permissions do you need for Azure Key Vault key rotation?
To perform Azure Key Vault rotation actions, your account or the administrator account requires specific key management permissions. The built-in roles are as follows:
- Key Vault Administrator. Performs all data plane operations on the key vault and objects in it.
- Key Vault Certificates Officer. Performs any action on key vault certificates but can't manage permissions.
- Key Vault Contributor. Manages key vaults but can't assign roles in Azure RBAC or access secrets, keys or certificates.
- Key Vault Crypto Officer. Performs any action on keys, except manage permissions.
- Key Vault Crypto Service Encryption User. Reads key's metadata and performs wrap/unwrap operations.
- Key Vault Crypto User. Uses keys to perform cryptographic operations.
- Key Vault Reader. Reads key vaults' metadata as well as its certificates, keys and secrets. The role does not allow the user to read sensitive values.
- Key Vault Secrets Officer. Performs any action on secrets, except manage permissions.
- Key Vault Secrets User. Reads secret contents.
These roles work only for key vaults that have the role-based access control (RBAC) permission model. The default options are access policies, so be sure to choose Azure RBAC. For the next examples, we will use the Key Vault Crypto Officer role.

To assign permission to an account, you can use the Azure Key Vault administration pages, PowerShell or Azure CLI. In this example, we will use CLI.
az role assignment create \
--role "Key Vault Crypto Officer" \
--assignee [email protected] \
--scope "/subscriptions/b47a11f0-1018-subscription-id"
The subscription scope is added within the identity and access management (IAM) section of the Azure tenant. This means it is available at the highest level and inherited down at the vault. Use the path for the specific vault if you need more granular control.
az role assignment create
--role "Key Vault Crypto Officer" \
--assignee [email protected] \
--scope "/subscriptions/b47a11f0-1018-subscription-id/resourceGroups/rg-name/providers/Microsoft.KeyVault/vaults/kv-name"
The specified account can perform cryptographic functions with this permission set, including key rotation.
How to create a key rotation policy
You can now define and create a rotation policy with the permission set on the subscription, resource group or key vault.
To view existing keys, you can use Azure CLI like the following:
az keyvault key list --vault-name "kv-name"
To see the existing rotation policy for a key, use the following command:
az keyvault key rotation-policy show \
--vault-name "kv-name" \
--name "key-name"
To update the current rotation policy, you'll have options. Within the Azure Portal, enable the Enable auto rotation option, then set the rotation timespan.
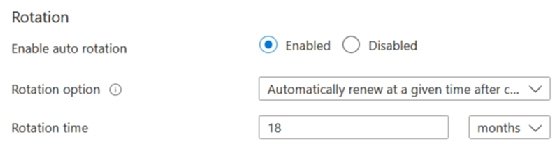
If you use Azure CLI or PowerShell, define the configuration in a JSON format and then use that within the commands. The values "P30D" and "P90D" stand for the number of days -- 30 or 90 -- with "D" standing for days. If you set it to "Y," it would become the number of years. 724 days is the maximum time length that can be set, no matter which option you pick.

With the JSON created, you can execute the following Azure CLI command:
az keyvault key rotation-policy update \
--vault-name "kv-name" \
--name "key-name" \
--value ".\Azure\Key Vault\Policy.json"
If you want to use PowerShell to perform the same task, use the following PowerShell:
Set-AzKeyVaultKeyRotationPolicy `
	-VaultName "kv-name" `
	-KeyName "key-name" `
	-ExpiresIn (New-TimeSpan -Days 720) `
	-KeyRotationLifetimeAction @ {
		Action = "Rotate";
		TimeAfterCreate = (New-TimeSpan -Days 90)
	}
With the policy updated, the specified key will automatically rotate after 90 days.
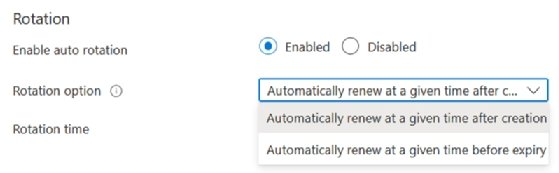
When choosing rotation options, the key can also rotate at a specific time before expiration. If the settings aren't defined, this option is not available.

To enable this rotation, modify the key and set an expiration date and time.
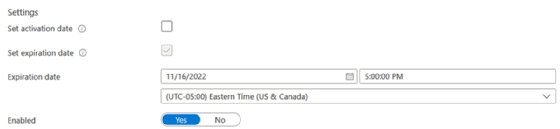
Now both options are available for key rotation.
If you want to enable this type of rotation but use Azure CLI, modify the expiration date and time for the key, and execute the following command:
az keyvault key set-attributes \
--expires "2022-11-20T17:00:00Z" \
--vault-name "kv-name" \
--name "key-name"
You also have to modify the JSON as follows:
az keyvault key rotation-policy update \
--vault-name "kv-name" \
--name "key-name" \
--value ".\Azure\Key Vault\Policy.json"
While best practices for key rotation depend on an organization's needs, Microsoft recommends rotating keys at least every two years.
Azure Key Vault rotation integration with Event Grid
Defining Azure Key Vault rotation policies is great, but what about a notification before a key expires? Integrate Azure Key Vault with Event Grid to receive notifications. It is possible to go one step further and provide an approval process that automatically rotates the keys based on the approval.
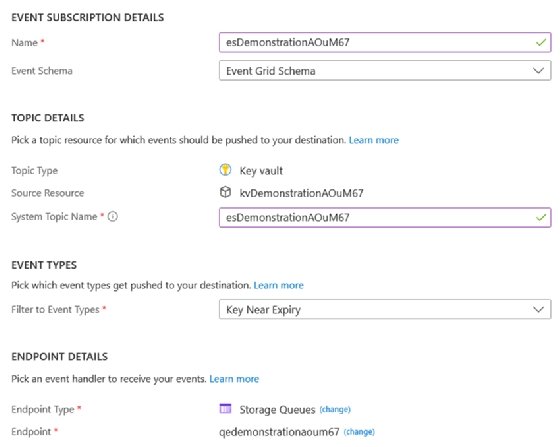
Access the key vault and click Events to enable event grid monitoring. Then click Event Subscription and define the core details, event types and endpoint. For the event types option, use Key Near Expiry. For this example, we will use a storage queue for the events.
When you create the subscription and connect it to Azure Key Vault, events are logged as they happen.

You can also take it further and integrate it directly into Azure Functions, Logic Apps, Event Hubs, Service Bus Queues and Service Bus Topics, as well as send to hybrid connections and use webhooks.
Azure Key Vault rotation pricing
As with many features in Azure, key rotation comes at a cost. Microsoft offers different pricing for most Azure Key Vault functions based on whether you use a standard or premium subscription. Nearly all pricing, however, is identical except when you use keys protected by hardware security module, which are available only with a premium subscription.
Azure Key Vault rotation is a flat charge of $1 per scheduled rotation. If you manually rotate a key, there is no charge.