Getty Images
An Azure Data Factory tutorial for beginners
Azure Data Factory can be used to create data pipelines to process data from multiple sources. Learn how to effectively create these pipelines within Azure Portal.

Azure Data Factory can help businesses with data engineering, ingestion of data into data warehouses, operational data integration, analytics and more. In this tutorial, we explore Azure Data Factory's features and how you can work with it.
To be able to create Data Factory instances, your Microsoft Azure user account needs to have an administrator or contributor role.
To get started, do the following:
- If you don't already have an Azure account, create one for free.
- Create an Azure storage account; you'll use it later in this tutorial.
- Create a new Azure blob container, and upload a text file.
What is Azure Data Factory?
Azure Data Factory is a fully managed and serverless data integration platform in the cloud. An organization can use it to build data-driven workflows for transforming, orchestrating and automating the movement of data between supported data stores.
The platform is convenient to build data pipelines that are scalable and useful. These pipelines ingest data from multiple sources, process it, transform it and load it into your data stores and warehouses for downstream analytics and reporting. You can track the progress of the data migration, monitor its performance in real time and receive notifications if something goes wrong.
The benefits of Azure Data Factory
Azure Data Factory provides several benefits, including the following:
- Reduced cost. Save on infrastructure costs by using the cloud rather than on-premises resources.
- Increased productivity. With the drag-and-drop interface, you can create and schedule data pipelines without having to write complex code. This reduces development time and increases productivity.
- Flexibility. Azure Data Factory offers a flexible platform that you can connect with diverse data sources both within and outside Azure.
- Enhanced scalability. Azure Data Factory scales up or down as needed, so you pay only for resources consumed.
- Better security. Azure Active Directory is used for authentication and authorization, which secures your data.
How does Azure Data Factory work?
Typically, Azure Data Factory works by following the steps outlined below:
- Connect and collect. Azure Data Factory can connect to all your data and processing sources, including SaaS, file sharing and other internet services. Since the data is time-sliced, you can select either a one-time or a scheduled pipeline mode. The next step is to consolidate the data stored in on-premises and cloud-based data repositories into a single location in the cloud, where it can be analyzed further.
- Transform and enrich. Once saved in a centralized data storage location, the data can be transformed using Azure Data Lake Analytics, HDInsight Hadoop and Machine Learning. You can take advantage of data flows to create and manage data transformation graphs -- without having to know anything about Spark clusters or Spark programming. Data Factory connects to and retrieves data from numerous data sources, transfers the data to a central location and performs data processing to clean and enrich this data.
- Publish. Lastly, the cloud data is converted to on-premises sources, such as SQL Server, or stored in cloud storage for business intelligence and analytics applications.
- Monitor. Once your data integration pipeline has been deployed successfully, you can monitor it via Azure Monitor API, Azure Monitor Logs and PowerShell. Azure Monitor can be configured to receive diagnostic logs generated by Azure Data Factory. You can then stream the generated logs to Azure Event Hubs and analyze the logs using Log Analytics.
Real-world use cases
Azure Data Factory is adept at moving data between on-premises data stores and cloud-based data stores. This can be useful if you're migrating to the cloud or if you need to keep your on-premises and cloud data stores in sync.
Another common use case is syncing data between multiple cloud-based data stores. This can be useful if you have multiple applications or services that need access to the same data.
An organization could also use Data Factory for extract, transform and load operations. This is for when you would like to perform complex transformations on your data.
Create Azure Data Factory via Azure Portal
To create an Azure Data Factory using Azure Portal, follow these steps:
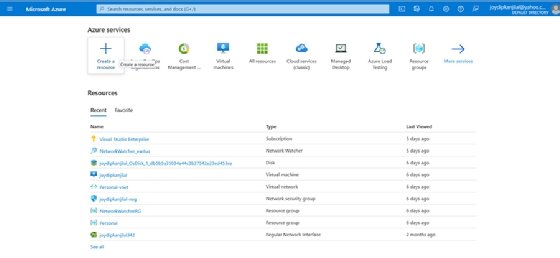
- Log in to Azure Portal.
- Select Create a Resource from the menu.
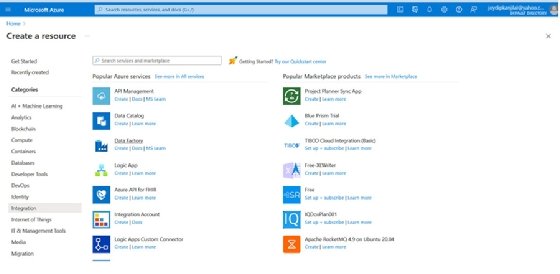
![Select create a new resource in Azure Portal]()
Create a new resource in Azure Portal. - Select Integration from Categories.
- Click on Data Factory from the list of the Azure services displayed on the right pane.
![Select create a new Azure Data Factory within Azure Portal.]()
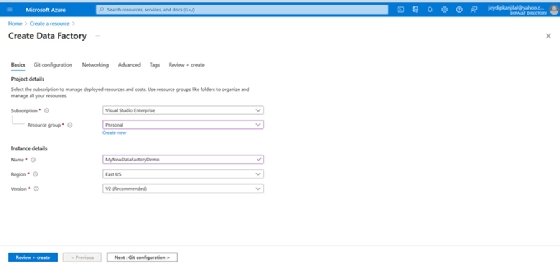
Create a new Azure Data Factory. - On the Create Data Factory screen and under the Basics tab, select the Azure Subscription you would like to use.
- Specify the Resource Group and Region.
- Click Review + create.
![Enter the subscription, name, version and region details from the drop-down menus.]()
Specify the subscription, name and other details while creating an Azure Data Factory. - Lastly, click Create if the validation is successful.
To see your newly created Azure Data Factory instance, select Go to resource, and then navigate to the Data Factory page.
Copy data using Azure Data Factory
To copy data using Azure Data Factory, follow the steps outlined below:
- Select the Ingest tile from the home page of the Azure Data Factory instance you've created in the earlier section.
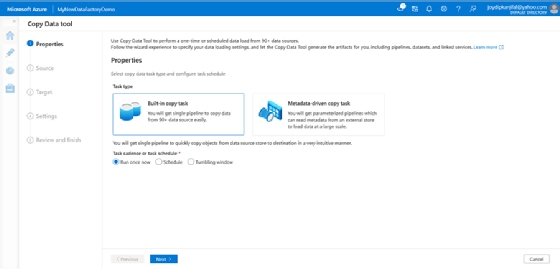
- From the Properties page of the Copy Data tool, select Built-in copy task.
![Select create a built-in copy task using the copy data tool from the options]()
Create a Built-in copy task using the Copy Data tool. - Click Next.
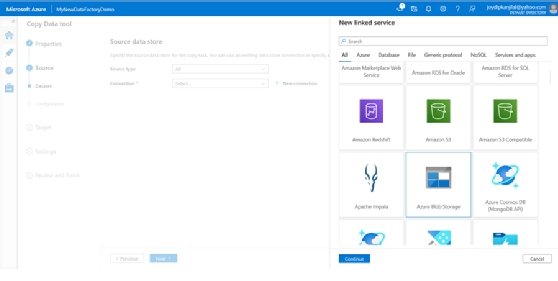
- Click + New connection in the Source data store screen.
- Select Azure Blob Storage.
- Click Continue.
![From the linked service options, select an Azure Blob Storage]()
Select an Azure Blob Storage as the linked service. - On the New connection screen, specify a name for your connection.
- Select the Azure subscription you would like to use.
- Select the storage account you would use from the Storage account name list.
- Test the connection.
- If the connection is successful, click Create.
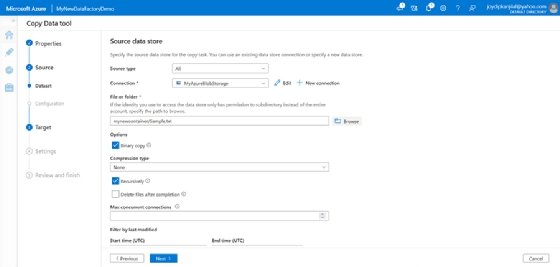
- In the Source data store screen, select the connection you just created.
- In the File or folder section, select Browse to navigate to the folder, and select the file you would want to be copied.
![Enter details in the Source Data Store from the drop-down menus]()
Specify the necessary details in the Source data store screen. - Select Binary copy, and then click Next to continue.
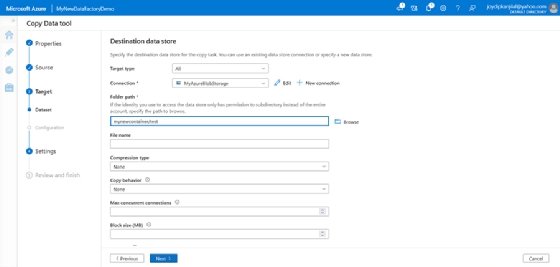
- On the Destination data store screen, select the Azure Blob Storage connection you created earlier.
![Enter details in the Specify the Destination data store screen]()
Specify the Destination data store name. - Keeping the other selection to their defaults, click Next to continue.
- In the next screen, specify the name of the task.
- Leave the other defaults as they are, and click Next to continue.
- In the Summary screen, review all settings, and click Next to continue.
![Ensure all details and settings are correct in the summary screen]()
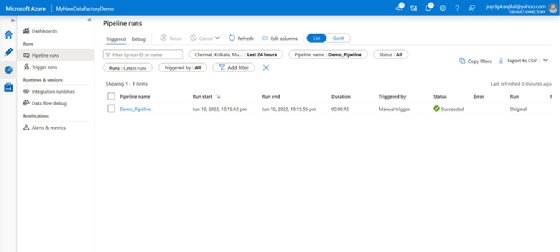
Review all settings in the Summary screen. - Click on the pipeline to go to the Pipeline runs view.
![View your created pipeline in the The Pipeline screen]()
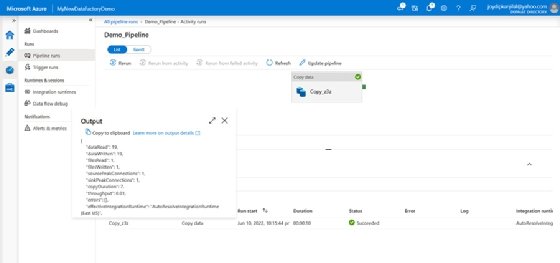
The Pipeline runs screen showing the pipeline we've created - Click on the Output link under Activity_name to see the details of the activity.
![Display of The Activity details]()
The Activity details being displayed