
Getty Images/iStockphoto
How to create a Google Cloud Spot VM
A Google Cloud Spot VM can help you take advantage of discounts, but you must be careful not to run certain apps on it. Learn more about Spot VMs and the process to create one.

Public cloud vendors continue to roll out new pricing models and lower-cost services. Enterprises need to fully understand what they sign up for before they apply these models to production workloads.
Google Cloud users who want to save money should consider a Spot VM and evaluate its common use cases. If it is the right choice for you, follow these step-by-step instructions to create a Spot VM using Google Cloud Console, the CLI and Terraform.
What's a Spot VM?
A Spot VM -- formerly known as a preemptible VM -- is a virtual machine that you can create and run at significantly reduced costs. The caveat for Spot VMs is that Google Cloud infrastructure can preempt your Spot VMs at any time, terminating the VM and causing you to lose your data within it.
The ideal use case for Spot VMs is workloads that can tolerate disruption, such as testing environments. It is not a good option for any workload that requires constant availability, such as business-critical applications, or persistent data storage, such as big data and analytics.
Spot VM discounts
Working with Spot VM discounts can be tricky if you're unfamiliar with their discount model. Like Spot VMs that AWS and Azure offer customers, Google's Spot VMs provide as much as 80% off the cost of a regular VM. The exact discount varies depending on the region and availability of resources, so expect fluctuations based on demand.
Google uses a complex algorithm to determine Spot VM pricing based on supply and demand, which makes it impossible to game this system or determine Spot VM pricing and availability patterns. The current market price for unused resources in your selected region is the basis for your Spot VM discount. Pricing can change at any time.
There are no cloud FinOps secrets to tell here. You set the maximum price for what you're willing to pay for a Spot VM. If the market price is below the maximum price you set, you can create your Spot VM, and Google charges you the current market price. When the market price rises above the maximum price you set, then Google can preempt and terminate your Spot VM.
Set up a Spot VM with Google Console
To set up a Spot VM in the Google Cloud Console, follow these steps:
Step 1. Open the Google Cloud Console and select the project in which you want to create a Spot VM.
Step 2. Locate the Compute Engine page in the left navigation menu.
Step 3. Click VM instances to open the VM instances page.
Step 4. Click Create Instance to begin creating a new VM.
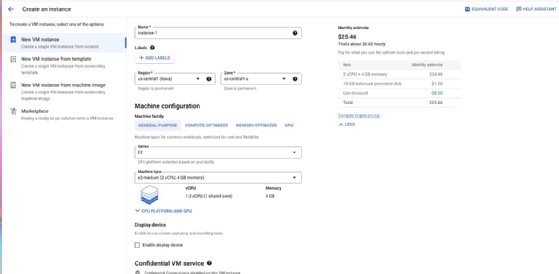
Step 5. Under Machine configuration, select the Machine family, Series and Machine type.
Step 6. Scroll down to the Advanced options section and expand it.
Step 7. Scroll to the Management section and select Spot as the VM provisioning model.
Step 8. Configure any additional options, such as host maintenance and automatic restart.
Step 9. Click Create to create the Spot VM.
Set up a Spot VM with CLI
To create a Spot VM using the Google Cloud CLI, follow these steps:
Step 1. Open a command prompt or terminal window and install the Cloud SDK if you haven't already done so.
Step 2. Authenticate the gcloud tool with your GCP account by running the following command and then following the prompts:
gcloud auth login
Step 3. Set the default project for the gcloud tool by running the following command:
gcloud config set project PROJECT_ID
Step 4. Replace the PROJECT_ID with the ID of the project where you want to create the Spot VM.
Step 5. Create a new Spot VM instance by running the following command:
gcloud compute instances create NAME --preemptible --image IMAGE_NAME
Step 6. Replace NAME with the name you want to give to your Spot VM instance and IMAGE_NAME with the name of the image you want to use.
Set up a Spot VM with Terraform
To create a Spot VM using Terraform, follow these steps:
Step 1. Install Terraform on your local machine by following the instructions in the official documentation.
Step 2. Set up a new Terraform configuration file in a new directory and add the required provider information for GCP. Here's a sample configuration file:
provider "google" {
  project = "<project_id>"
  region  = "<region>"
  zone    = "<zone>"
}

resource "google_compute_instance" "spot_instance" {
  name         = "my-spot-vm"
  machine_type = "n1-standard-1"

  boot_disk {
    initialize_params {
      image = "debian-cloud/debian-10"
    }
  }

  network_interface {
    network = "default"
    access_config {
      // Ephemeral IP
    }
  }

  scheduling {
    preemptible = true
  }
}
Replace the following placeholders:
- <project_id> with your Google Cloud project ID.
- <region> with the region where you want to launch your Spot VM.
- <zone> with the specific zone where you want to launch your Spot VM.
Step 3. Define a new compute instance in your Terraform configuration file by adding the following code:
resource "google_compute_instance" "spot_instance" {
  name         = "my-spot-vm"
  machine_type = "n1-standard-1"

  boot_disk {
    initialize_params {
      image = "debian-cloud/debian-10"
    }
  }

  network_interface {
    network = "default"
    access_config {
      // Ephemeral IP
    }
  }

  scheduling {
    preemptible = true
  }
}
Step 4. Run terraform init in your new directory to initialize the Terraform working directory and download the required provider plugins.
Step 5. Run terraform plan to see a preview of the changes Terraform will make to your resources.
Step 6. Run terraform apply to create the Spot VM instance.
Dig Deeper on Cloud provider platforms and tools
-
![]()
Automating domain joins for Azure VMs with Terraform
By: Anthony Howell
-
![]()
Google Cloud Engineer Certification exam dumps and braindumps
By: Cameron McKenzie
-
![]()
Certified Google Cloud Engineer Associate Practice Exams
By: Cameron McKenzie
-
![]()
Ansible vs. Terraform vs. Vagrant: What's the difference?
By: Terry Slattery